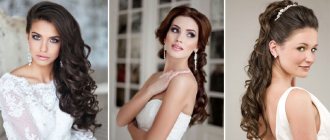
What does a modern girl need to look irresistible and attract the attention of others? Of course, a beautiful outfit that emphasizes your figure, stylish, neat makeup and a wonderful hairstyle.
But if clothes can be prepared in advance, then you always have to do your hair just before going out. And modern women live in conditions of time shortage.
Therefore, today at the peak of popularity are easy hairstyles for yourself in 5 minutes for medium hair. Options for such styling allow you, without wasting extra time, not only to put your hair in order, but to create a stylish and original hairstyle that will be a worthy addition to your look.
In this article we will look at the simplest and most interesting examples of such styling that will help you look irresistible day after day in any situation.
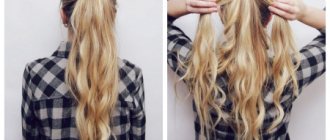
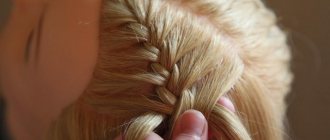
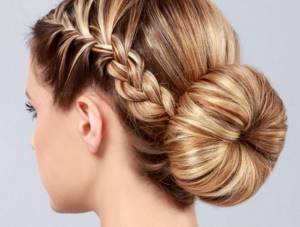
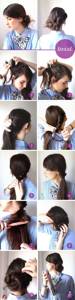
Fishtail hairstyle in 5 minutes
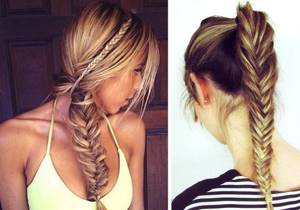
The hair styling method called “Fishtail” has a simple technique, fits perfectly on medium-length hair, and makes the image feminine and interesting. This hairstyle is appropriate for a work environment, a casual walk, or any type of evening outing.
Step-by-step instruction:
- If you master this technique, this everyday hairstyle will turn out quickly and look beautiful.
- First you need to comb your hair and distribute it into two halves.
- As a result, you need to get a spikelet formed by two batches of hair.
- To do this, a strand is separated on one side and placed on the opposite side.
- The strand taken from the second side is also sent to the other side.
- We continue weaving until the end and attach a beautiful hairpin or elastic band at the bottom.
- It is better to fix the finished “Fishtail” with varnish, since during the day it is not always possible to straighten the hairstyle.
Simple and quick DIY hairstyles
So, we bring to your attention easy styling that you can easily do yourself, even if you are very short on time.
At the same time, they will give your hair an interesting and stylish look, which will allow you to stand out among owners of banal hairstyles.
You can do quick hairstyles on hair of almost any length, so in our article there is a suitable option for every young lady.
If you practice these simple hairstyles every day, over time they will become useful assistants for you during your morning preparations.
In order to look original and attractive every morning, it is enough to master the basics of performing simple and quick styling. Among the proposed options, you can easily select those that best suit your hair.
Some of their styles are universal, as they can be done on hair of almost any length.
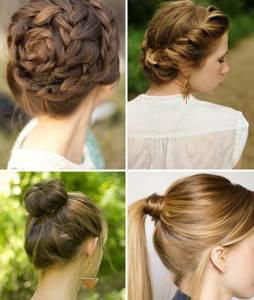
Quick hairstyle
This beautiful hairstyle, consisting of two braids, is well suited for medium-length hair and is an easy option for daily styling. You can make such a basket yourself, without anyone’s help. We call this hairstyle everyday, but it is also appropriate for a holiday.
Step-by-step instruction:
- Make a straight parting on combed hair.
- Temporarily fix one half so that it does not interfere with the adjacent braid.
- We braid a braid on one side using the spikelet method, starting from the bangs area and placing it closer to the ear so that the finished hairstyle resembles a cute basket.
- The second part of the hair also needs to be turned into a braid, symmetrical with the adjacent braid.
- At the end of the weaving, we connect the ends of the braids.
- These ends need to be intertwined and secured with an elastic band.
- An alternative is to tuck the end of the braid behind the opposite braid.
- The result is braids laid behind each other in the form of a basket.
Side bun for medium length
The next hairstyle may seem complicated, but this is only at first glance. It's actually quite simple. This option is suitable for those with not only medium-length or short hair, but also long hair. For a side braided bun, it is preferable to use only five bobby pins.
Creation
- Part your hair on the right or left side, whichever is most convenient for you. In the photo, the parting is made on the right side, respectively, the weaving goes on the left side. Braid your hair into a braid from top to bottom. To do this, form two strands from one strand. And the one that is closer to the face is thrown over the last one by the hand. The one after it, then turn it towards your face. For the second strand, do a pick-up, that is, like a French braid. And thus all the way down, behind the ear. It is worth pinning this wicker part behind the ear with a bobby pin so that it does not fall apart.
- Once the first part is done, it's time to make the bun. Wrap your hair to one side (inward) and secure with bobby pins.
You will surely like this method for its simplicity and ease.
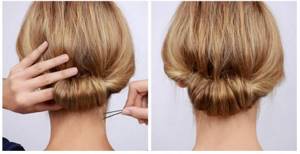
Hairstyle "Bun"
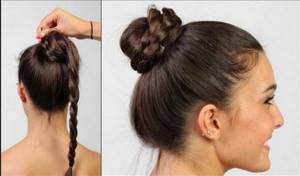
Another great hairstyle option for medium hair for every day is the “Bun”. This simplest hair styling method provides convenience as the hair is tied straight back. The “bun” was liked by girls and women of all times, and it continues to be popular today.
Step-by-step instruction:
- We start by combing the hair and creating a ponytail, securing it with a thin elastic band.
- Our near ancestors, showing resourcefulness, acted in a very interesting way.
- They put a sock with a hole on the tail, which was held on by an elastic band, instead of the area where the fingers should be located.
- If you use this outdated but effective method, the bun will turn out to be impressively thick.
- Next, we begin to take one strand from the ponytail, attaching each strand to the hair right next to the elastic band using invisible pins.
- If desired, you can decorate your hair with a small beautiful scarf; all the excess ends of the hair will be hidden under it.
- At the end, fix the “bun” with varnish.
Easy hairstyles for medium hair
Medium length hair is the “golden mean”. You can do any simple and easy hairstyles that will look attractive and interesting.
"Ponytail Braid"
The essence of such an easy hairstyle for medium hair is that you don’t need to braid it at all. It is necessary to make three “malvinkas” along the entire length of the hair. Each resulting ponytail should be turned inside the previous one and secured with a thin silicone rubber band. As a result, you will have a collected hairstyle with a ponytail, which, if desired, can be hidden under a voluminous hairpin:
Easy hairstyle for loose hair “Malvinka with a braid”
How to do this simple hairstyle for medium hair:
- Make your usual parting (on the side or in the middle of your head)
- Separate a strand from each side of the parting
- From each strand, braid loose braids “spikelets” towards the back
- Fasten two braids at the back of the crown with a silicone rubber band
- Some fragments of braids can be additionally pinned with bobby pins
"Ponytail"
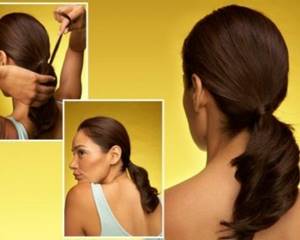
The best way to do your hair quickly and easily:
- Comb your hair well
- Gather all your hair into a ponytail at the back of your head
- Separate one strand from the tail, which you will wrap around the entire tail.
- Secure the strand you used to wrap your ponytail with a bobby pin.
- Fix your hair with hairspray
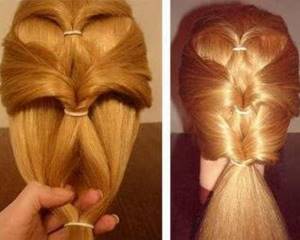
Classic hairstyle "Spikelet"
Step-by-step instruction:
- We comb our hair, directing it back.
- You need to select a strand of hair in the forehead area and divide it into three parts.
- The resulting strands should be placed on your hands so that you can freely work with your fingers, throwing the strands one on top of the other.
- We place the left strand above the central strand, and we also place the right strand on the central one.
- You need to weave this simple braid, periodically weaving in thin strands taken from the sides.
- Having reached the end of the braid, we fasten the “Spikelet” with an elastic band.
Quick hairstyle for every day: bun

Step-by-step instruction:
- Pull your hair into a tight ponytail, then thread your hair into a special donut, which is sold in almost all hair accessory stores.
- Smooth the hair from the ponytail over the entire surface of the donut and put an elastic band on top, securing it to the foam base.
- Carefully wrap the excess strands around the bun, pinning them with hairpins.
- Using a small donut will give you a small bun.
- And by choosing a larger bagel, the hairstyle will also become more voluminous.
- You can put your hair in a bun without any additional equipment, simply by gathering your hair into a ponytail and wrapping it around an elastic band in a chaotic manner.
- The hairstyle looks great with bangs.
Nodule on the back of the head
Move the knot from the top of your head to the back of your head and you have the perfect evening hairstyle for the summer.
Option 1
To make this option, divide your hair into four even sections and sprinkle with a little hairspray, if desired. Twist each one in turn with a flagellum and secure with bobby pins. The hairstyle can be decorated with flowers and other accessories.
Option 2
This is a more complex but sophisticated hairstyle option. Start by curling your hair to create light waves. Then divide them into two parts: at the top and at the back of the head. Tie the hair at the back of your head into a ponytail, but do not thread the strand all the way through to create a knot. Cover the elastic band with the free ends. Then take strands from the top of the hair, twist them into a rope and secure them in a knot with hairpins or bobby pins. Repeat this with all the hair on the top of your head until you have at least 6 strands. One strand, right in the center of the parting, should remain free. Backcomb it and secure it last, tucking the ends inside the hairstyle. Spray your hair with hairspray. Leave a few thin strands on your face to create a softer look.
Option 3
Separate two strands from one side of your head. Start weaving them together, moving towards the neck, and add new hair to the strands to make the hairstyle more voluminous. Tie all your hair into a ponytail and backcomb it along its entire length. At the end, twist the hair at the back of your head into a voluminous knot, secure with hairpins and spray with hairspray. You will get a romantic and elegant hairstyle.
Option 4
Divide your hair into three sections. The middle one should be larger than the others. Weave a voluminous braid out of it and twist it into a knot using bobby pins or bobby pins. Roll the strand on the left into a bundle and pass it around the knot counterclockwise (from below). Wrap the strand that remains on the right around the hairstyle clockwise (through the top). Secure with bobby pins or spray with varnish.
Option 5
To achieve this hairstyle, you need hairspray, bobby pins and a little time to practice. To begin, fluff your hair with your hands to create good volume and apply generous amounts of hairspray. Then gather your hair together and curl it inward to form a shell. Secure your hair with bobby pins. You can leave a few loose strands to give your hair a sophisticated casual look.
Option 6
This is a very simple way to make a knot at the back of your head. First of all, tie the ponytail and divide it into two equal strands. Twist each strand clockwise. Then, start weaving the strands together (counterclockwise). Tie the tourniquet at the end with an elastic band and twist it into a knot at the back of your head, securing it with hairpins.
Option 7
Tie a ponytail at the back of your head, not too high. Make a gap above the elastic and pull the hair through it. Then, carefully curl the tail into a shell and secure with a hairpin or other accessory.
Option 8
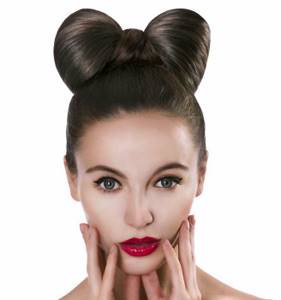
To make a hair bow, you will need a thin elastic band, bobby pins and 1 minute of time. To begin, tie a knot high on the top of your head and divide it into two parts. Pass the tip of the tail in the middle and secure it at the back with a bobby pin. This hairstyle is also called “Lady Gaga style bow”.
Option 9
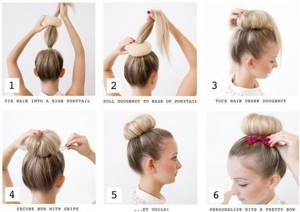
This hairstyle will take longer to create than the previous ones. You will need a foam donut and pins. Tie a high ponytail, put a donut on it and hide your hair under it one strand at a time, securing it with hairpins for security. At the end, the hairstyle can be decorated with a bow or other accessories.
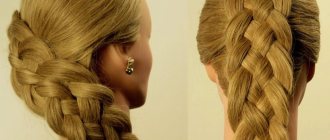
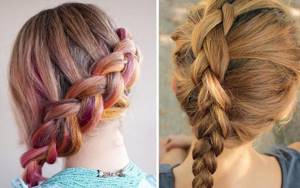
Stylish braid in 5 minutes
Step-by-step instruction:
- Comb your hair thoroughly with a comb, comb your hair back and divide it into 4 equal strands.
- For convenience, we will call the far right part the first, the strand located immediately behind it the second, the next one the third, the last one the fourth.
- With your right hand we push the first strand under the second.
- With your left hand, place the third strand on top of the first.
- We insert the fourth strand under the first.
- Now she is in the center of the weaving.
- Place the second strand on top of the third, and the fourth strand on top of the second.
- In the same way, we place the first strand on the second, the third on the fourth.
- Next, we place the first strand on top of the third, and place the third on top of the second.
- We weave according to this pattern to the required length.
- Secure the end of the braid with an elastic band.
Chignon loop
The most popular motif in hairstyles this year is no perfect styling. The priority is natural, slightly careless summer hairstyles. The loop chignon is that classic look that is easy to create yourself. This will take no more than 5 minutes.
Step-by-step instruction:
- Comb your hair at the top of your head to add volume.
- It is important to comb your hair only from the inside so that the hairstyle remains smooth on top - this will make the look softer and more feminine.
- Divide your hair into three parts: two on the sides and one in the middle.
- The last part of the hair should be a little thicker - we will make a loop from it.
- Tie the middle part of your hair with an elastic band, gently smoothing it out.
- Divide the hair into two strands over the elastic band that tied the hair.
- Next, wrap the ponytail between these strands and pull it down, creating a simple twisted knot.
- Now tuck the side strands inward on both sides.
- You will end up with a loose chignon loop.
- Pull the hair out of the chignon a little to make it look softer and fuller.
- Fix your hair with hairspray.
Easy hairstyles for girls
When getting your girl ready for school, you need to make sure she looks neat. It is imperative to teach the little princess how to do her own easy hairstyles for school, so that from childhood the girl learns to take care of herself and look good even when she has no time to style her hair.
We suggest you teach your little one these three hairstyles:
- "Horns"
- First you need to make an even parting all over your head so that you get two lush strands. These strands need to be gathered into high ponytails.
- The tails need to be twisted into bundles, which in turn should be wrapped in a spiral around the elastic band with which they are connected.
- The plaits are pinned with pins and decorated with hairpins. The result is charming horns that will suit any girl.
- Ponytails on the sides
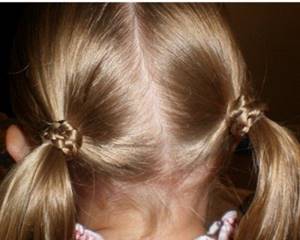
The principle of this hairstyle is the same as the previous one. Only in this case you do not need to twist your hair into plaits. Here you need to select a small strand from each tail, braid it into a simple braid, and tie it around an elastic band holding the tail.
- Tail from the side

- To create this hairstyle, you need to divide all your hair into three strands.
- Each strand needs to be rolled into loose strands and connected all of them into a ponytail on the side.
- Decorate the place where the bundles are bundled with a bow or a beautiful hairpin with a flower.
Sometimes in a hurry you can make good hair styling options. Use your imagination and creativity to make your hairstyle look uniquely beautiful.
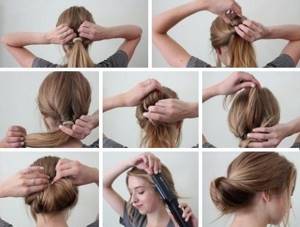
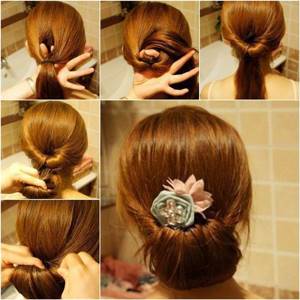
French bun in 5 minutes
Step-by-step instruction:
- The French hair bun can vary depending on the occasion and purpose of the event for which you are going to do it, however, in most cases the general technique remains approximately the same.
- First you need to backcomb the hair on the top of your head.
- To do this, you will need a thin comb (for the backcomb itself), a small amount of mousse or styling foam, a hair dryer and hairspray.
- Comb each center strand in turn, moving from the back of the head towards the crown.
- The backcombing can be varied depending on your own preferences, however, it is worth remembering that excessively backcombed hair will give a comical rather than sophisticated look.
- Measure, measure and measure again.
- After combing, you need to make the bun itself from the hair, the higher it is, the better. But you still need to build on the length of your hair.
- You can strengthen the hair bun with hairpins.
For short hair
For a bob, there is an interesting selection of methods that will help you effectively remove hair from the child’s face, but leave the beauty of the haircut.
In most cases, all hairstyles are based on the mermaid braid method and false mermaid braids.
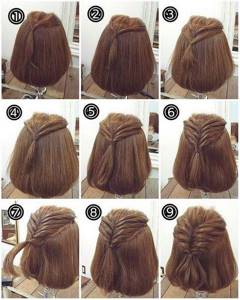
A method similar to flagella. The length and width of the structure are selected individually. The sections can be pulled up, or they can be left tightly twisted if this concerns a small and very active girl.
Believe me, during an active day, the entire styling will take on that slightly disheveled look. Loose sections run the risk of falling out of the hairstyle completely.
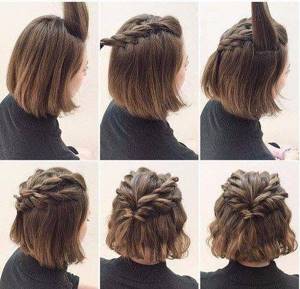
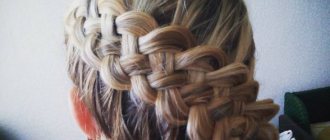
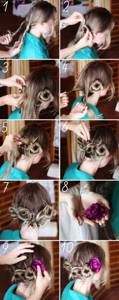
Openwork bun
Step-by-step instruction:
- Gather the hair at the back of your head into a ponytail and tie an elastic band with a satin ribbon of the desired color.
- Divide your hair into 3 parts, and the ribbon is considered the fourth strand.
- Place the ribbon at the edge and label it as the “first strand.”
- Place the second strand on top of the third, then take the ribbon and pass it under the third strand of hair.
- Then place the fourth strand on the ribbon, and then the same fourth strand goes under the second.
- The next step is to place the third strand under the fourth and on the second.
- Then place the ribbon on the third strand and pass it under the second strand.
- Repeat.
- The principle is that the ribbon remains in the center, and the strands of hair curl around it.
- It will be easier for you if you constantly say your action out loud, this way you won’t get confused and will remember the order faster.
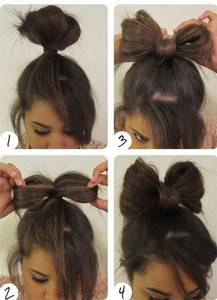
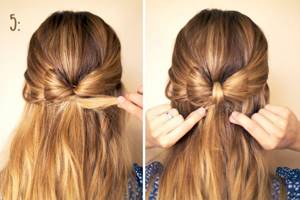
Quick hair bow
- elastic hair band (preferably in the same color as your hair);
- invisible;
- Polish for hair.
Step-by-step instruction:
- Gather your hair into a ponytail, then make a “loop” and secure with an elastic band (the larger the loop, the larger the bow);
- Then you need to divide the resulting loop of hair into two sections;
- After this, unfold the hair a little to make a bow and secure the shape with bobby pins;
- The remaining ponytail must be raised to the base of the ponytail and secured with bobby pins; if the hair is long, you need to wrap the base of the bow several times;
- Then additionally form the resulting hairstyle into a bow of hair and secure the result with medium-hold hairspray.
- This styling can be done neatly, or a little carelessly, all at your discretion.
- The main thing is that a hair bow will be relevant in almost any situation.
Photo ideas for fashionable hairstyles for every day with hair accessories.
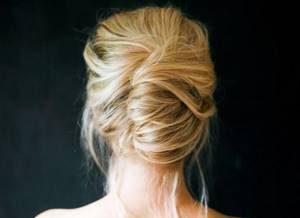
The bun is such a universal hairstyle that attracts with its beauty and sometimes unusual technique. This easy and beautiful hairstyle is suitable for any amateur. The bun is chosen by long-haired brides as their festive hairstyle, by businesswomen for every day, by students for a casual and fashionable look, by dancers for a delicate and discreet look. Practice shows that this hairstyle is most in demand with various decorations that can be easily selected, adhering to a festive or everyday style. All tips can be seen in the photo.
Another idea on how to make a simple hairstyle with your own hands using one elastic band and a stylish bow:
- We separate the top strands on the top of the head and make a ponytail out of them, without affecting the curls at the temples.
- Now we bring the temporal strands to the main ponytail and also fix them with an elastic band.
- We bend the bottom of the tail and secure it with a clamp.
- Divide the remaining hair into two equal halves.
- We bring each of the strands to the main body of the hair and secure it, bending the ends with a bobby pin.
In order to hide all the imperfections and fastening pins, you can use a bow, which will give the image even more stylish details.
For little fashionistas whose mothers are not ready to spend a lot of time creating a masterpiece, we have prepared a photo selection of original hair jewelry.
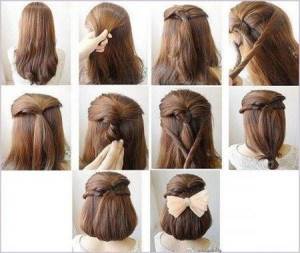
Easy hairstyle in 5 minutes
Step-by-step instruction:
- The hair is separated by an even parting;
- Near the temples, equally even strands of medium thickness are separated from both sides, brought together in the center, and secured with a small elastic band.
- The fastening must hold the strands tightly, otherwise the bow will not be fixed;
- Do not make the tail all the way, form a loop with a small tip;
- Divide the loop in half, 2 parts will be the basis of the bow;
- Half a bow is formed from each loop and secured with a hairpin;
- The tip of the hair remaining after the first loop is useful for the middle of the bow. They wrap it around the junction of 2 loops and secure it to an invisible one;
- Varnish your hair and curl the strands with a curling iron.
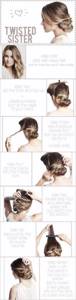
Hair bow a simple way

- hair dryer brush or styling iron;
- elastic bands of different sizes;
- combs – brush and comb;
- stilettos and bobby pins.
Step-by-step instruction:
- After you wash your hair, apply a special smoothing balm to your hair.
- Dry them with a towel.
- Then gently rub styling mousse into the roots of your hair and distribute it evenly over the entire length using a comb.
- After this, treat the strands with a hairdryer brush, stretching and straightening them.
- Once your hair has cooled, you can start styling.
- Decide how you want your bow to look.
- You can try making a chic “propeller” on the top of your head, placing an elegant figure eight above your ear, or making a strict “butterfly” at the back of your head.
- The choice should be made based on how you intended the final image.
- Before you make a high hair bow on your head, remember that it will make you look slightly childish and eccentric, while a low bun will be an ideal complement to an evening dress and will add elegance
- Let's try to put a bow on the back of the head.
- Comb your hair thoroughly with a brush and divide it into two equal parts.
- Pin the upper part with a hairpin; you will need it at the final stage of creating your hairstyle.
- Gather the lower part at the back of your head and tie it with an elastic band, preferably in a color that matches your hair.
- Then rub a drop of styling wax in your palms and distribute it through your hair to make it smoother.
- Approximately ten centimeters from the first elastic band, tie another one of the same color.
- Divide the hair that is between the ties so that you have two identical loops.
- Then lift the bottom of the ponytail towards the base so that the elastic bands are in close proximity to each other
- The “blades” that you have obtained need to be carefully straightened.
- Part of the hair on the back of the head needs to be combed a little, sprinkled with hairspray and divided into two parts.
- Attach each part to the halves of the bow, giving it a little fluffiness.
- The ends of the loose strands should be tucked inward and secured with bobby pins.
- Both halves of the bow are fastened with pins.
- Comb the front part of your hair a little, smooth it with a brush and spray it with hairspray.
- Pull the wide strand back, thus covering the middle of the bow.
- Wrap the ends inward and secure with bobby pins.
- Secure the entire structure with studs for greater strength.
- Your bow is ready!
- To give your hair a stylish look, sprinkle it with hair gloss.
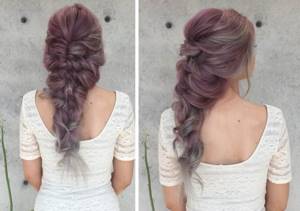
Easy hairstyles for long hair
What easy hairstyles can you make for yourself for long hair? There is a huge field for imagination here
As a rule, long-haired girls do not welcome collected hairstyles, because it is important for them to emphasize the length and beauty of their hair. Taking into account this feature of long-haired beauties, we have made a selection of easy hairstyles with loose hair
"Malvinka from braids"
To do this hairstyle, you need:
- Make your usual parting (we recommend combing your hair slightly to one side)
- Separate two wide strands on each side
- Weave regular classic braids from each strand
- The braids need to be secured at the top of the head with hairpins so that one is positioned higher than the other.
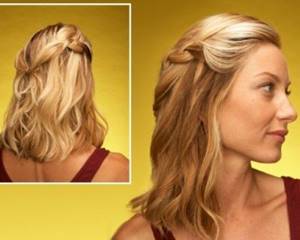
"Greek hairstyle"
- To create such a hairstyle, you need to get a beautiful textile headband, although you can make it yourself from beautiful decorative ribbons.
- The headband is attached to the head very simply, because, as a rule, it has an elastic band. IN
- You will need to screw the lower part of your hair nicely into the headband. To be safe, we recommend securing the headband with bobby pins and spraying your hair with hairspray.
"Tail with Bubbles"
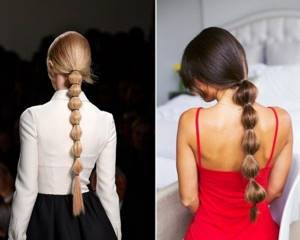
You can do this easy hairstyle every day for long hair. The girl will always look interesting and neat. What sequence of actions should you follow:
- Gather your ponytail on the top or back of your head (the hairstyle will look great in either case)
- Comb your tail and tie silicone elastic bands at equal distances along the entire length of the tail.
- If you wish, you can fluff up the “bubbles” that come from your hair a little with your fingers.
List of sources
- lifegirl.ru
- opricheske.com
- volosy.me
- thewom.ru
- salon-nagorkogo.ru
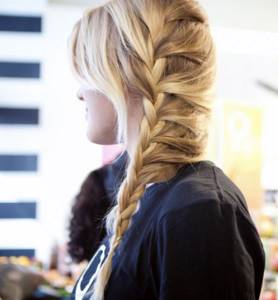
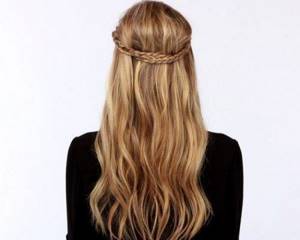
Mermaid braid stylish and fast
Step-by-step instruction:
- Bring the majority of your hair to one side, moving all the hair to the "heavy" side of the head (the side that has the most hair relative to the long natural parting).
- Separate a five-centimeter section of hair on the “heavy” side towards the back of the head.
- Divide this strand into three equal parts.
- Cross a side strand over the center strand, then another side strand over the center strand.
- This is very similar to how you would do a regular braid.
- Cross the back strand back over the center one, this time adding another narrow section of hair from the back of your head (below where the braid started) into the strand you crossed.
- Cross the front strand over the back strand, now adding another narrow section of hair just before the braid.
- Continue repeating these steps, pulling out small sections of hair and adding them to the braid, until the braid reaches the end of the hair.
- Secure the braid using an elastic band of your choice.
- Now you are ready to charm the most beautiful young men.
- Now that you have mastered the braiding technique, make it yourself.
- Take a thin ribbon, try a fishtail braid - the sky's the limit with this versatile style.
- Hit the road and enjoy your weekend.
Quick braid in 5 minutes
Step-by-step instruction:
- Move most of your hair to one side
- Separate a section of hair towards the back of your head
- Divide this strand into three equal parts
- Cross a side strand over the center one, then another side strand also over the center one.
- Cross the back strand over the center strand and add a narrow section of hair from the back of your head to the strand you crossed
- Cross the front strand over the back strand and add another narrow section of hair just in front of the braid.
- We braid the braid according to this principle, pulling out small strands and adding them to the braid
- We fix the hairstyle with a hairpin or elastic band
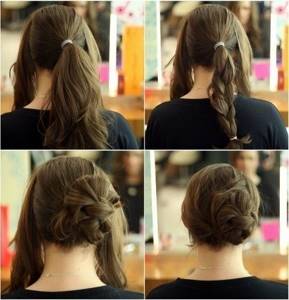
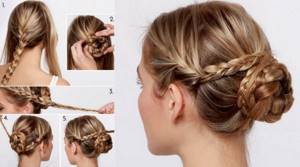
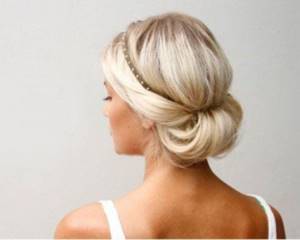
Bun hairstyle for every day. Master class with photos.
The most current and very fast hairstyle for every day is a bun. This option is very easy to implement and takes literally 5 minutes. There are many techniques for doing this hairstyle. Let's look at the photos of the most current ones.
Various versions of the bun are performed both on the top of the head and on the back of the head. If this is a voluminous option, then it is better to do this hairstyle as high as possible; if it is a bun made without a special roller, the occipital area will do.
Let's start creating our first hairstyle for every day - a bun:
- We collect hair in a ponytail.
- We put a roller on the elastic band.
- We distribute the hair throughout the fixative so as to hide its presence.
- Secure with an elastic band.
- The remaining hair is wrapped around the bun and secured with hairpins.
Another option is to form a braid from the remaining strands and fix it in the same way as the first option.
If you don’t have a special roller at hand, you can make one yourself from an ordinary sock. To do this, take a sock and cut off the toe (the part where the toes are located). We twist it into a donut shape - the roller is ready.
Another version of the bun with strands is also not difficult to recreate, but attracts attention with its originality and accuracy.
- Take a thin comb and make a parting, moving from the forehead to the middle of the head. For an even line, the comb is held perpendicular.
- We separate the front part of the temporal curls from the rest of the hair and braid it, not tightly, into a ponytail at the back.
- We do a small backcombing of the flowing tail - this action is necessary to give volume to the hairstyle.
- We also braid the lower part of the hair.
- We turn the lower tail up and thread it, leading it to the left, through the gap in the upper one.
- We hide the remains of the ponytail in the bun itself and secure it with bobby pins.
In the photo you can see the above technique for an easy and quick bun hairstyle that is suitable for every day.
The bun is not just for office ladies. This hairstyle can be done both for every day and for a festive occasion. For a neat and delicate look, the bun can be complemented with accessories, for example, for those with bangs, the ideal option is a thin headband with rhinestones or a small flower on the side. For stylish, young girls, a small bow above or below the bun is suitable.
Let's turn the simplest bun hairstyle into a festive version:
- We tilt our head so that the hair falls on the face.
- Divide the hair into three equal parts.
- Starting from the back of the head (the base of the hair), weave a regular spikelet.
- We braid the braid to the end.
- We fix it with a transparent silicone rubber band.
- We make a bun from the braid, wrapping it around the axis.
- Secure with hairpins or a bright hairpin.
The same technique can be used with a reverse French braid.
Let's take a closer look at the photo on how to make a quick hairstyle for a festive event.
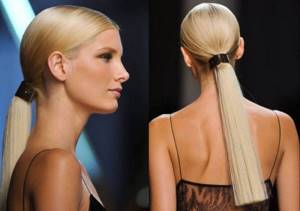
Low ponytail very fast

Step-by-step instruction:
- Wash and dry your hair well in your usual mode (hair dryer or natural drying).
- Now comb your hair to one side.
- Next, you can simply secure your hair to one side with an elastic band or a hairpin.
- Or you can form a twisted strand of hair on the back of the head, running from the base of the ear through the entire back of the head.
- And only then gather your hair into a low ponytail, dropping it over one shoulder.
- Be sure to secure your hair with an elastic band.
- Now it’s worth imagining a little.
- For example, curl your hair with a curling iron, forming beautiful large curls, or simply curl a few strands.
- You can also do a light backcombing on your hair, but in this case it is important not to overdo it.
Hairstyles for school for yourself for teenagers
At any age, girls are always fashionistas. And if little schoolgirls have their hair done by their mothers, older girls have to do it themselves.
For a teenage girl, the opinions of others are very important and you want to be sure that you look no worse than your friends. I offer my selection of video lessons for hair of different lengths. These easy hairstyles take minimal time and look very beautiful.
The simplest hairstyle is, of course, a ponytail.
Based on the tail, you can come up with a large number of hairstyles. The tail can be with or without braiding, on the side or on top, with or without backcombing, high or low, inverted. The most ordinary simple ponytail will look unusual if you wrap the elastic band with a lock of your hair or a pigtail. Secure the end of the strand with a bobby pin.
The simplest ponytail, which can be done in a couple of minutes and looks original, is an inverted one. To do this, tie the ponytail low, without pulling the elastic tightly, and pull it over the elastic, as in the diagram below.
You can make several inverted ponytails at once, as in the photo below. Moreover, they can be done not only from behind, but also from the side.
And more options for inverted ponytails. It looks stylish and beautiful, and it only takes a couple of minutes.
The next option to decorate your ponytail is to wrap it in strands. To do this, leave 2 curls on the sides free. Then wrap them one at a time around the base of the tail and secure. In the video you will learn how to fix strands in different ways. A stylish hairstyle is guaranteed.
After watching the tutorial video below you will learn how to do 7 cool and very beautiful hairstyles in 2 minutes
And a few more options for easy hairstyles with ponytails.
Video tutorial on creating an original hairstyle with a ponytail
Classic ponytail in 2 minutes
Step-by-step instruction:
- Use a horizontal parting to separate part of the hair at the top of your head.
- Stab it with a crab so that it doesn’t interfere for now.
- Tie the lower part into a ponytail.
- Release the top one from the clamp and comb it at the roots.
- Lower it down and smooth the top layer.
- Connect both parts using another elastic band.
- Take one thin curl and wrap an elastic band around it.
- Hide the tip in the general mass and pin it with a bobby pin.