Spikelet hairstyle: advantages and disadvantages
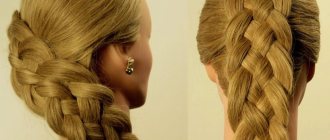
Each hairstyle, regardless of the complexity of its creation, has its own advantages and disadvantages. If you have never made a spikelet, then pay attention to them. First of all, we note that this hairstyle is a universal solution for any occasion. Depending on the design style, the spikelet will be appropriate both in the office and at an evening event or a walk. The benefits also include comfort. Hair of any structure can always be braided into a spikelet and calmly do household chores or even do a workout. And of course, the attractiveness of such a hairstyle is difficult to overestimate. Just look at the French spikelet, which looks luxurious.
As such, this hairstyle has practically no disadvantages. Some girls note that making a spikelet on their own is quite difficult. This is true, but only at the beginning. Practice several times and then you will be able to do everything as quickly as possible. It will also be difficult for those with curly hair at first. Remember that in this case it is especially important to comb them even during the weaving process.
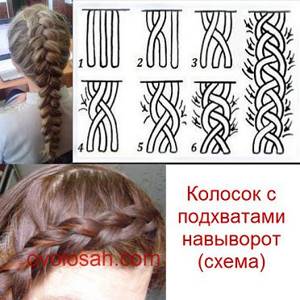
Reverse spikelet (inverted) of 3 strands
Reverse braiding differs from the classic spikelet in the appearance of the braid.
It turns out that the braid is placed on the outside of the weave, this is achieved by placing tiebacks under the bottom (the name is a reverse French braid).
- Comb your hair thoroughly.
- Divide into 3 strands and weave 2 strands, placing the strands underneath. Right under the central one, left under the central one, with the help of such manipulations we get an outer braid.
- Next, we make grabs and place them under the strands. So we weave to the back of the head.
- We finish in the same way, with a classic reverse braid and tie with an elastic band./li>
Step-by-step video instructions will help you figure out how to weave a reverse braid on a child:
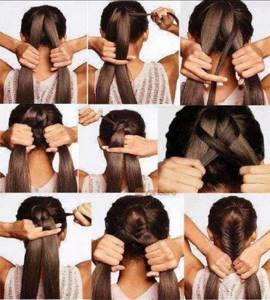
How to make a spikelet hairstyle?
The classic spikelet is most common because it is the simplest and most basic hair design option. It is not too complicated, so every girl can do this hairstyle on her own without any problems. The main thing is to understand the nuances and practice a little.
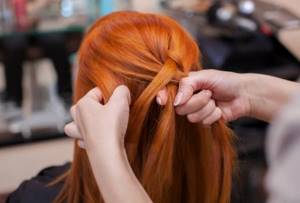
Before you start working, be sure to comb your hair. Remember that clean and smooth hair plays a significant role in this case. Take a small section of hair from the top of your head and divide it into three sections. Then braid a classic braid, alternately adding one strand on each side to the main braid. Most often, this hairstyle is woven straight, but if desired, it can be done on the side.
How to braid a spikelet for a child (step-by-step instructions)?
- Sit the child down and engage him in his favorite activity. As a last resort, cartoons on a tablet or TV or a game will do. The telephone is the worst option, since it is the most harmful for children's eyes.
- A chair or other device that is comfortable for you (note that the baby will not sit or lie strictly straight) so that the child can sit or lie comfortably. Standing half bent over for a long time is extremely uncomfortable and you will want to get up, and this is difficult to do if your hair is short.
- Prepare everything necessary to speed up the process of weaving a spikelet as much as possible. Combs, elastic bands, gel or wax.
- Practice on dolls or yourself first so that there are no difficulties with the technique.
- Learn to evenly divide strands using your fingers.
- Start weaving by separating the strands.
- Separate a strand with one hand, and with the other, insert two fingers perpendicular to the floor to make 3 strands.
- Then we weave according to the chosen spikelet technique and the desired pattern.
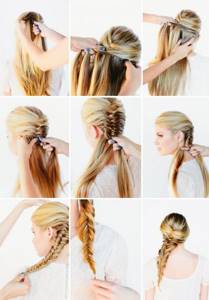
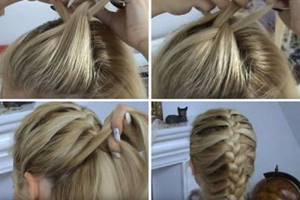
French spikelet: how to weave?
This type of weaving looks really luxurious. It is chosen for evening events, romantic dates and is most often done in a beauty salon. But in fact, this hairstyle is not at all complicated and you can do it yourself. First you need to prepare your hair, that is, comb it. Separate a small strand in the area where you plan to start weaving. Divide the strand into three parts and alternately cross the right and left parts with the central one.
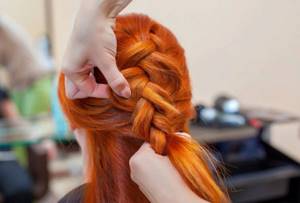
Please note that the strands should move under each other. It is due to this that it is possible to make a reverse spikelet. Gradually, with each binding, add a small strand on each side.
When the hairstyle is ready, you can slightly stretch the strands for more volume. The spectacular French spikelet is ready! If desired, you can always decorate it with an unusual elastic band, ribbon or hairpins with flowers. It all depends on what event you are going to.
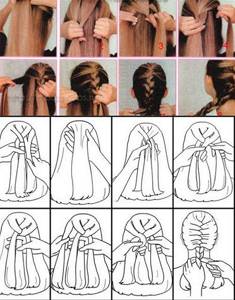
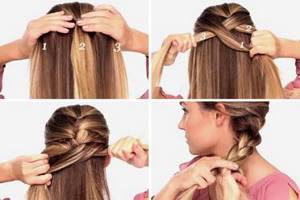
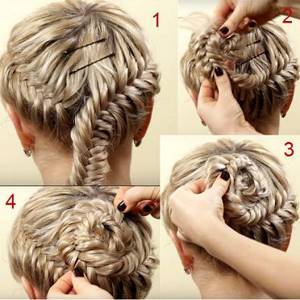
Scheme of a spikelet of 3 strands (photo)
These diagrams will help you quickly master the positioning of your hands and see the process recorded at every moment of weaving.
The photo shows how to do it step by step and what you will see after rearranging the strands.
Classic spikelet with tiebacks
In this scheme, we place the picked up strands on top of the main strands.
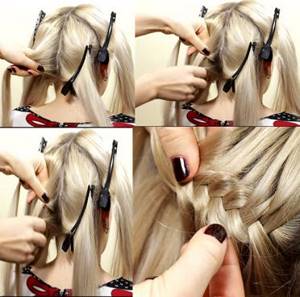
Reverse or inverted
In this scheme, the picked up curls go underneath. Pay attention to the photo, where you can see step by step which strand we take and place under the braid.
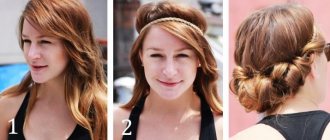
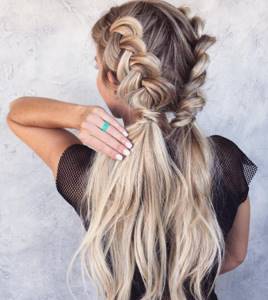
Fashionable hairstyle: two spikelets
Of course, classic weaving looks attractive in itself. But still, many girls prefer to experiment, designing their curls in different ways. For every day, for a walk, shopping or traveling, a hairstyle consisting of two spikelets would be an excellent solution. They can be voluminous, standard, or unusual in shape. It all depends on personal preference. Weaving in a slightly casual style also looks great. This hairstyle will definitely be comfortable for long flights. In addition, when you let them down, you will get beautiful, romantic curls.
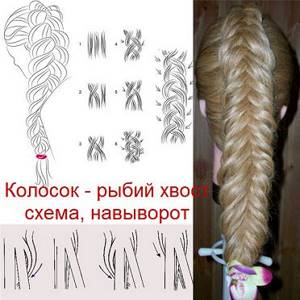
Scheme of a fishtail spikelet (photo)
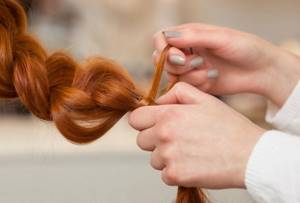
The above diagram draws your attention to the fact that there are 2 strands, and the process of transferring and separating strands is slightly different from that discussed above.
Fishtail classic option
In the fishtail technique there are 2 strands, and the transfer goes upward in a similar way.

Fish tail inside out (bottom)
Here the transfer of strands occurs under the main strands, i.e. we seem to see the reverse side of the spikelet braid.
Spikelet from the tail
When you first decide to braid a spikelet, we recommend starting the braiding on the tail, as it is easier on your hands and you don’t have to worry about the beauty of laying the initial strands.
To train your hands and hone your technique, watch the video lesson and practice.
Video tutorial on weaving a spikelet on the tail:
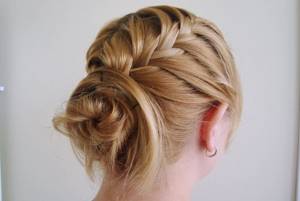
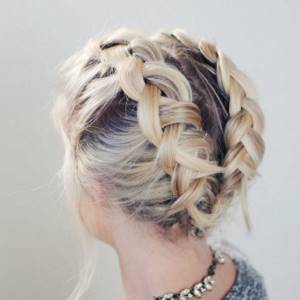
Hairstyle around the head
If you have already mastered the basics of classic weaving, it’s time to try more complex options. For example, a spikelet around the head looks impressive and at the same time allows you to keep your hair away from your face. First, we recommend combing your hair and only then start braiding. You should start from the occipital area from the bottom up. Take a small strand, divide it into three parts and begin the process of adding hair one at a time. Having reached the starting point, continue braiding and secure it at the back of your head. It is best to use invisible ones for this.

How to braid a spikelet for yourself video, photo and description
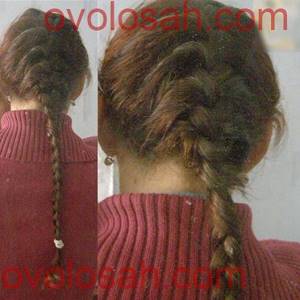
Pay attention to the photo, you will see some rotation of the spikelet and the braid itself - this happens when braiding itself, since we often braid to the back of the head, and then shift the braid to the side when the hooks are over and continue on its side.
To weave for yourself, we install mirrors to see what is happening behind.
Although experienced girls recommend braiding without mirrors, since the mirroriness of the braid can confuse you.
- Comb your hair thoroughly and start braiding like a regular braid. Hair that is not the first freshness is ideal.
- We separate 3 narrow strands on the frontal area and shift the right one to the central one and the left one to the central one. This is the first weave, you can make 2-3 of these and then start making grabs.
- 4th span, we shift the side strand to the central one and grab a strand of hair from the side part from the temple area and put the strands on top. We repeat with the 2nd strand, we continue to weave with tiebacks to the back of the head, alternating tiebacks.
- Having reached the back of the head, we braid a classic 3-strand braid.
- We tie it with an elastic band to match the hair or lightly comb it and spray the tip with varnish so that the braid does not unravel.
It turns out that your hands are placed on the sides and you make grabs with your thumb, lifting them from the hair growth up to the braid.
Do-it-yourself large spikelet
The second option is to use larger strands and start weaving by making a ponytail of hair on the frontal part. Then all operations are repeated, as when weaving above.
Video tutorial on weaving a spikelet for yourself:
For long hair, as for medium hair, the braiding will be similar, only after moving the braid to the side, try not to turn it out to avoid “turning.”
How to braid a spikelet around your head
This version of the spikelet is ideal as a hairstyle for kindergarten or school, since all the hair is removed and does not distract from the main activity.
The hair will stay in the braid for quite a long time and not fall out. If the hairstyle assumes that the child will sleep in the garden, then it is worth weaving a little tighter, but moderately, to avoid tightness.
Step-by-step instruction:
- Divide thoroughly combed hair into 4 sectors horizontally and vertically. The lines run along the parting and from ear to ear, as in the photo.
- We start weaving with a 2-sided pick-up of 3 strands from the lower left sector.
Try to separate strands of the same width and quantity of hair. This way your spikelet will turn out more even and uniform along its entire length.
- Picking up the strands from above, above the braid and from below. Move the links apart and select the top and bottom links as in the video tutorial.
- We braid this way, slightly pulling the braid in the right direction. Watch the tension and fix it correctly with 2 fingers, index and thumb, so that it does not fall apart.
- Having reached the ear, remove the clamp and weave further. Weaving goes from below clockwise. It is important to follow exactly this sequence, so the braid above the forehead will be more massive and full. For those with bangs who want to remove them, we recommend spraying your hair with hairspray so that small hairs do not fall out and stay in place.
- We braid the braid like this to the back of the head with grabbers, then switch to a regular one. Braid while keeping the direction of the braid to the left, i.e. without dropping down. Slightly spread the braid links to add volume. We tie the end of the finished braid with an elastic band to match the hair. This may be the end of the hairstyle.
- We pin 2 bobby pins slightly offset at the back of the head.
Here we place the remaining tail in a shell or spiral. Lightly curling starting from the tail. - Stretch the folded spiral slightly, adding volume. Spray the finished hairstyle with hairspray.
The video will teach you how to weave a spikelet of 3 strands with tiebacks around the head:
A variant of weaving a spikelet around the head on a child with short hair
- Carefully comb and divide the child's hair into a side parting, reaching half of the head to the top of the head.
- Use a comb to separate a thin strand and divide it into 3 parts.
- We begin to weave by placing the outermost strand (left) on the central one, then the right one on the central one. If you find it difficult to imagine, return to the weaving pattern above.
- Next, we repeat the operation, laying the side one on the central one, and on top we add a thin strand of the remaining hair from the side of the strand.
Pay attention to the video of how your fingers hold the braid and how they move when adding strands to the right and left.
- We braid it to the area above the second ear and try to braid it tighter, without pulling the braid away from the head to avoid airiness. So we continue weaving, slightly wrapping the braid up to the temple area.
- When there is no hair left for tie-ins, we braid a regular classic braid.
- Tie the end of the braided braid with an elastic band. Pin it with an invisible pin, like a hairpin, hiding the tail of the braid in your hair.
- We lay the rest of the braid along the parting or at our discretion and pin it with hairpins (choose small ones that match the child’s hair).
- Decorate your hair with lavender flowers or any other flowers. Screw-in rhinestones are also suitable.
Detailed video on weaving a spikelet and creating a festive hairstyle based on it
Spikelets for short hair
It used to be that short hair was not the best solution for girls. But in the modern world, masters offer to experiment, do unusual coloring and hairstyles on any hair length. Therefore, spikelets are a great solution for fashionistas. Depending on the features of the haircut, you can braid the spikelets on the sides and connect them together with the rest of the hair into a ponytail. Weaving in the form of a rim looks great. This option allows you to move strands away from your face and is suitable for both indoors and outdoors. No less original will be a spikelet in the form of a malvinka or in combination with curls. Owners of a bob haircut can make a weave consisting of four or even five strands.
To look attractive in everyday life, it is not at all necessary to do complex hairstyles with styling products every day. Spikelets of different shapes allow you to constantly experiment. Therefore, follow the step-by-step master classes, try new, original weaving.
Options for weaving a spikelet of 3 strands
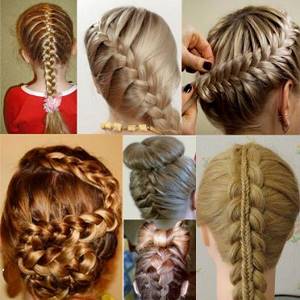
. All over the head from the forehead to the back of the head or to the very ends (classic or reverse). We look at the photo:
- weaving with tiebacks all over the head from the forehead to the back of the head;
- diagonally or around the head in the form of a crown (Timoshenko braid);
- snake;
- from the back of the head to the top of the head, turning into a bow or bun;
- 2nd spikelet with fish tail.
Spikelet braid in a braid

To make such an unusual spikelet from 2 braids, let's consider the option on ourselves and on the child.
On a child
We shift all the hair to one side, combing it thoroughly.
Exquisite spikelet with released strands
For those who have mastered any type of weaving, we invite you to remember the released strands.
To myself
On a child
We shift the new separated right strand to the left side. We separate another strand from the left side and give it to the child to hold in the other hand; we transfer another strand to the right.
We repeat after each span. We place the replaced strand on the opposite one, as when weaving a spikelet.
Inverted or outer spikelet of 2
A type of spikelet on both sides of the head. This version of weaving has its own secrets; those who already know how to weave a spikelet with ease should switch to this option.
Spikelet for 2 braids
This weaving option can be diversified by combining a spikelet with a transition to a classic braid and vice versa, we will show several weaving options in the photo for inspiration and ideas.
The thinner the strand, the more accurate and beautiful the weaving will be, and the easier it will be to weave.
Positioning of hands: hold the right strand with 4 fingers of the right hand, place the left strand on the thumb. We perform the rest of the actions with our left hand.
With our left hand we separate a thin strand from our outermost part and pick it up with the middle finger of our right hand and place it under the right strand. We separate a part from the remaining hair and place it under the added strand.
For left
Hold the left strand with 4 fingers of your left hand.
Then, using the index finger and thumb, we help our right hand to separate a thin strand.
With our right hand (middle or index finger) we separate a thin strand from our outermost part (we hold it with the index and middle fingers of our right hand) and pick it up with the index and middle fingers of our left. Transfer it to your hand, adding it to the strands in your left hand.
As if moving the right strand, we hold it with the remaining fingers of the right hand.
Using the index or middle finger of your right hand, separate it from the right side of the remaining mass of hair and place it in the left strand. What options are there for adding strands?
Left We hold both strands with 2 hands, with the left index finger we separate a ton strand, turn the hand over and place it. Grabbing with your right index finger. We add part of the hair from the left hand side, separating a strand from the remaining ones.
Right Hold your hand palm down. Using your index finger, pinch off a thin strand to the right of the main strand. We turn it over, pick it up with the middle finger of the left hand, while the index finger and thumb hold the weaving and prevent it from unraveling. We dive under the strand with our right hand, separate it with our index hand, and place it in our left hand.