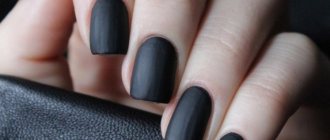
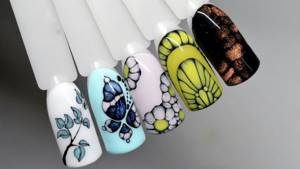
Chinese nail painting technique. Master Class
The Chinese “double stroke” technique is a set of drawing techniques united by one feature. 2 colors are applied to 1 brush at once and a pattern is created using various continuous movements of the brush.
There are only 5 main types of strokes presented in this technique:
smooth - straight line;
We draw lines on the nails and this is a good option for beginners.
- openwork - dense vertical wave;
- semi-openwork - a wide wave from top to bottom, then sideways, up and down, without lifting off the surface;
- feather - abrupt strokes with a thin brush in different directions;
- wave - continuous movement in different directions with rotation of the brush.
To complete a drawing using this technique you will need:
- LED lamp with UV spectrum, or UF lamp;
- white gel polish;
- acrylic paints in white, pink, black colors;
- finishing top;
- clinser;
- linen napkins;
- flat brush
- dotting brush;
- dots;
- palette;
- small rhinestones;
- water.
Their structure makes it easier to apply, distribute and mix paints at the time of the stroke. Master class “Flower” using Chinese technique with acrylic paints is very simple to perform and even the most beginner can handle it.
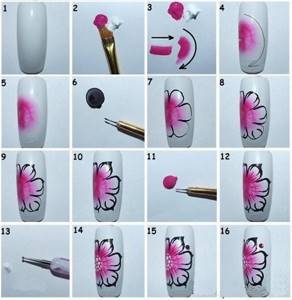
Master class “Flower” in Chinese technique
- Prepare your nails for painting.
- Apply white gel polish to all nails.
- Dry in a lamp.
- Repeat application of white base varnish.
- Dry in a lamp.
- Treat with a clinser.
- Treat the base layer with a thin buff.
- Apply a small amount of pink and white paint to the palette, close to each other.
- Dip a flat brush with opposite bristles into different colors. Draw test lines on a sheet of paper, checking the intensity and width of the paint, mixing it at the same time and removing excess from the brush.
- Using a circular motion, draw a circle in the left middle part of the nail plate with pink color inside. If necessary, correct the result.
- Place some black on the palette.
- Draw the rounded contours of the flower with a dotted brush, add leaf veins on top.
- Using the same point brush, draw out the central part of each petal, sharpening and shaping.
- Trace the outline of the flower again, achieving straight lines.
- Using pink paint and a dotting brush, draw the veins of the flower from the center to the middle of the petal
- Using dots, draw a lot of white small dots in the center of the flower.
- Using dots with black paint, mark the places where the rhinestones are attached on the free surface of the nail.
- Wait for it to dry
- Cover with a thin layer of finishing top.
- Attach the rhinestones to the prepared places. You can add small transparent rhinestones to the center of the flower.
- Dry in a lamp.
- Using the finishing topcoat, use a dotting brush to draw a circle around the rhinestone, further strengthening the adhesion to the surface.
- Dry in a lamp.
- Remove the sticky layer with a cleaner.
Drawing on nails for beginners is wiser to start with simpler techniques and techniques. Chinese painting fully reveals its beauty in the hands of experienced craftsmen.
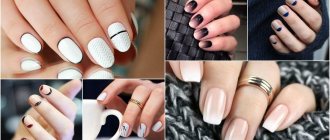
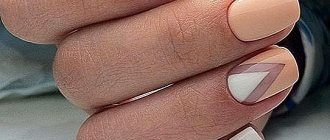
What kind of design can you create?
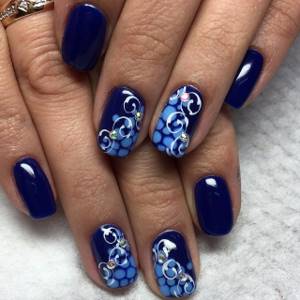
More recently, the most common designs for wet gel polish were floral patterns. Today, trends have changed and the number of options has increased dramatically.
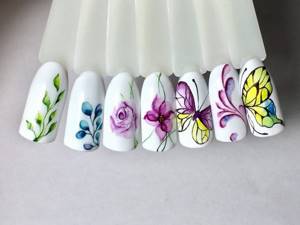
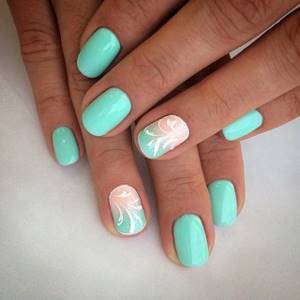
Flowers of various shapes, sizes and colors, as well as graphic patterns, abstractions, haze of various interpretations, butterflies and other patterns continue to be very popular.
Marble manicure, which is very popular today, is also performed using this technique. You can design circles with penumbra, a cobweb entangling your nails, or create a shell effect, as well as use a marine theme. All this is available using this technology.
Is there a gel polish that spreads with a pattern?
Gel polish, which spreads in a pattern, is available from many manufacturers; the following products are known to provide the desired result:
- Nika Nagel gel polishes;
- MiiS base, which can be combined with flower beds from any company;
- flower beds and Rosalind solvent;
- BlueSky Flower Gel gel polishes;
- Gellaktic Mystic compositions.
These media may be called watercolors. Or there is no such definition on the bottle, but there is information about the spreading effect.
Drawing on a wet surface will make your nail design unique even with a simple image. This technique is accessible to beginners; it does not require additional funds or costs. And an unsuccessful picture can be corrected with a clean brush or erased with a napkin soaked in a degreaser.
Source of the article: https://gel-lak.online/dizajn-po-mokromu-gel-laku/
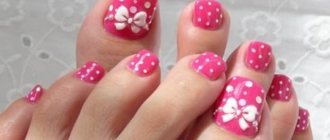
Black roses on nails, photo
Nail art with black roses will look stylish and playful. This manicure is practical, will fit perfectly into your everyday look and at the same time can be suitable for various celebrations.
Spectacular manicure with black roses
This design can be done without difficulty at home. To do this, you can use a needle, brush or toothpick, whichever is more convenient for you.
- Using black varnish we draw petals to our future roses from the center of the bud
- We gradually open our rose bud to the desired size and shape
- Afterwards, if desired, add some elements such as dots, curls, petals
Design option with black roses
- If you design the design closer to the “retro” style, then you will have to add dots. To do this, place them symmetrically over the entire background of the nail plate. You will get a polka dot manicure.
- Adding stripes on one nail will also look elegant. At the end of this combination manicure, cover your designs with a matte finish.
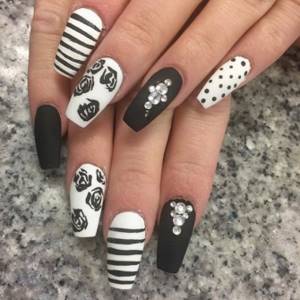
Cute black roses on nails
Ideas
Schemes for applying drawings do not require special effort or talent. You can master them very easily. Main types:
- spots. On the wet surface of the varnish coating, spots are drawn with dots. Different colors are applied in a certain sequence. The entire nail plate is filled with drops, a certain pattern is built on the sides or in the center. The colored monograms will flow neatly, creating unusual transitions;
- imitation of reptile coloring. Drawing is done using dotted technology in a checkerboard pattern, leaving small gaps between the dotted lines;
- curls. Paint is applied pointwise along the nail. Next, curls and patterns of the required shape emerge from the drops. Unusual method: using a needle between the points to draw figure eights and loops;
- flower. To form a beautiful floral print, you need to put several dots in a circle with varnish, then extend the lines towards the center or in different directions, forming petals. In order to draw roses, you need to use a brush - leave a few lines curved in a circle and finish drawing the core;
- branches. You need to draw a white line exactly. Drop emerald varnish into the middle of each point. Then you need to carefully pull a toothpick along the points, pulling them out to get a twig. Another method involves applying dots in two rows, alternating varnish. From each drop you can draw a leaf, stretching it towards the middle, gradually forming a twig;
- spring. A few drops must be placed in a row with alternating colors, and then walk over them with a dot, making movements in a spiral;
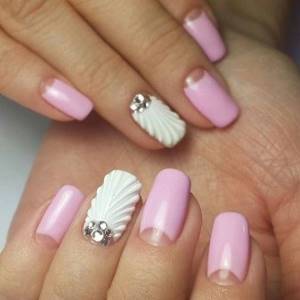
- shells. To apply the drawing correctly, you should draw a circle of dots, then draw another smaller circle. It is necessary to connect the drawing in a spiral motion, gently pressing at the curves of the shapes;
- marble imitation. This pattern is based on a combination of two shades, usually black and white. On a light tone, certain areas are darkened - on the sides and in the middle. Next you need to draw so-called “veins” from one darkening to another. Sometimes the lines can be shaded smoothly;
- butterfly. On a plain base, you should draw several colored parallel lines, and put a transverse line in the middle. After this, you can connect the tips at one point, thus forming butterfly wings;
- peacock feather. You should drip some varnish into the middle of the nail, then outline it with different colors, carefully extending the pattern to the sides. For this design, it is recommended to use varnishes with glitter;
- abstraction. This design is similar to a water manicure. It is better to use several shades for it. Draw stripes close to each other, then draw transverse lines, but changing the speed and pressure;
- cobweb-mesh. Using a regular brush from the bottle, draw two or three stripes vertically along the surface of the nail. Then, using a thin brush or toothpick, draw transverse lines, as if crossing out the composition. If you want to design the design in cobwebs, you need to do the same, only the transverse lines should be drawn unevenly and to the sides;
- French classic manicure. Created using the standard method, only with a vague border. On a damp base, you need to draw a curved line along the edge of the nail, and then shade its edges with a needle or soft brush.
Tips for beginners:
- It is better to give preference to contrasting shades. The most original ideas are obtained by combining bright colors. But you should remember that they are not suitable for everyday manicure;
- If it is necessary to change or correct the design, the brush must be wiped dry after any action. If you don't do this, the shades will easily overlap and blend beautifully, which is also very beautiful. Therefore, you just need to decide on the design;
- movements should be performed clearly and confidently - this is how the most unusual and beautiful combinations are formed.
French with roses on nails, photo
French is a wonderful decoration for your nails. A white jacket with white roses and patterns is perfect for summer and spring. This manicure is easy to do.
French manicure with voluminous rose effect
- We perform standard procedures for preparing nails for manicure
- We draw a French jacket in any way convenient for you
- Then everything depends on your imagination. You can add voluminous roses to your design or draw a beautiful rosebud with various design elements
- You can decorate with rhinestones
The variety of modern materials allows you to realize your most unusual fantasies.
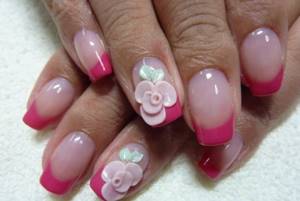
Pink jacket with voluminous roses
Stencils
Another way to paint roses on your nails using varnish is with stencils. They are paper stickers with a protective backing that have slots that fold into a pattern. Such a stencil must be peeled off from the protective backing and pasted onto the nail, pressing firmly to avoid bubbles, and then covered with varnish. With the help of such a stencil, the drawing also turns out to be quite schematic, but recognizable.
The stages of performing such a manicure are almost similar to those performed when applying a dots pattern. You need to cover your nails with a protective base, then a lighter background varnish and dry it. The differences begin further - you need to glue a stencil onto the nail and carefully smooth it out so that it sticks to the entire area of the nail. Cover the slots in the stencil with a layer of thick varnish and wait until it dries. Peel off the stencil and cover the nail with a clear sealer for great shine and longevity of the manicure.
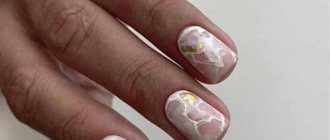
Variety of nail designs using wet gel polish
Nail designs in this style are gaining increasing popularity among many modern girls. Increasingly, representatives of the fair sex are striving to learn stylish techniques themselves using household tools. If you have the first skills, you can without a doubt start creating the following types of designs on the nail plate:
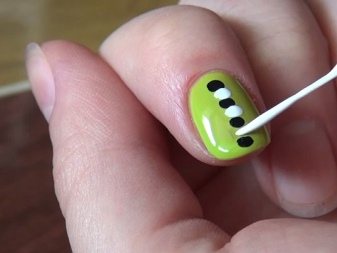
- Creating a manicure using bright and colorful designs on wet gel polish. Perfect for beginners, as this type is very simple and easy to perform. In this case, you need gel polish in variegated shades and a pillbox stick with a small ball at the end. In particular, the image is applied to the ring or middle finger. After applying the base base, dots of your chosen palette are applied to the gel and the hand is placed in a special beam machine. In the video of nail design using wet gel polish, you have the opportunity to see how elementary the technique being presented is.
- Manicure with quick drawing. The technique is as follows: apply the base and dry it in a manicure equipment (about 40 seconds), then cover the nail with black gel polish and dry it again, the procedure is repeated (only with the thinnest layer) and using a pillbox, a unique design is made. The process ends with the same drying in a lamp and coating the finished manicure with a special top coat.
- Wet gel polish images for beginners. In this situation, in addition to simple dots, you can try to apply several thin lines in the center of the nail plate or along the very edge (also using a dot). Cover the areas that remain unpainted with a selected gel polish, and then create the required pattern using a special tool. Complete the process by drying it in a lamp and securing it with clear varnish.
- A new version of manicure using wet gel polish with a chrome effect. After preparing the fingers, an acid-free primer is applied to the nail plate, followed by a base coat (it needs to be dried in a special apparatus). Next, they undermine the sticky base, apply white gel paint to places that are not sealed and also dry. Then another layer of white gel paint is applied, on which stains are made with a brush. Secure everything with a lamp and topcoat.
- Roses over wet gel polish are the most commonly used type of manicure. The procedure is as follows: first you need to remove the gloss, degrease, apply primer, base, then cover with a second layer and immediately begin drawing gorgeous roses. Secure everything with topcoat. In most cases, white, red and black shades of gel polishes are used. The manicure then turns out to be extravagant and bewitching, giving the woman determination and sexuality. For a very young girl, roses with a pink tint are perfect.
Among the unusual and more complex options for nail designs using wet gel polish is the effect of velvet roses. You can achieve the desired effect using professional acrylic sand. The selected image is applied to the prepared manicure according to the scheme using gel paint. Immediately after this, the illustration is sprinkled with velvet powder, which is immediately saturated with paint. Unnecessary residues are brushed off with a brush. This is the only case when, upon completion of a masterpiece, the nail is not covered with a fixative, since the velvet effect will instantly disappear.
Another type of manicure is a combination of French and roses. This gives a certain femininity and elegance to delicate female hands.
Spreading effect in manicure. Secrets of applying gel polishes from the Sharm Effect line from Semilac.
The Sharm Effect collection consists of 18 rich colored gel polishes and 2 special bases: transparent Clear and white White. With this line of gel polishes you can easily create a watercolor effect on your nails, which will give your manicure a unique charm!
1. Apply a base for gel polish to a properly prepared nail plate and dry it in a lamp.
2. a) apply colored gel polish in 1-2 layers and dry in a lamp (we dry each layer separately). On the dried layer of gel polish we apply the transparent base Sharm Effect Clear and on the undried base we apply patterns with Sharm Effect gel polishes. Once the desired spreading effect is achieved (a few seconds), dry it in a lamp. If you need to highlight the contours of the resulting drawing or add additional effects to the design, add and dry all the elements in the lamp. To complete the manicure, apply any top coat from the Semilac offer. Dry it in a lamp and enjoy the result!