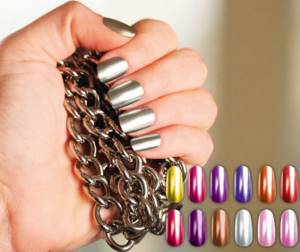
Eyes are the mirror of the soul, and what is the mirror of a good manicure? Nail designers have a simple answer - a manicure with glitter or simply rubbing it in.
This type of nail art will give your nails a mirror-like depth, a similarity to a metallic sheen and, of course, attention from others. With it you will shine equally at work and at an evening reception.
Dust for nail design how to use
Many girls who are interested in modern trends in manicure often wonder what nail dust is and how to use this fairly new material?
Designing nails with dust is not so difficult if you know some of the tricks of applying this wonderful material. Dust for decorating nails is most often sold in metallic colors, these are silver, gold or copper shades. Dust can also have a matte or mirror-like shine, or have a fine or coarser grain structure. Fine dust for manicure is applied with a thin brush, for larger ones you can use a toothpick, it all depends on the idea and type of manicure.
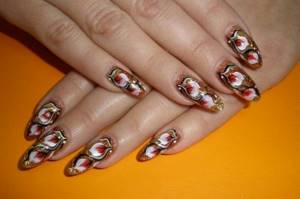
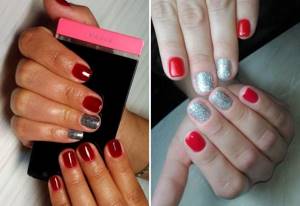
Beginners in nail art should not immediately take on complex designs; they need to start with the simplest techniques, in this way a certain skill and dexterity will gradually appear. Here are some easy to follow ideas. A thick layer of varnish is applied to the nail, which will serve as a background for the future design. Without waiting for it to dry, immediately take a thin brush, dip it in dust, carefully shake off all excess, and put a few dots on the varnish. Take a toothpick and make streaks with chaotic movements. This pattern can be made over the entire surface of the nail or just in a corner. The combination of red or black varnish with gold dust looks very beautiful. This manicure takes quite a long time to dry, so it is best to use a nail polish dryer.
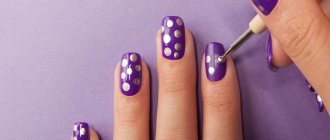
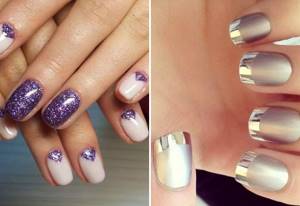
Before applying dust to your nails, it is important to prepare everything you need, stock up on a napkin in order to remove any remaining dust from the brush, and cover the surface of the table, otherwise you may accidentally stain everything. Recently, the so-called lunar manicure has been very popular, which is easy to perform using dust. First, apply a thick layer of varnish to the entire surface of the nail plate, then take a brush (for a larger fraction, use a toothpick) and dip it in the dust for nail design. After that, with neat jerky movements, glitter is applied to the hole in the shape of a semicircle. You can leave it like that, but for a more interesting option, take a toothpick and make rays from the hole towards the middle of the nail, in this case it is important that the background varnish has not yet set, otherwise nothing will work.
Nail designs with dust allow you to make smooth transitions with a gradient manicure without the use of foam sponges. First of all, the nail plate is covered with a base, this is done in order to prevent the harmful effects of the varnish. Then a white tint is applied, allowed to dry thoroughly, after which the tip of the nail is painted black or any other contrasting color, and the edges should not be smooth, and also allowed to dry. Then apply transparent varnish to the entire surface, and immediately, without allowing it to dry, use a brush to transfer silver-colored dust to the places where black and white colors meet. They try to smooth out the surface, the dust is applied unevenly, in the middle with a denser layer, and at the edges - transparent, it is necessary to make the transition unnoticeable, this way you get a gradient manicure.
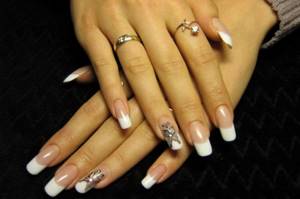
Using dust for nail design, you can create a rather interesting French manicure. To do this, you need to apply background varnish to the entire surface of the nail plate and let it dry thoroughly. Then take strips for a French manicure - easily replaced with construction tape - stick them on so that the tip of the nail is free. Apply transparent varnish, trying not to touch the tape, immediately take a brush, dip it in the dust and transfer it to the tip of the nail, then remove the stripes, you get the most beautiful version of a French manicure.
Having mastered these simple techniques, almost any girl, and in the shortest possible time, will learn how to perform a decorative manicure using nail design dust on her own.
Translucent manicure with decor
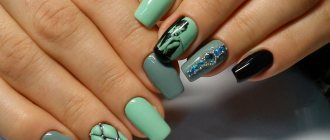
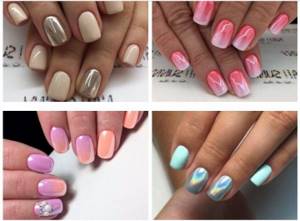
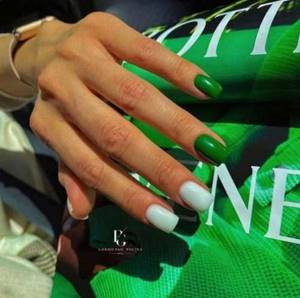
And another trendy design for 2021-2022 is translucent nail design with decor. Including metallic paint stains, gold leaf foil, sparkles, glitter, rhinestones, rubbed top coat. You can simply add them to the finished design, highlight all the nails or two fingers. And don’t forget about a manicure in a delicate light green or sea green color - a trend.
Features and Benefits
There are several ways to manicure the nails themselves. In this case, acrylic powder can serve as a basic fixation, a design solution, or a simple coating. Advantages of this tool:
- quick manicure . Using acrylic, you can speed up the nail treatment process to a minimum of 5-7 minutes. Acrylic powder hardens much faster than classic varnish (12-20 minutes);
- large selection in design . The color spectrum is very wide: from standard shades (white, transparent, cream) to bright combinations (metallic, rainbow, mother-of-pearl). This allows you to use modeling tools to the maximum;
- one-time nail treatment . When applying acrylic powder to nails, there is no need to process it. It is very firmly fixed to the base, and the pigment itself is inside the varnish and does not come off;
- durability . Since the powder is able to glue layers of manicure and create a durable coating, it does not lose its brightness for a long time and is not damaged by impacts or impacts;
- universal use . After an acrylic-type product has been used on the nails, they can be treated with other varnishes. Thanks to the strengthening of the platinum of the nail, it is possible to use complex design solutions and unusual materials that cannot be applied to thin nails.
This material also has its own characteristics for use. For example, powder is difficult to process. Without special training, it will not be possible to use it as a fastening element. Accuracy and speed in application appears over time, thanks to skill. The material hardens quickly and requires high-quality handling. In addition, it has specific vibes that do not smell very pleasant.
Before use, you should remember that acrylic-based powder does not have healing properties, but strengthens nails only due to its mechanical effect.
Powder differs in types:
- colored - used for design solutions in a modern style, for example, nail art. The use of colored particles can be either on the entire nail or on part of it. Sometimes a mother-of-pearl base is used to create both the most delicate classic designs and festive types of manicure;
- transparent - the base is used to create a natural coating, without unnecessary patterns. Used to create a French manicure or a simple strengthening coating. This also includes the mirror type of powder, in which a shiny base is applied on top of special plates with a mirror reflection;
- camouflage - a base for manicure that hides nail defects. This product can be applied even in a thin layer - it will perfectly eliminate and hide unevenness or delamination;
- finishing coating . The top layer, which consists of powder, may include glitter (shiny particles can be of different sizes: from the smallest to the most voluminous) or a velvet coating.
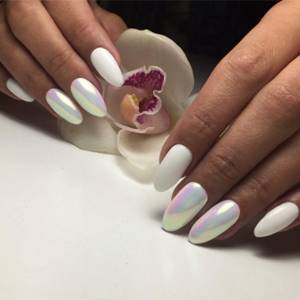
Nail design with pearl rub.
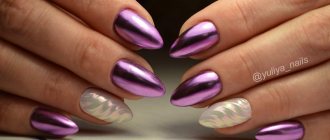
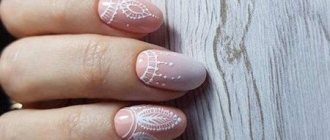
There is always a place for naturalness and tenderness in fashion trends. If you are a follower of this image, then you should pay attention to mirror powder with a pearl shimmer effect. A nude shade with a pleasant shimmer does not impose any conventions in clothing and style on its owner. Lightness, freedom and no attachment is the credo of this technique.
This manicure is well suited for decoration. Any design solution in the form of painting, rhinestones, or dotted patterns combines favorably with this technique.
How to use it correctly
Before you start using powder, you need to select it. It should be remembered that the main criterion is the result that needs to be achieved:
- To fill your nails with a smooth surface, you need to give preference to powder with camouflage properties. Its color should match the shade of the nails, therefore, the palette of choice is cream and soft pink tones;
- To strengthen shellac plates, or to simply correct the shape of the nail, a transparent powder is ideal. This acrylic can also be used for French manicure;
- In order to create a nail design on your nails, it is better to use a glitter coating or a colored base for your manicure. The overall design, in this case, is limited only by imagination.
There are several ways to use acrylic powder: simply applying it to the nail plates, or using the product over gel polish.
The technique of applying powder to gel polish is quite simple. Necessary actions:
- clean the nails (remove the cuticle and file to the desired nail shape);
- file the nail plates a little to a smooth, glossy surface - this way the varnish will lie perfectly and the adhesion to the shellac will be strong;
- Degrease the fingers with a special type of solution. If this is not available, regular alcohol will do (it should not be rubbed too hard, otherwise the surface will be overdried);
- After drying, apply base coat. When choosing a brand, remember that some products need to be dried in a special lamp for several minutes. All information can be found in the varnish insert. If artificial drying is not needed, just let your nails rest in the air for a few minutes;
- use gel polish. Its application is no different from a simple coating. Do not skip the outer edge of the nail - this will allow you to “seal” the shellac over the entire surface;
- Sprinkle a layer of wet varnish with acrylic powder. If you need to cover the entire nail with powder, then first you should dip it into a container with powder, sealing the composition, and then, placing your finger on the stand, sprinkle the remaining surface with a spatula. The excess should be shaken off, after which a light rubbing is necessary (do not touch with your fingers - use brushes for this). Afterwards, dry your nails under the lamp for 3 minutes;
- use a brush to treat each nail after drying to smooth out any remaining unevenness;
- Cover with a finishing layer of varnish for a smooth effect.
It is important to know that acrylic type powder is always applied to the final layer of gel polish. If several layers are applied, then acrylic powder should be on the last one.
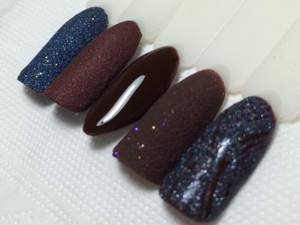
star dust
Velvet sand manicure can be performed using acrylic powder, which is used for nail extensions. It is slightly finer in structure than sand, and forms a slightly different rough surface on the nails. With it the effect is more velvety. It sticks to even the finest lines and strokes.
To achieve a sparkling effect, it is recommended to mix the powder with any small glitter of different densities. With colored dust the design may get a little dirty, but with transparent dust it won't.
When using translucent gels, it is necessary to apply gel polish as a base to match the glitter or light color. If the design contains dark shades, then the base color can be anything.
The application technique is exactly the same:
- Apply base and 2 colored layers of gel polish to the nail.
- Sprinkle acrylic powder generously and evenly onto a wet, undried nail so that it reaches all parts of the nail. It’s better to do this over a jar so that you can immediately pour the excess into it.
- Before sending your design to the lamp, remove as much excess dust as possible. It is recommended to dry your nails 2 times longer than usual.
- After polymerization, remove any remaining powder.
Brand overview
Manufacturers produce a large number of acrylic powders: plastic, with fast and medium polymer cohesion, stained glass type, for classic and colored manicure.
Special series - presented from the Iris 'K Professional . Application is possible both with ultraviolet monomers and with monomers that do not have an unpleasant odor. The products can be used at home. Acrylic powder of this series has great plasticity, is easy to lay on the surface of the nail and does not flow down. Suitable for beginners and professionals;
Signature Nail Systems is a new product from the USA. It represents gel powder, which has no analogues in the world. The SNS product is applied to clean nails, without using varnish. This powder does not require a lamp, and correction occurs in a matter of minutes. The coating has increased strength and does not crack.
The PC series from Iris'K represents camouflage powders for nails, which have several names. The set contains three colors of basic shades. A peach shade of a matte type, which is intended for French manicure - it easily removes and mattifies all the unevenness of the nails, and also lengthens the nail plate. It is characterized by great plasticity and does not give a “marble” effect. Can be used with Iris'K shades. There is also a dark beige tone for a classic manicure, a delicate pink color, a transparent base and a cool matte shade with a pink tint.
What does rubbing look like on short nails?
The answer is simple - wonderful! Designers advise using pastel colors. This manicure emphasizes and visually lengthens the nail plate.
Beautiful manicure with “dust”: what is it, design ideas and technique
Hands are the part of the body that others pay attention to most often, so most women want them to look well-groomed and neat. Salon procedures can turn even the most neglected nails into small works of art - they are given the correct shape, extended to the required length and, of course, covered with various varnishes and gels.
Professional craftsmen are able to create a unique design using professional equipment and materials, but this procedure is quite time-consuming and not every girl can afford. In order to easily replicate the manicure of a model from the catwalk, large manufacturers of cosmetic companies offer budget-friendly and easy-to-use products. One such product is special crystal dust.
Features of manicure with powder
First, you need to decide what this manicure is and what acrylic powder is.
Acrylic powder is a special fine powder that is used in nail services to strengthen the nail plate and to create decorative patterns, designs, etc.
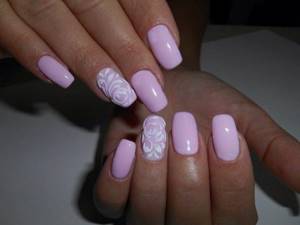
Manicure with acrylic powder can also be classified as a 3D design due to the fact that a three-dimensional pattern is created with the help of powder.
Manicure with acrylic powder has a huge number of various advantages. Let's note some of them:
- Strengthening the nail plate. This is the most important advantage of acrylic powder. It is not only a beautiful decoration, but also a substance that strengthens the nails and protects them from delamination.
- Ease of use. Acrylic powder is very easy to apply and does not require any additional tools for use.
- Economical. A manicure with acrylic powder can be easily performed even at home, so you do not need to visit expensive beauty salons.
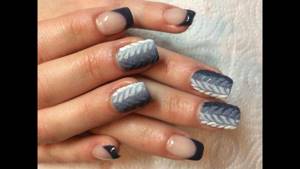
- Multiple design options. Using acrylic powder you can create a manicure that is simply unrealistically beautiful. These include various volumetric monograms, drawings, and even an imitation of a knitted sweater.
Don't miss: Manicure for every day (69 photos)
There are several different options for acrylic powder:
- Transparent or white powder - used to strengthen nails. In addition, it is also used for nail extensions, as well as in curly sculpting.
- Colored powder. This option is used mainly when creating various patterns and designs.
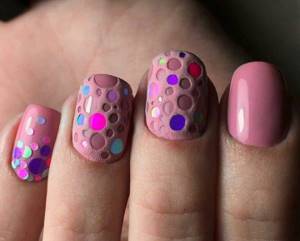
- Glitter powder. It is also used to create decor and various festive nail designs.
- Neon powder. This type of powder is also used to create a spectacular manicure.
Peculiarities
Crystal dust or rubbing is a special product in the form of a dry powder that went on sale several years ago. It got its name because such powder is used by rubbing it into the decorative coating of the nail plate, although the dust can be used in other ways. A manicure created using such a powder shines brightly and shimmers in the light, reminiscent of the surface of a mirror or polished metal.
Unlike regular sparkles, it looks more discreet and very expensive. With such nails you can go not only to any celebration, but also just to work in the office.
Of course, in this case you should choose calmer and more natural shades, but even the simplest and most laconic option guarantees that others will pay attention to the originality of the idea.
In addition to the usual rubbing, such dust can be applied pointwise and even drawn with a special brush. Doing such a manicure at home is much more difficult, because the procedure requires experience and considerable dexterity, especially when it is performed with the left hand. At the same time, both expensive rubs and cheaper options dry quickly and shimmer with every movement of the hand.
This soft shine is achieved due to the size of the pigment from which the dust is made. The particles are so small that the human eye is not able to separate them into individual grains, so it sees such a coating as radiance and iridescence. In addition, many rubbings have the additional effect of strengthening and moisturizing the nail plate due to the ceramides included in their composition.
New mirror manicures
Manicure with rubbing is a relatively new trend and therefore nail designers have the opportunity to develop and delight us with fresh ideas for the masterly combination of different techniques with pearls, rhinestones, painting and other decoration attributes.
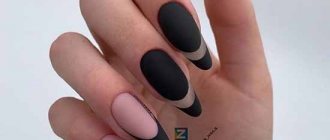
At the moment, the combination of matte and mirror manicure is very popular. Thanks to his contrast and inconsistency, he quickly found his admirers.
Let’s also pay attention to a new design item in the “Chameleon” style (sometimes called “chameleon”). Violet-green tints cannot leave any modern fashionista indifferent
.
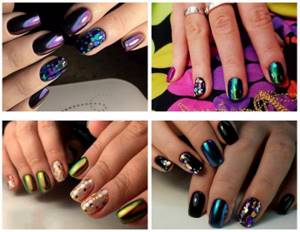
“Northern Lights” is another type of fashionable rub this season. Thanks to it, your nails will gain a slight shimmer. Goes great with any colored gel polishes.
Shimmering powder with a prism effect does not lose its popularity.
Also, don’t forget about mirror and gold rubbing.
Below we will look at some popular colors and models of mirror nail designs.
Types of rubs
Initially, only two shades of the rub went on sale, reminiscent of the shine of silver and gold. Over time, the quantity and quality of these coatings has increased significantly. Today, there are several varieties of this material, each of which creates its own special effect.
Mirror
This type of dust appeared very first, but still remains one of the popular varieties. With its help, a perfectly smooth coating is achieved, reminiscent of chrome-plated metal.
The color of the finished manicure depends on the shade of the dust itself and on the color of the varnish or gel on which it is applied.
Pearl
A softer shimmer can be achieved by using a “pearl” rub, which is often applied to a light or even transparent varnish or gel, but is sometimes added to a dark design.
It is convenient to use for French manicure and wedding nail design.
Chameleon
Such powder, when applied to a plate, changes shade as you move your hands from darker to lighter, and vice versa. One of the most popular rubbings is considered to be a variant called “Chafer bug”. Nails with this coating shimmer, like the shell of this bright insect.
Unicorn
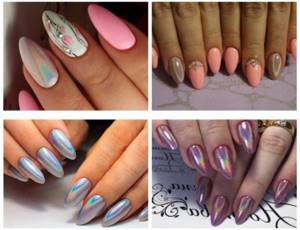
No less popular is the “unicorn” rub, which allows you to create a transition not from two, but from three or more colors.
Nails shimmer like polished shells collected on the beach and have a rainbow shine.
Aurora
This rub resembles a product called “unicorn”, but has a clearer shimmer in blue-pink shades. It got its name from one of the most beautiful phenomena on the planet - the northern lights.
Prism
Similar to the decomposition of white light when passing through a glass prism, the coating with this dust has a linear spectral iridescence.
This holographic manicure goes well with a monochrome look, contrasting against its background, and with bright clothes of various shades.
Flakes
This product allows you to create the effect of shiny scales or wet sand on your nails. To do this, it is applied pointwise to the entire nail or part of it. If you rub in this powder, you can get a softer shine that retains its unusual shimmer.
Application rules
Using crystal dust is quite simple, because it does not require any special tools, and you can carry out the entire procedure yourself. The step-by-step instructions are as described below.
- First of all, you should prepare your nails for coating. To do this, you need to trim the cuticle, give the nail the desired shape, walk over the nail plate with a soft buff and apply a base coat.
- One or several layers of colored varnish or gel of the selected color are applied to the base. The less dense the texture of the product, the more layers must be made to obtain an even and smooth surface.
- A top coat is applied to the varnish, which does not have a sticky layer. This is very important, since rubbing dust over the sticky layer simply won’t work. The spot application of rubbing flakes can also be done on the sticky layer.
- Then you need to dip your brush or finger into the mirror powder, press it to the nail and rub the dust in a circular motion until the desired effect is achieved.
- The finished manicure must be covered with two layers of finish with a sticky layer and removed after drying.
Examples of manicure for long and short nails
Of course, there are simply no strict rules for using the rub, depending on the length of the nail plate. However, the same effects look different on short and long nails.
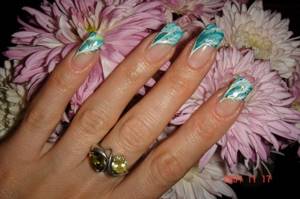
A larger area allows the rainbow effect and the effect of the northern lights to be better revealed, so it is preferable to apply these rubs on long nails.
Short nails prefer a softer shine or a more dramatic color transition. An excellent option would be to use “pearl” rubbing or “prism” holographic dust.
In this case, it is better to focus on calmer shades and not choose bright flashy colors.
Rubs such as “mirror” and “chafer bug” look great on any nail length, and the darker the color of the varnish or gel is chosen, the brighter the nails will shine and shimmer after a manicure.
Translucent manicure on short nails
Short nails allow you to safely experiment with different colored translucent coatings, designs, decorations and color combinations. For example, milky and pastel colored camouflage coatings are one of the main trends of the spring/summer season. It is recommended to complement short lengths with translucent multi-colored manicure, milky gradient, gold foil, and sliders. Also in fashion is a top with an imitation of a “quail egg” pattern and a rubbing effect. Any of them will give an airy and original look to short nails.
What it is?
Gel powder for nails is a unique opportunity to quickly and efficiently cover your nails with any color. This coating system appeared around 2012. And every day it is gaining more and more popularity among nail art masters and home users.
The gel-powder system consists of different materials: degreaser, base, powder, powder, top, activator. This step-by-step technology is applied in layers and does not dry in a lamp. Everything dries on its own thanks to a good fixative (activator). The structure of the nail is denser than when coated with simple gel polish.
The coating will look perfect with any clothing. You can make a classic French manicure, apply a single-color coating, fill your nails with glitter and paint on the surface with gel polishes. The system combines perfectly with all standard manicure techniques.
An interesting feature of the gel-powder system: you can apply French gel powder and then paint your nails with regular polish. If you get tired of the shade, simply remove the color with nail polish remover. Surprisingly, you will still have a French coat on your hands that was made with gel powder.
Express manicure is done without UV or LED lamps. The coating dries on its own within a few minutes and can last for 3 weeks. It's not that easy to remove. It protects your hands from frequent chips, cracks and other problems with the nail plates.
Operating principle
The combination of base gel and powder does not have a strong odor and does not cause a burning sensation. All materials are very easy to work with. A thin layer of gel is applied to the nail, after which the finger is immersed in a jar of powder. The system is suitable for thin and weakened nails and is absolutely not harmful. Nails look natural and the color lasts for 3 weeks. To achieve an ideal coating, several layers of materials must be applied.
To fix, you need a polymerizer (other names: activator, fixer, hardener, sealer)
. This product polymerizes gel powder and helps to combine all materials into a single monolith. You can remove gel nail powder using a cutter using the same technology as gel polish.
Properties of gel powder
Gel powder is suitable not only for creating a colored coating. With the help of this system you can further strengthen or increase your legs. Let's take a closer look at all the beneficial properties of the gel-powder system.
Advantages and disadvantages
Gel powder for nails is an organic system that has its pros and cons. Let's take a closer look at them.
- speed of coating creation;
- no pungent odor;
- ease of use;
- a huge number of shades;
- the ability to create French without brushes and stencils.
- a large number of materials that are easy to get confused in;
- expensive cost of materials.
Strengthening nails
If your nails have any unevenness, bumps or depressions, then gel powder is a great option to even out and strengthen your nails. This procedure is quite simple. It is easy to do at home.
- manicure file;
- buff with an abrasiveness of 240 grit;
- brush;
- primer;
- base;
- gel powder for nails;
- top;
- activator (fixer).
How to strengthen nails with gel powder:
- Treat your nails with a manicure file.
- Remove excess cuticle.
- Treat your nails with a 240 grit buff to remove excess gloss.
- Use a manicure brush to remove excess dust particles.
- Apply primer to your nails as a primer.
- Apply a thin layer of base gel to your nails.
- Dip your entire finger into the pink powder.
- Use a brush to remove any residue.
- Apply the gel to your nails again and dip into pink powder.
- Cover the design with a finishing top.
- Allow the materials to dry and apply the activator.
- File your nails with a buff and brush off any remaining residue.
- Ready!
Nail extension with gel powder
Gel powder for nails will help you achieve strong and long nails. The technology is reminiscent of gel extensions on tips, but still has its own characteristics. Let's take a closer look at the basics of gel powder extensions.
- manicure file with 240 grit abrasiveness;
- buff;
- brush;
- primer;
- base for extension;
- tips;
- gel glue;
- powder;
- top;
- activator.
How to extend nails with gel powder:
- File and shape your nails with a 240 grit manicure file.
- Carefully remove the gloss with a soft buff.
- Remove excess dust with a brush and apply degreaser-primer.
- Apply a thin layer of base gel.
- Place the tips on ½ of the nail and glue them with gel glue.
- Press the tip firmly with your finger and wait 10-15 seconds.
- Cover your nails with an even layer of gel powder base.
- Completely dip your nail into the gel powder.
- Cover the nail with base coat again and dip the whole nail into the powder.
- Use a brush to remove excess material.
- Apply an even layer of finishing top.
- Let the material dry for 30-60 seconds.
- Cover your nails with a special glue activator to harden the materials.
- Correct the shape with a 240 grit buff and remove excess dust with a brush.
Best ideas
Gel powder for nails can create an even finish with perfect highlights. For you, we have collected the best and simplest ideas that will help you create a luxurious manicure for any occasion.
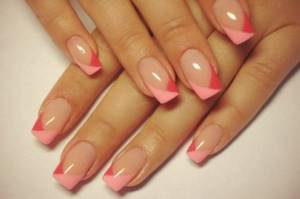
French
French manicure with gel powder is done without the use of brushes or stencils. You don't need to draw a smile line and struggle with drawing mustaches. In this coating, everything is reduced to automation.
- manicure file;
- degreaser;
- base gel;
- white, pink and transparent powder;
- special form (bath) for the French jacket;
- activator (fixer);
- top
How to apply gel powder correctly:
- Use a manicure file to remove the glossy layer.
- It is good to disinfect the nail.
- Apply a thin layer of base gel to your nails.
- Dip your fingertip into white powder.
- Apply base gel again.
- Dip your entire finger into the translucent powder again.
- White powder should fill the tip of the nail, and transparent powder should fill the entire nail plate.
- Repeat the same on all nails.
- Dip your fingertip into the white powder again.
- Dip your entire finger into pink powder to add color to the base.
- Repeat steps 4-10 again.
- Level the surface using a manicure file.
- Cover the design with a fixative and finishing top in 2 layers.
Video instruction
How to make a colored coating using sns gel powder can be seen in the video below.
Color coating
You can give your nails any shade you want. For this you will need a special colored powder. This manicure lasts about 2-3 weeks and is perfect for any look. The standard design is quite easy to do.
- manicure file;
- degreaser;
- gel powder for nails;
- top;
- fixative
How to make a colored manicure using gel powder:
- Treat your nails with a manicure file and remove excess gloss.
- Apply degreaser to your nails.
- Apply one thin layer of base gel to your nails.
- Dip your nails completely into the colored powder.
- Apply the gel again in a thin layer.
- Dip your entire finger into the colored powder again.
- Carefully coat your nails with the finishing topcoat.
- Apply the fixative to the nails and wait 2-3 minutes until the material dries.
Exactly the same procedure for applying glitter powder. As a result, the nails are decorated with an iridescent palette of small glitter. An example of a color coating that was made using gel powder can be seen in the photo below.
Gel powder for nails is just starting to gain momentum. It is still quite difficult to find it in cosmetic stores. Due to its high price, it is currently not available to everyone. But now you know what she is.
How to make mirror glitter for nails with pigment?
The pigment is a coloring agent. Outwardly, it looks like small particles; the tones of the pigment particles can be different. For mirror design, chrome pigment of different colors is used.
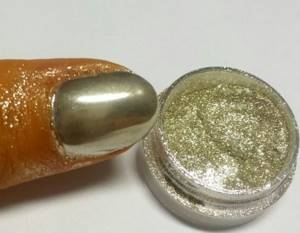
Metallic manicure on gel polish with chrome pigment
Benefits of the pigment:
- Using this substance you can create nail plate designs of varying complexity.
- Its light particles are securely attached to the surface of the nails
- Low cost, low consumption
- If the pigment is applied to gel varnishes, it will be resistant to any external influences (it will not be erased within 2-3 weeks)
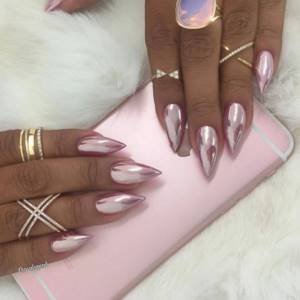
Delicate, pink mirror manicure with pigments
Metallic manicure. Step-by-step instruction
- Make your nails neat. Remove the cuticles, sharpen them with a nail file so that they are the same size
- Degrease the plates with a special compound
- Apply base (gel polish)
- Dry it
- When the gel sticks slightly to your fingers, apply the pigment
- You can rub it in with your finger, or you can apply it with a brush.
- Carefully get rid of excess grains of pigment
- Apply coating on top
Mirror nail design with pigments
IMPORTANT : Try to shake off all remaining pigment dust from your nails. Otherwise, small grains of pigment will remain and spoil the appearance of the manicure.