Adviсe
- Bun forever
- How to do a high bun
- Low bun for medium hair
- How to decorate the bunches?
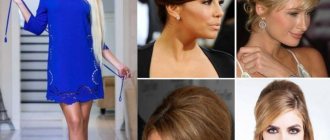
Thanks to laconic, comfortable, elegant or casual bun options, women and girls look stylish and fashionable in any look. This hairstyle is now well-known and popular, because making a bun for medium-length hair is very simple, and the result is impressive and pleasing: both the hostess and those around her.
Hairdressers and stylists call shoulder-length hair medium. Or 2-3 fingers longer. This length is always relevant due to its ease of care, but for the last three years it has been at the peak of fashion.
Bun forever
The history of bun styling goes back to ancient times.
Surviving ancient frescoes, statues and mosaic drawings confirm its popularity in Europe as an element of hairstyle back in antiquity: during the Minoan civilization and among the ancient Greeks and Romans. From the Rococo era, ancient records of advice on how to make a knot decorated with a velvet bag have been preserved. Classicist hairstyles also used a curled roll of hair along with framing the face with curls on the sides. Well, judging by the paintings of the great women, the locks of Renaissance women were also collected in low buns.
In China and Japan, even men wore similar buns, not to mention women, who could make two “donuts” on the sides at once. Such variants are often found in modern Japanese manga and are very popular among young people. Other peoples also made “horns” from hair, for example, North American Indians and some Slavic tribes. Hair gathered high on the back of the head, secured with a net for security, was worn by ballerinas for a long time, which is why the hairstyle was at one time called the “ballet bun.” In the 50s hair, tied up in a neat bun, along with the “bebette” complemented the new look style. And in the eccentric 80s, false hairpieces also made a splash.
Varieties of buns have always been used by women. But in the eventful modern life, this hairstyle has gained real recognition. “Bumps” and “ghouls” are done low at the neck, high, almost at the forehead, on the side and somewhere in the middle. There doesn’t have to be one bunch; you can make two, three, or more, combining them into a single composition. Or deliberately separate it, highlighting it with various mischievous accessories. Bunches look unusual when combined with different braids around the hairstyle, and in it itself.
Man buns are also becoming common and fashionable. Brutal men who have grown their hair tie it in a bun, even buy men's hairpieces for this purpose. Artificial extensions are a fun new product for those who don’t have enough hair length, but really want to be on trend.
Bun options for medium hair
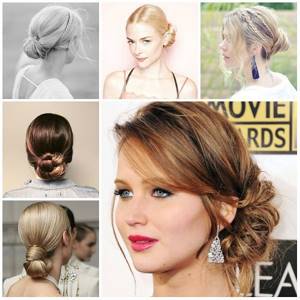
Head knots are so popular that they can be seen on many famous world actresses. Learning how to collect hair is not difficult, it is recommended to follow the step-by-step instructions. After some time of practice, the curls will come together quickly.
How to make a perm using a roller
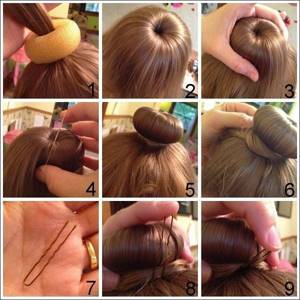
Option 1 For this hairstyle, purchase a special wide donut. The curls are carefully combed up and secured with a thin elastic band into a ponytail. It rises its full length above the head. A roller is threaded onto the ends, about ten centimeters long. The hair is distributed around the roller so that it is invisible. Note that a bun with a roller makes the styling more voluminous.
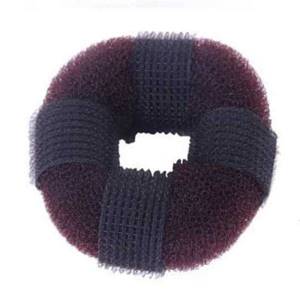
“Donut” for a bun
The ends can be wrapped under a donut. The roller is folded down to the base of the thin elastic band and discreetly secured with pins around the entire circle. Varnish will help prevent strands from being knocked out.
It is better to choose a bagel according to your hair color. If during the working day the strands move to one side, the device will go unnoticed, as it will blend in with the hair color.
Option 2 You don’t need to twist the bagel from the ends, but straight through it to the base of the tail. Then all the hair is laid on a donut, pressed and secured with another elastic band at the base. The ends of the strands are carefully tucked in and secured with hairpins. To hide possible flaws, the hairstyle is tied with a beautiful ribbon at the base or a thin scarf.
If you don’t have a donut-shaped device at hand, you can use a regular sock. It is cut off at the fingers and twisted. Using the sock is very comfortable. For rare strands, you can make a roller from thin sock fabric.
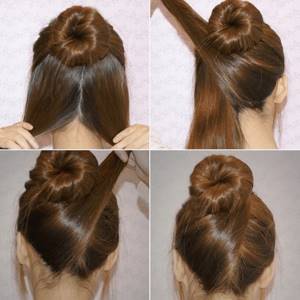
Casual styling
This image does not contain formalities. A bun in this style looks a little careless, as if you slept with it all night, got up, smoothed it and went. The image evokes ease and lightness. It's easy to create a casual uniform.
Casual style bun
A small part of the hair at the back of the head is twisted in the form of a rope, laid in a snail shape and secured with hairpins. The rest is divided into four strands. There should be two strands at the front and back on both sides. First, the left rear strand is twisted and laid clockwise around the resulting snail. Fixation with studs will be required. Then the same manipulations are done with the right strand from behind counterclockwise. The front left wraps the bun counterclockwise and the front right completes the bun.
If your hair is heavy and thick, you can additionally secure your hairstyle with hairpins and spray it with hairspray.
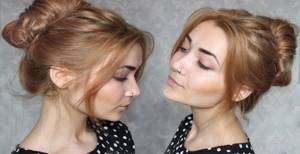
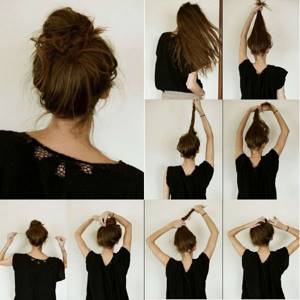
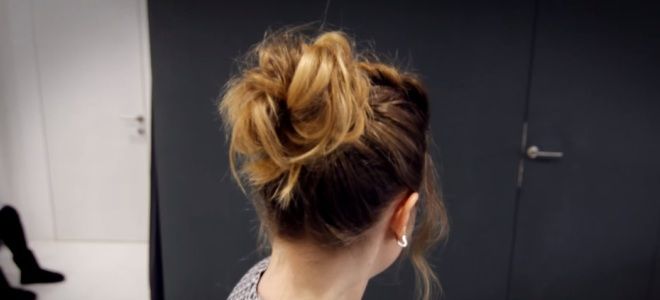
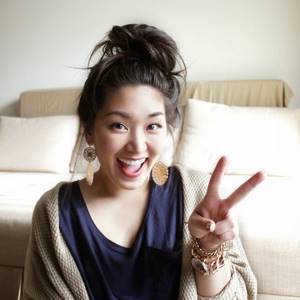
High messy bun
Option 1 Messy buns work well without using elastic bands. The hair is divided into two parts - front and back. The back of the hair is lifted and wrapped around the hair at the top in the form of a ribbon. You should get a tail without an elastic band. The ends of the lower part are secured with pins. The remaining tail is loosely wrapped around the lower fixed part and secured in front with a hairpin. After creating the bun, the curls in the lower part of the head sag carelessly, and strands in the bun are knocked out. Option 2 Hair is gathered into a loose ponytail in the middle of the head. The required number of strands are separated from the tail and wound in a chaotic manner around the elastic band. If the strands are too thin, you can comb them with a fine comb before wrapping. The hairstyle is fixed with hairpins, bobby pins or bobby pins.
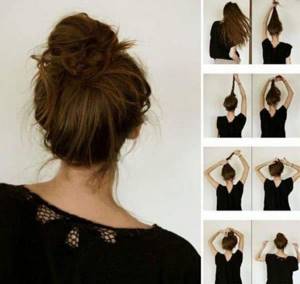
Messy bun
Node based
The hair is divided into two parts and combed thoroughly. The head must be lowered back to create more knots. Simple knots are tied along the entire length. The hairstyle is fixed with hairpins and secured with varnish. To prevent the strands from falling apart, they can be lubricated with foam before weaving.
Knot-based laying
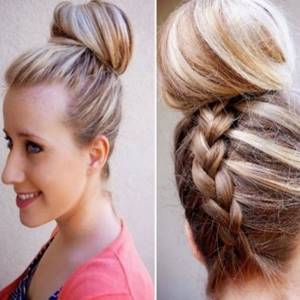
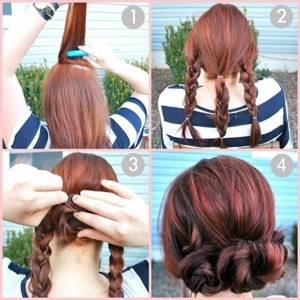
Braiding
The hair is divided into three equal parts and braided into wide braids. For a voluminous shape, they can be woven by knocking out strands. Each braid is secured with a thin elastic band and wrapped. The bundles are secured with hairpins. The close distance between the braids creates the effect of a one-volume bun, which is fixed at the bottom.
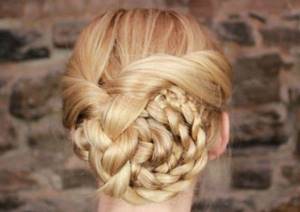
Bun of braids
Option 3
The easiest way is to collect the ponytail, braid it and wrap it around the base of the ponytail.
Volumetric hairstyles on the side
Side buns are created on the basis of side braids across the entire head. To diversify the bun, you can weave different types of braids - “spikelet”, “French braid”, “fishtail” and others. The hair from one part of the forehead is divided into three parts, capturing strands, the braid is woven to the middle of the back of the head and the other side.
Why hair ends split: effective methods to combat the problem
See more examples of wedding hairstyles for medium hair here
All about children's hairstyles for thin hair: https://guruhair.ru/detskie/prichosky-dlya-detey-mladshego-vozrasta/kak-prichesat-rebyonka-s-korotkimi-volosami.html
At the base of the braid, the hair is pulled into a tight and very thin elastic band. For volume, the strands in the braid are slightly knocked out. The rest of the strands are combed and gathered into a knot with a snail. It must be secured with pins and varnish.
Laying on its side
Interesting tips
To prevent a bun on medium hair from looking scanty, you can not collect all the strands, but leave a few curls. They can stick out or frame the oval of the face. The strands can be left straight or curled with a curling iron.
Bun hairstyles are also suitable for medium hair with bangs. Before weaving the knot, you should carefully separate the bangs so that there are no short strands in it.
How to do a high bun
A high, smooth bun for those with medium-length hair is a great way to style it for the summer, because it opens up your neck and makes it less hot. For winter use as an office or evening option. But it is not suitable for everyday hairstyles, because on frosty days it is difficult to hide under a headdress, and the hood, according to reviews, falls off.
Collected hair on the top of the head emphasizes the oval shape of the face and the elegance of the neck. When the swan-like appearance of the neck is in doubt, it is better to style it lower. If done casually, it becomes appropriate for a casual style. For sports - make it tight and small, or disheveled and careless.
For medium hair, high buns should be done like this:
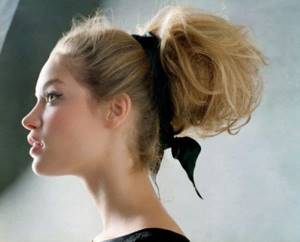
Gather your hair into a ponytail. The higher the better. Twist the strands around the base until smooth, securing each with bobby pins and bobby pins. For a casual effect, lightly tousle the hair, slightly pulling the strands out of the styling. You can comb your hair first, then the negligence and splendor of the final result will increase. The “guli” option on the very top of the head does not look very good on girls who are too tall.
A more voluminous bun is very easily obtained using an overhead round roller, which is placed on the tail. Then the curls are evenly distributed in a circle and a loose elastic band of medium thickness is put on. The ends are wrapped clockwise, hiding the accessory, and secured with hairpins. You can also strengthen it with a thick elastic band, an elastic band or a braid woven from a previously left curl. An overly curvy model may not be suitable for fragile and thin women.
It is convenient to make buns for medium hair using a twister. A foam accessory with a flexible wire inside allows you to fix parts of your hair in the desired position. If you get used to it, you can make a “doughnut” in a matter of seconds. And unlike a round roller, the “twister” allows you to make the “donut” not only smooth and neat, but also, if necessary, free. It is not difficult to create a high original bun with a braid at the back of the head. Throw your hair forward, bending over, and from the bottom up from the neck, braid a French braid to the top of the head. Tie the remaining curls into a ponytail, smoothing them away from the forehead for neatness. Then proceed as usual. Such an adjacent braid, and more than one, can be woven both from the side and from above.
You can make a bun with an original accent like this: make a “donut” from the upper part of the hair, like a “malvina”, and divide the lower part into two halves. Crossing the ends, “wrap” the bun and secure the ends.
It is easy to style a lower bun by dividing the hair along the parting, separating and “tying” the strands into knots from top to bottom. From this composition, make a three-dimensional structure, which is secured with pins.
The foam rubber “donut” can be perfectly replaced with the following life hack: take a rolled up nylon stocking without a sock part or a similar “pipe” from a sock. The denser the material, the larger the bun will be.
The use of mousse, gel, foam or varnish adds reliability to the structure and diversifies the result. According to reviews, bobby pins hold tighter than stilettos.
Types of buns for medium hair
High bun
This hairstyle is suitable for both weekdays and special occasions, if you choose the appropriate accessories for it. It will look beautiful on any face type if the bun is positioned correctly. If you have a round or square face, then it is best to place it on the top of your head. All hair is fixed with an elastic band, after which the tail is backcombed and the hairstyle is given the desired shape using hairpins. If you have an elongated or triangular face, then it is better to place the bun below the crown, closer to the back of the head. If done high, it will visually lengthen your face, which will affect your appearance. For an oval face type, any option is acceptable.
high bun high bun
Bun with a donut
This hairstyle is performed using a special device called a donut. You can also use part of a sock. To do this, you need to cut off the elastic band and twist it into a rope. To create a hairstyle, you should first decide on the place where it will be located, following the example of the previous bun. After this, all the curls are wound onto a donut. The hairstyle is ready, but it is only suitable for everyday life. If you want a more formal option, then you should not fix all the curls on a donut or on a sock. You can braid the ends and wrap them around your hair, or you can curl them and leave them in a chaotic manner. Then with this hairstyle you can even go to a pretentious social event.
bun using a donut
Bun for curly hair
If you have natural hair, then you can also make a bun. If your curls are straight, then for this hairstyle you should first curl them with a curling iron or curlers. After this, you need to gather the strands into a ponytail and pin up the remaining hair with hairpins. This hairstyle can be styled with strands that should be pulled down the cheeks. However, you don’t have to do this if you feel uncomfortable with them. This hairstyle is suitable for a holiday.
for wavy hair for wavy hair
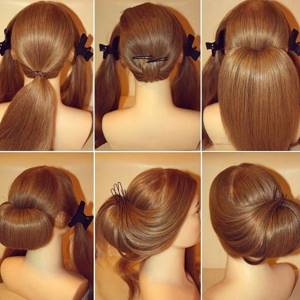
Volumetric beam
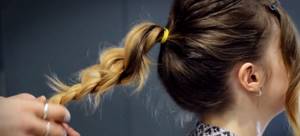
In this case, you will also need to curl the curls, but not their entire length, but only the ends. After this, all the hair is fixed in a ponytail, but during the last pull through you should not pull out all the curls. You need to leave the tip, which is rotated several times around the beam. This hairstyle can be done both on weekdays and on holidays.
volumetric beam volumetric beam
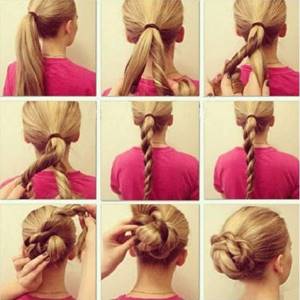
Bun-braid
To achieve this hairstyle, you should braid the braid in a classic style, wrap it around several times and secure with hairpins. This strict hairstyle is suitable for those girls who have a strict dress code at work, but at the same time want variety.
bun-braid bun-braid
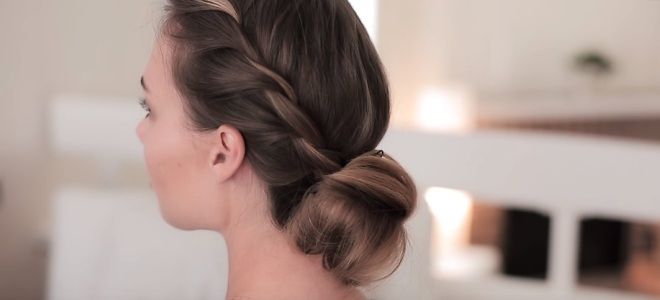
Low bun for medium hair
A low bun is an absolute favorite among similar styles for medium hair. It is suitable for creating a romantic look, a glamorous and elegant look, as well as an everyday one. Decorated with curled curls, braids, and accessories, it will look new every time. Suitable for different body types, for any type of face, including oblong and square without bangs, which is a contraindication for highly curled curls.
How to make a low bun for medium hair:
The simplest option: distribute the upper part of the hair into two parts along the parting and twist each strand symmetrically inward. Secure with an elastic band. By inserting your fingers from below, stretch the end of the resulting tail between the two strands. Straighten the resulting knot and secure it.
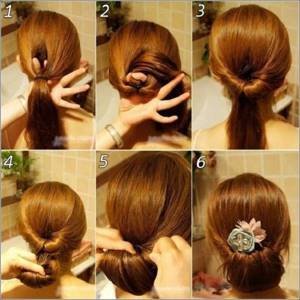
Evening version of a low bun: divide your hair into three parts. The temporal part, divided along the parting, is secured with “ducks” so as not to interfere. Make a ponytail from the bottom, lift it and secure it carefully with bobby pins. You will get a voluminous ponytail, the ends of which must be bent, secured with hairpins, and the temporal parts of the hair must be used to emphasize the elegance of the styling. Spray generously with varnish.
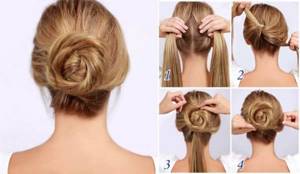
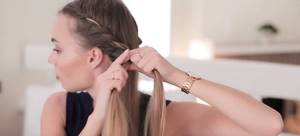
You will get a romantic bun if you divide the curls as in the previous method, but also divide the side ones into two strands. Twist the lower ponytail with a flagellum, wrap it around itself several times, and secure it with bobby pins. Then do the same with each strand.

Similar to the one discussed above, it is easy to make a low bun from a tail divided into two parts, twisted with a rope. Such a casual, everyday bun can turn into a romantic one if you add ribbons, elastic bands with flowers, or wrap it in a delicate silk scarf.
Beautiful knots are obtained from voluminous braids. But if you don’t have the time or skills to weave masterpieces, then three simple braids, wrapped in “buns” and styled with hairpins and bobby pins nearby, allow you to get a wonderful multi-part bun, suitable for all occasions.
Any method of styling your hair in a bun can be supplemented by curling or pulling out curls using a curling iron or combing. Then each time you can make a slightly different version of the knot, which will add variety and zest to the images.
How to make a bun for medium hair?
Forming a bun is very easy even without prior practice. There are many ways to create a bun on your head for everyday activities, work or school, sports, special occasions and romantic dates. In most cases, it will only take 5-10 minutes to create your hairstyle. Evening styling variations will require a little more time and effort.
Bun for medium hair for every day
Different types of this hairstyle have become a trend in previous seasons and remain in the leading positions of current fashion. The most popular is a high, messy bun for medium hair at the crown or back of the head. It can be done with a donut or a twister clip, but it’s easier to make do with your own volume of curls. To ensure that a bun on medium hair lasts all day, it is better to pre-treat the strands with mousse or foam with a fixing function. Additionally, a varnish that does not glue the strands will help secure the styling.
A bun for medium hair is quick and beautiful (all manipulations can be easily done by yourself):
- Make a tight ponytail at the back of your head and secure it with an elastic band. Lightly curl the curls.

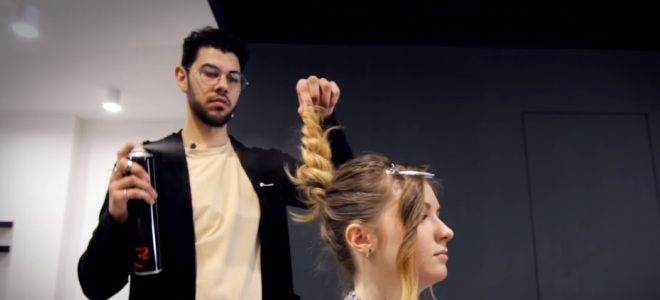
- Divide the strands into 2 parts, twist them into a not very tight rope.
- Holding the ends, straighten it with your fingers, adding volume. Secure the air cord with varnish.
- Wrap it around an elastic band. Secure with pins and bobby pins.

- Let the ends out or hide under the bun.
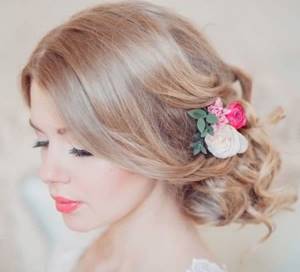
Bun for medium hair for a celebration
If you need a romantic holiday hairstyle, it is optimal to make a low bun with decoration. Even elegant buns for medium hair can be done quickly and easily with your own hands, especially if you have a certain skill. Curls should be clean and dry; you can pre-treat them with foam or mousse.
Beautiful bun for medium hair:
- Select thin strands on the sides. Weave them into braids or twist them into openwork strands. Secure with small elastic bands at the base of the neck.
- Combine the resulting tails into one. Secure it with a thin elastic band.

- Lightly comb the tail, just to give it fullness. Wrap your hair around an elastic band and temporarily secure the bun with a stick or comb handle.

- Secure the bun with bobby pins and hairpins. Remove the stick.

- Spray your hair with hairspray. You can decorate the bun as desired.
How to decorate the bunches?

The choice of accessories depends on the event for which the bun is made:
For an evening out, stilettos and combs with rhinestones, pearl threads, and velvet ribbons are appropriate. It is possible to make a hairstyle with a Greek headband and headbands: with stones, beads, fresh or artificial flowers. For a casual date, you can decorate your buns with original clips, elastic bands, hairpins, stylish headbands or headbands. For an everyday look, it is convenient to secure the knot with a thick elastic band or a twisted neckerchief. To prevent strands from coming out, flat clapper clips are suitable.
The “correct” decorations for buns will allow you to set the right accent and make your look expressive and memorable.
In any case, a fashionable hairstyle will add charm and confidence. The bun does not require much time to style; skills are acquired quite quickly. It is comfortable and versatile, suitable for children, youth and mature women. The main thing is to choose exactly the individually suitable option. If the owner of medium hair needs to look well-groomed and stylish, and is given a limited period of time for this, there is nothing left to do but make a bun.