What adorns every woman? Long, beautiful, well-groomed hair! This statement has firmly entered the consciousness of any beauty. But sometimes all this splendor is inappropriate, and simply gets in the way. And in such situations, the most universal hairstyle comes to the rescue - a ponytail. Today we will talk about this method of installation, consider the design options, and look at how to make the most interesting techniques step by step.
High ponytail
The high ponytail has a lot of options. But there is one characteristic feature: the collection point of the strands is at or above the midline of the back of the head. Please note that there are certain requirements for this hairstyle:
- The length of the hair in the lower part of the occipital area should be at least 10 cm. Otherwise, the hairs will simply fall out and the hairstyle will lose its neatness;
- Purity. The times when collected hair saved an unwashed head are gone. In general, if the hair “knew” water more than a day ago, this is a terrible bad manners. But that's a separate conversation.
- Coloring. Regrown roots will become much more visible if you collect your hair high on the crown. Moreover, there is a danger of unsightly color separation. Gray hair is especially noticeable.
- Shape of the skull and ears. Oh yeah! High styling exposes all the flaws in the line of the head and ears. There are, of course, ways to hide them, but it is better to give preference to another version of this hairstyle.
- Neck, posture and body composition. On the one hand, a high gather can visually lengthen a short neck. But it can also expose flaws.
- Face oval. There are also a lot of points here that can ruin or improve the appearance.
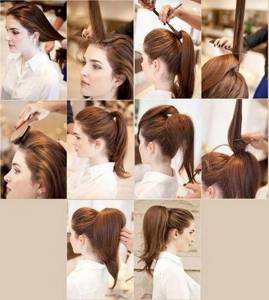
Making a high ponytail couldn't be easier. The hair must be thoroughly combed and the strands raised above the midline of the back of the head. If desired, you can treat it with any fixing means: foam and styling gel or varnish. Just without fanaticism, otherwise the hairstyle will be sleek and the head itself will seem dirty.
Prepare a retainer: elastic band, hairpin, hairpins. In general, any device that will securely fix the hairstyle. Pin.
Method 1. Casual ponytail
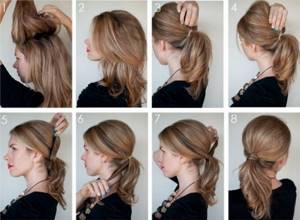
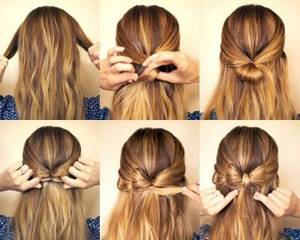
This beautiful hairstyle is ideal for going to work and will also make you look well-groomed and elegant. To work, you only need an elastic band and a comb. If your hair is frizzy, straighten it with an iron.
- Comb your hair gently.
- Near your forehead, take a small section of hair and backcomb it a little. Smooth the top with a comb.
- Carefully gather the hair from the sides and back into your hand and tie with an elastic band.
- Take a thin curl and wrap it around an elastic band, pinning the end with a bobby pin.
- Divide the finished tail into several equal parts.
- Throw them over the top of your head, leaving only one at the bottom.
- Comb each part, lowering it one by one.
- Carefully smooth the top one with a fine-toothed comb.
Low ponytail
This is an on-the-go option. Here you don’t even always need a comb: just collect the strands as they are, slightly straightening them with your fingers. Low fixation does not require symmetry. The hairstyle can be pulled to one side, placing the curls on the shoulder. If “roosters” suddenly form, artificially add a few more, pulling out the strands with your fingers and getting a fashionable hairstyle.
This method perfectly hides “bump ears” and an irregular head shape. Even regrown roots will not attract attention; they will simply merge, smoothly turning into the main color.
Possibilities for combed hairstyles
A regular ponytail can also be done using the backcombing technique. The principle of execution is the same as in the traditional case, only before decorating the tail on the top of the head you need to backcomb it.
You can easily style this hairstyle every day and always look great.
The backcomb is done on the top of the head, after which the hair is combed to one side and secured with hairpins. In this case, the strands can be left with loose curls or braided into a loose braid.
Photo:
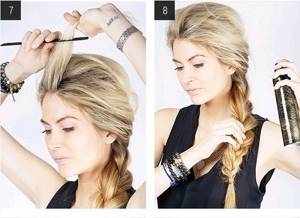
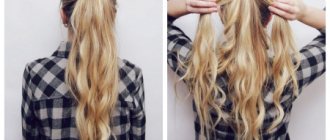
Another “every day” hairstyle is a braid combined with a backcomb.
The hairstyle is done step by step as follows:
- A small backcomb is done on the top of the head;
- That part of the strands that has not been combed is thrown back, smoothed and weaved into a regular braid; Along the way, stops are made to slightly stretch the braided strands, approximately every 3 links of the braid. With this simple method, the braid will gain volume and slight negligence;
- To secure the braid, it is fixed with an elastic band, and the remaining tip is combed.
Short strands can also be styled using combing. Both the boy's haircut and the classic bob and bob look completely new if they are styled with backcombing.
However, it is not recommended to do this styling every day. Stylists advise using backcombing on short strands when doing evening styling or to create a romantic look.
To do this, a strip of strands in front, about 1 cm wide, is left untouched, and the rest of the hair is combed. Then the untouched layer of curls is placed on top of the combed strands and fixed with varnish.
Any hairstyle can easily be made unique by adding accessories to its design - headbands, elastic bands, tiaras, headbands, hairpins or flowers.
Photo:
Mastering new hairdressing techniques leads to new types of hairstyles.
We hope that this article will allow you to master additional hairdressing skills, and new hairstyles will make your appearance even more attractive.
19209 Published February 12, 2016
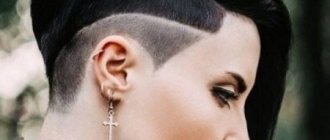
With a shaved temple
Creative and bold! Shaved temples or the back of the head blew up the hairdressing fashion several years ago and successfully remain on its Olympus. Once upon a time, this style meant adherence to a subculture. But over time, everything changed. And now the most daring fashionistas are sporting shaved temples and the back of their heads. But the pinnacle of skill is the drawing on the shaved area. What kind of beauty is not drawn with the help of a master’s machine!
The advantages of this hairstyle are obvious:
- Bright and eccentric;
- Gives visual volume to hair that lacks natural density;
- You can maintain your hairstyle yourself if there is no pattern;
- Suitable for any age and style.
There are also disadvantages:
- You can't change your hairstyle with a click. It will take a long time to grow;
- The result may be disappointing.
As you can see, there are quite a few downsides. Therefore, if your soul asks for drastic changes, then shaved temples are an excellent option.
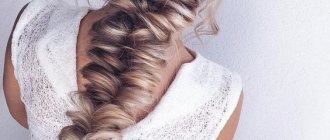
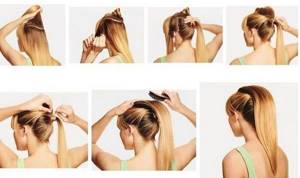
Shell laying
You probably could see this styling on the pages of all fashion glossy magazines. It is considered surprisingly luxurious, but at the same time remains, perhaps, the simplest to implement.
- Pull your hair into a ponytail, but don't pin it up at this stage.
- Twist the resulting tail into a rope.
- Make a loop on your head from the rope and thread the tip of your tail through it.
- Secure the resulting structure with pins and spray with varnish. It is advisable to use a strong hold product so that the hairstyle retains its original appearance throughout the day.
To make your hair fall into the shell more easily and prevent frizz, initially treat it with mousse. Remember that ideally the hairstyle should be absolutely smooth and even.
You can decorate the shell with wide side combs, which, for example, are used to create a wedding version of it. Also, having adapted to the classic version of this hairstyle, you can subsequently create a double shell, with curls released at the end, as well as other types of styling.
Haircuts for guys with shaved temples: fashionable modern hairstyles
See more examples of women's haircuts that do not require styling here
Currently, there are several hundred of them, and, perhaps, all of them are incredibly popular among women. This hairstyle is very practical and appropriate under any circumstances.
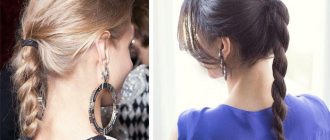
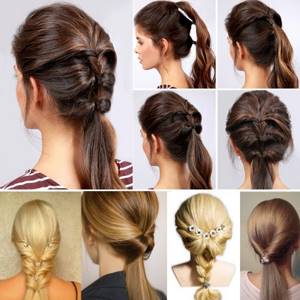
Ponytail
Universal and endlessly loved by absolutely the entire female part of the planet. Any height. But how is it different from the usual one? And the whole point is that the elastic band is not visible at the ponytail. It is hidden by a strand that wraps around it. Well, then there is complete scope for the implementation of any ideas:
- Classic. The strand covers the elastic:
- Tourniquet. The wider the clamp, the more interesting it is. The tourniquet can also be closed with a strand;
- Curling after assembly;
- With weaving. First the braid is braided, but not completely. Any weaving: in the center, side, double. Then the braid is fixed with an elastic band, which is hidden by a strand. The remaining length remains free;
- Reverse weaving. First you need to collect the strands, and only then braid it into a braid using any technique. Very suitable for school, since all the hair is collected, which is important for physical education lessons;
- Flashlight. Great for those who have shorter temporal strands than their occipital strands. It's just a double mount. The first to be fixed are the temporal and parietal strands above the midline of the back of the head. The elastic band is hidden using a strand. Then the remaining hair is collected and fixed again on the neck line. The elastic band is again hidden by a loose curl.
- Greek. A variant of the well-known hairstyle, when only the temporal strands are gathered into a ponytail, while the parietal and occipital strands remain loose.
In general, no matter how wildly the imagination flows with the design of the tail, only one thing is important: the elastic band must be hidden by the curl. This is the main condition of the hairstyle
You might be interested in:
- trendy hairstyles 2022;
- fashionable bob haircuts;
- fashionable hair coloring 2022.
How to decorate the ends of the ponytail?
Decorating the front of the head in a ponytail hairstyle is common, but decorating the ends is what we will do now.
Photos from left to right:
- Tail - tourniquet
- With weaving
- Tail with 3 flagella
- Ponytail with ribbon
- Ponytail + 4-strand braid
- Triple braid
Divide the tail into 2 parts and twist it into a rope, twisting each strand and intertwining it with each other.
With the ponytail tied, we separate the strand and begin to weave a braid with a one-sided tie. We weave along one side and wrap the tail around the outside.
Divide the ponytail into 3 strands. Twist the strands one by one, tie them with an elastic band, making sure that the strands move from left to right and from top to bottom.
We braid a braid of 3 strands, with 2 strands being a ribbon. Braid and tie the ends with an elastic band.
We analyze in detail how to weave a braid of 4 strands, described here. Experiment with a combination of hair and ribbons.
We braid a classic braid, but divide the separated strand into 3 parts and stretch it, while using foam to give it structure.
The ideas are presented in the photo, see which option did you like best?
Video on creating 6 hairstyles based on a ponytail:
For medium hair
A medium-length ponytail is no different from a regular ponytail, except for the design decisions of the hairstyle. Just a few things to consider:
- Length. Plays a role because of the final result. There is a risk of getting a mouse tail. This is why you should not make a high gather for a medium length;
- State. Split ends will be clearly visible at this length. Therefore, you should give preference to low fixation;
For a medium-length ponytail, it is better to come up with decor from accessories rather than try to create something with the tail itself, because if braided or twisted into a rope, it will become even shorter and will look somewhat ridiculous.
Backcombed hairstyles: rock star
Backcombed hairstyles should not be associated with old-fashioned, bulky styles. Backcombs can be used in many modern and even trendy hairstyles. Backcombed hairstyles can become the basis for a bright look. The bouffant will come in handy if you want to create a punk or retro style hairstyle. To do this, you need to lift up the hair in the frontal and occipital areas, and, on the contrary, at the temples, comb it smoothly or leave it flowing. Hairpieces, hairpins and bobby pins will help with this.
Backcomb + loose braid: why not?
It's easy to feel like a diva with an updo bouffant hairstyle.
A bouffant does not necessarily imply a shocking image. For example, a lightly brushed robe can be worn to work or to college. Combing only on the back of the head and forehead visually elongates the face, so it is especially suitable for chubby girls.
If you want to make an evening hairstyle with a backcomb, pay attention to babette and shell. Singer Zendaya's shell hairstyle
Credit: Rex by Shutterstock
Singer Zendaya's shell hairstyle. Credit: Rex by Shutterstock
Backcomb hairstyle: how to do it
If we've convinced you to try a bouffant, it's time to explain how to do it. To do this, we made a special video instruction:
By throwing your hair to one side, you will achieve even more volume.
The bouffant hairstyle can exist on its own without additional buns and braids. Those with long hair can toss it to one side to create extra volume.
The bouffant on short hair also looks bright.
Take a comb with thin, frequent teeth and use it to comb the hair several times in the root zone along and against the hair growth. Preliminary use of the TIGI Bed Head Motor Mouth volumizer and fixing the hairstyle with varnish, for example, “Natural Shine” from the “Clean Line” brand, will help enhance the effect significantly.
Volume
Backcombed hairstyles for medium hair
With backcombing, you can create interesting everyday hairstyles for long and medium-length hair.
Backcombed hairstyles for medium hair can be a good everyday solution. The main thing is to learn how to “get out” of the backcomb in the evening. Regular use of Dove Nourishing Care shampoo and conditioner with ultra-light oils will help detangle your hair easily. With shampoo and conditioner in this series, hair becomes smooth, strong and less tangled.
Nutrition
Curls and backcombing for medium hair
The bouffant combined with curls looks like a real mane.
A bouffant on medium-length hair will look luxurious if the hair is curled or naturally curly. Short hair is simply lighter than long hair and holds volume better.
For long hair
Girls who have wealth in the form of long hair can find it difficult to choose a hairstyle. The simplest is the usual method, but it can also be made to look impressive.
Among the main variations: low, when the bun is closer to the neck, medium - a bun at the level of the back of the head, and high - collected strands at the top of the head.
It is important that the tail does not get lost under clothes, otherwise the view of such wealth will disappear and your “zest” will disappear. The good thing about the long length is that it can be assembled however you like. Various techniques are used:
- Weaving. Both the assembled part and the body of the tail itself;
- Perm;
- Creation of "flashlights";
- Assembly of double and triple tails;
- Masking of fixing elastic bands using separate strands.
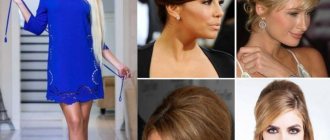
Beautiful hairstyles: stylish and simple
Those with long hair will be able to try many options. The simplest, but quite interesting one is the “little dragon”. The technique of weaving such a braid is quite easy to master. On average, it takes 15 minutes to create a hairstyle. The advantage of this hairstyle for long hair is that it is universal. It is suitable for both naughty girls and respectable business ladies. “Dragon” is the favorite hairstyle of show business stars: Jessica Alba, Rihanna, Beyoncé. The braid can be easily diversified with accessories. The hairstyle can have different types of arrangement. It looks great on its side, at an angle, vertically or in a semicircle.
Hairstyles with dragon braid, photo
Hairstyles with dragon braid, photo
Beautiful and easy hairstyles in casual style are small braids at the temples. A striking representative of this option is the talented actress Kristen Stewart. To do this, you need to braid two pigtails on the side and secure them under the hair.
Beautiful and easy hairstyles with braids at the temples for medium hair, photo
Beautiful and easy hairstyles with braids at the temples for long hair, photo
An incredibly fashionable style this season is Provence. The basis of this hairstyle is a low ponytail and flowing curls. You can do this hairstyle in just 5 minutes. Ribbons of any color and headbands with flowers can be used as decoration. This hairstyle can be done not only for long, but also for medium hair.
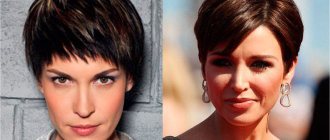
Beautiful and easy hairstyles for short hair
This season, deliberate carelessness in hairstyles will be more relevant than ever. Those with a creative pixie haircut can try different options. This haircut looks especially interesting in combination with a large curl. How to make such an easy hairstyle for short hair with your own hands? Yes, very simple! To do this, the hair is first treated with mousse, then a large curl is made with a curling iron to the left or right side. The resulting “wave” must be fixed with varnish. A bright and shocking hairstyle is ready.
Beautiful and easy pixie hairstyles with curly bangs, photo
Beautiful and light textured pixie hairstyles with light curls, photo
Many interesting variations of easy and quick hairstyles can be done with a bob haircut. Weaving is especially popular. It can be made in the form of a rim. This hairstyle has both aesthetic and practical significance. The French braid headband can be an excellent hairstyle option for every day.
Beautiful and easy hairstyles with a braid in the form of a headband, photo
Beautiful and easy hairstyles with a braid in the form of a headband, photo
The bob haircut looks great. For everyday styling you will need a hairdryer and a large round comb.
A beautiful hairstyle in the style of the 60s looks elegant. To do this, slightly damp hair must be treated with a volumizing spray. Then curl the curls with large-diameter curlers. Next, the hair is dried with a hairdryer. After the curlers are removed, the hair should be combed with a wide-tooth comb. Fix the hairstyle with medium hold hairspray.
Beautiful and easy bob hairstyles with curls, photo
Beautiful and easy bob hairstyles with curls, photo
You can make two French braids on shoulder-length hair. To do this, you need to comb your hair and make a straight parting. A strand is taken from one side and braided into a braid. You need to move from the top to the back of the head. Repeat the action on the other side. Secure the ends with a small hairpin and lightly spray the finished hairstyle with hairspray.
Hairstyles for long hair with two beautiful braids, photo
Beautiful and easy hairstyles photos
Quick hairstyles are a great way out in everyday situations. They are easy to do, but the result is always pleasing. You will definitely find interesting options for quick and easy hairstyles that will help you remain charming regardless of the situation or setting.
Beautiful and stylish bob hairstyles, photo
Beautiful and easy hairstyles for long hair, photo
Beautiful and easy hairstyles for long hair, photo
Beautiful and easy hairstyles for short hair, photo
Beautiful and easy hairstyles for medium hair with a bob haircut, photo
Beautiful and easy hairstyles for medium hair, photo
Easy hairstyles with a braid, photo
Short tails
This hairstyle is not suitable for all owners of short hair. A ponytail will only work if the hair length is at least to the level of the cheekbones. Bowl haircuts and pixie haircuts are absolutely not suitable for this hairstyle, because... it will be impossible to collect the hair, or it will be very small, and from behind it will look like the stub of a paint brush. This option is more suitable for young girls.
There is another solution for very young fashionistas: 2 ponytails. An excellent option for those who have a bob haircut, especially a short one. They can be made low, along the midline and at the borders of the temporal and parietal zones. Most often, two ponytails are made for girls or teenagers. But low ponytails are also quite suitable for older girls.
Ponytail hairstyles for dates
Mohawk with Dutch weave
A bright look for daring people, as well as for going to a club or party.
Divide your hair into two parts. Temporarily secure the bottom one with an elastic band or clamp.
Braid the top one in the form of a Dutch braid: it consists of three strands and is similar to a French one. Pull the strands out of the braid to make it appear even fuller.
Tie the remaining hair into a high ponytail, including a braid. Fluff it up.
Textured low ponytail
The combination of a smooth crown and fluffy tail is the ideal solution for a romantic dinner.
Make a deep side parting. Using a corrugated iron, create root volume and lightly backcomb the hair in the temporal area.
Create an asymmetrical ponytail. You can leave a strand of hair hanging out near your face so you can hide an elastic band under it later.
Use a curling iron to add texture to your ponytail. Curl your hair so that the ends of the strands do not curl. Comb your curls with your hands and treat with structuring spray.
High ponytail in retro style
Create a tight high ponytail (don't forget to hide the elastic), leaving a section of hair at your forehead and laying it to one side. Place a roller under the tail and secure it with pins at the desired height.
Divide the hair from the tail into two parts. First, comb and distribute the bottom one and then the top one over the roller. Lay out your hair so that the roller is completely covered.
Ponytail with bangs
The most popular ponytail with bangs is the classic ponytail. The hair in this hairstyle should not be curly. If you have curls, straighten them with an iron and tie them in a high bun. This is a universal hairstyle, that is, it will suit any bangs.
Please note that there are not as many beautiful options with bangs as we would like. Basically, bangs are complemented by thin strands at the temples, which can remain straight or curled. The strands can be released on one side or on both.
About the tail - a story
Women began making their first hairstyles in ancient times, using combs made of bones and wood.
As civilized society developed, hairstyles became more beautiful and varied, women found new ways of styling, and decorated their hair with floral wreaths and ribbons.
By the end of the Middle Ages, it became a tradition for women to grow their hair long. And since constantly walking around with loose hair was considered inconvenient and untidy, a huge abundance of hairstyles with collected hair arose, including a ponytail.
Currently, there are more than 80 variations of ponytail hairstyles. Do you want to look original and interesting? It is not necessary to contact a stylist for this; it is quite possible to do it yourself, it all depends on your ingenuity and imagination.
The ponytail hairstyle is performed in 3 options: high, when the hair is collected at the top of the head; low - at the back of the head, medium - at ear level.
What variants of tails are often found:
- ponytail is smooth, height: high, low, medium;
- with fleece;
- volume;
- asymmetrical;
- inverted;
- with and without bangs;
- with braids;
- malvinka;
- tail waterfall;
- ponytail with bow;
- Kardashian ponytail;
- ponytails for school;
- with accessories.
Secret: a smooth ponytail is a hairstyle that is also suitable for 2-3 days after washing your hair.
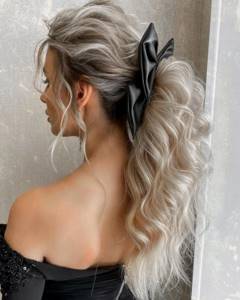
Ponytail with curls
Such a ponytail will be relevant for any age category and for any life situation, be it an evening look or an everyday option. The convenience of this hairstyle is this. That it is suitable for girls with medium length and long hair. But, nevertheless, due to certain circumstances, the hairstyle may not be suitable.
Large and protruding ears will be even more visible, so it is recommended to choose a different, more suitable hairstyle.
Density also affects the appearance of the hairstyle. If your hair is not thick, then it is better to abandon this hairstyle, because volume is important for such a ponytail.
Very voluminous curly hair of medium length. The hairstyle will look too voluminous and all the charm will be lost. But the main thing is that the hostess likes it, and if you think it suits you, then you shouldn’t refuse.
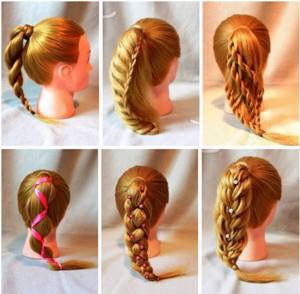
Ponytails for the garden and school with weaving
Decorating the tail with plaits, braids, or a combination of both is quite simple, but this styling looks more festive.
When choosing a ponytail hairstyle for school or kindergarten, it is worth considering that the elastic should not be too tight, otherwise the child may have a headache.
Children's hairstyles for every day in kindergarten with step-by-step photos
Look at the assortment of ponytails, they are easy to sell even in a hurry. Take note of them and hang them on the mirror where you do your baby’s hair.
To have a unique ponytail every day, take a photo on your phone or print a photo, ticking the option that has already been done.
We recommend looking at what other ponytail hairstyles you can easily do in the morning for kindergarten or school here. Detailed step-by-step descriptions and video tutorials will help you go about your business in a great mood. Discuss your hairstyle in the evening to avoid conflicts on this basis in the morning.
Video of a side braided ponytail and step-by-step instructions:
An educational article on creating a ponytail braided in a circle with a detailed description and step-by-step photos will help even a beginner master this braiding option.
The basis of this hairstyle is (a braid with a one-sided pick-up), since you have already figured out how to make a ponytail without cocks, now you just have to master weaving the braid around the ponytail in a circle.
It’s time to sort out the hooks and repeat this “bell” hairstyle; this is the name that has already appeared several times in the literature on creating this hairstyle.
To make it festive, add a bow to the base or small hair clips with white or black bows, flowers all over the head, they and the falling curls will support and decorate the hairstyle.
Video on how to braid a ponytail in a circle on a child:
Video on how to create such a ponytail on yourself:
Ponytail with tied strands
We begin creating a hairstyle with an inspection: on the front of the head, the bangs are divided into 3 parts and 3 inverted ponytails are tied (see how to do them above), the 2nd part is a high ponytail and knots are made along it, strand by strand.
Instructions for creating a ponytail hairstyle with tied strands
We will need: 4 rubber bands, 2 clips or crabs to hold strands, spray with water, a comb with a sharp tip and long hair.
- Divide the hair into 2 parts: 1 - bangs, 2 - the tail itself. Divide the bangs into 3 large strands, tying each with an elastic band and turning them out.
- Tie the ends of the inverted ponytails into a ponytail. Tie the ponytail high, since a low ponytail will leave little room for laying strands.
- Wet the ends of the hair spray with plain water. Comb the tail thoroughly with a wide-toothed comb.
- Separate two narrow strands at the edges (from the bottom of the ponytail) and comb them with a comb. Apply varnish.
- Tie them with a regular knot once. Quite tight, but not constricting the tail. Fasten the ends of the strands to the tail with crabs.
- Repeat the operation until you reach the end of the tail.
- When you reach the end of the ponytail, tie it with an elastic band. Straighten if there is any displacement somewhere.
The video will help you understand and easily repeat the creation of a ponytail hairstyle with tied strands:
Ponytail for school with classic French braids on the sides
This ponytail option is suitable for both long-haired schoolgirls and kindergarten visitors with medium-length hair.
- Divide the hair into zones: parietal and 2 lateral, occipital separately. Pin or tie: the top and one side, the back of the head, so that you are not disturbed.
- We work with the temporal zone on one side. Separate 1 strand and divide it into 3 parts to weave a regular French braid with tiebacks on 2 sides. We weave like this: we transfer the right strand to the central one, the left strand to the central one. We pick up a narrow strand on the right and weave it, then do the same on the left. We weave this way until we run out of hair on the side.
- We braid it with a regular braid to the middle of the head, where the division occurs. We tie the end with an elastic band. We do the same with the second braid on the side. We tie them together with 1 elastic band.
- Lightly comb the parietal area strand by strand. Let's smooth it out and comb it back.
- We will collect in a high ponytail: braids, hair on the back of the head and combed strands.
- In the upper zone we braid a French braid with tiebacks on both sides, slightly giving it volume and not tightening it. Having finished weaving, we secure it with 2 invisible ones crosswise.
For schoolgirls
For kindergarten, we choose the option with a French braid.
The video will help you understand braiding and tying a braided ponytail.
A braid made from ponytails with elastic bands would also be ideal, because... it does not require braiding, so even a beginner, as well as a child of 3-4 grade can repeat it on his own with a tied tail.
Let the child practice first on a doll or mother, and then do this hairstyle without haste at home more than once and only then in the morning for school to avoid stress. It can be done on a pigtail, a classic ponytail or 2 ponytails, whichever option you like best, choose that one.
How exactly to braid a braid from ponytails with elastic bands, what is needed for weaving, as well as what secrets you need to use to make it look chic are waiting for you at this link.
A bun of hair as an option for modifying a ponytail, here you will find many options for this hairstyle with photo and video instructions.
Having mastered the ponytail, we suggest you add some zest to your ponytail in the form of a bow. What kind of bow do you want to make for yourself? Big or many small ones? Watch video tutorials and step-by-step photos on this page.
Can't do your hair neatly because of dandruff and itchy scalp? Find out how to deal with this in a few uses at home at:
Volume tail
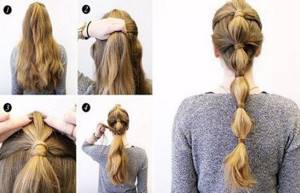
A voluminous ponytail is very easy to do:
- Separate a small strand in the parietal area with a horizontal parting and pin it up so that it does not get in the way;
- Lightly comb the hair on the top and back of the head. Not to the point of feeling like a felt boot;
- Close the comb with a separated strand and gather all the hair into a ponytail;
- Gently smooth the strands with a comb and lightly spray with hairspray.
The result should be volume over the entire area of the head. The tail itself can be curled with a curling iron so that it looks harmonious with the resulting volume at the roots.

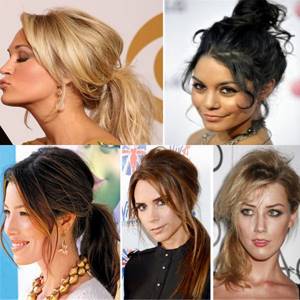
Nicole Ricci style 60s ponytail with and without extensions
Pay attention to the photo, where the creation of a ponytail without false strands is shown step by step, in the video with them (for those whose hair is sparse or not long enough). Use the option you like best.
Step-by-step instructions for tying a 60X ponytail:
- Comb your hair thoroughly and divide it into zones. The upper zone is the crown, lateral zones and occipital. We separate each zone with a comb and secure it with hairpins or clips.
- We tie a ponytail from the back of the head. Smooth, medium height.
- Lightly scratch the side strands from the inside and lay them on the sides, wrapping them around the tail. To secure it, use a bobby pin twisted onto a strand or fasten it with a bobby pin. Repeat on 2 sides.
- We comb the remaining hair in rows, moving from the crown to the forehead. For airy hair: spray each strand with hairspray. Do not comb the first strand over your forehead, leave it smooth. We lay the hair strand by strand on the ponytail.
- Smooth the backcomb and spray with hairspray to fix it.
- Place the bangs along the forehead and secure them near the tail with bobby pins; for short bangs, simply comb them.
Video on creating a ponytail hairstyle in the style of Kim Kardashian, Nicole Ricci a la 60:
Low inverted tail
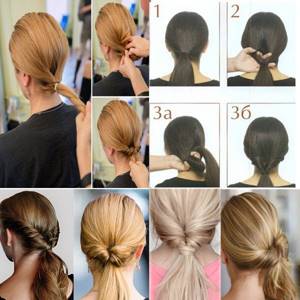
This hairstyle will only take a few minutes to create. With this ponytail, your look will be sweet and romantic. Let's consider the option of creating a tail and its modifications. In the first case, it will be a waterfall of ponytails, the second is an evening one.
First classic version
- Comb all your hair back.
- Gather a loose ponytail and secure with an elastic band.
- Lower the elastic slightly.
- Twist the resulting tail into a rope.
- Make a hole above the elastic and thread the tail through it, raising the elastic to the base of the tail.
To make this ponytail, watch the step-by-step video on how to tie a low twisted ponytail.
Waterfall from an inverted tail
Difference from the classic one: 3 ponytails are tied and each one is turned out in turn. The first one is without picking up the lower strands, and 2 and 3 are with picking up.
The video will help you understand in more detail how to create a waterfall ponytail. This video shows step by step the inverted ponytail hairstyle with its transformation into a waterfall:
This video will show the second version of an inverted tail, when the tails are wrapped without grabs, the previous tails are simply passed closer to the head behind the tails.
Asymmetrical side ponytail
Another simple and interesting solution would be to create a side ponytail. A sleek, feminine look suitable for any occasion. Depending on your mood, your hair can be either wavy or straight.
- Make a side parting and comb all the hair to one side, on which it will be convenient to wear the hairstyle.
- Gather hair into a loose ponytail and secure with an elastic band. For coquetry, it is welcome to use others.
- Hair accessories, for example, decorate with a hairpin, or tie with a ribbon or scarf.
Messy ponytail
Choose this hairstyle option if you haven't had time to wash your hair. It will also be appropriate for creating a spectacular image.
- Apply a small amount of mousse or foam and beat your hair.
- Create root volume by combing your hair a little or fluffing it with your fingers.
- Without combing, gather your hair into a loose ponytail at the back of your head or below.
- If desired, twist the tip of the tail or pull out a few strands.
Ponytail for a wedding
There are countless options for a wedding ponytail. But everything always starts from the base. But then, when the hairstyle is created, they begin to decorate. You can decorate your wedding ponytail with anything. The trend for 2022 is pearls. The main thing is not to overdo it and not to overload the “hairstyle”.
Flowers woven into strands look very beautiful. You shouldn't be afraid of them. After all, before flowers become decorations, they undergo special training by a master. As a result, you can go through the whole day with such magnificence and not worry about the safety of your hair.
Ribbons are a great option for a wedding hairstyle. Thanks to them, you can use weaving or other methods of collecting strands while simultaneously fixing them. In addition, the ribbons do an excellent job of decorating.
A ponytail is an ideal women's hairstyle that is suitable for all occasions.
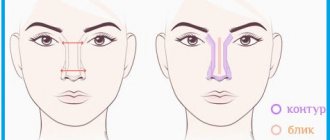
Hair styling before creating a ponytail
Before you start making your own hairstyles, you need to be well prepared. It is worth using 2 mirrors. One should be more extensive (a mirror in the bathroom or in the hallway), and the other should be small. All imperfections should be visible in it, and if necessary, such a mirror can be moved (a mirror in a powder compact, a small mirror).
First you need to style your hair:
- Wash them with shampoo according to your hair type;
- Apply conditioner and balm to make the strands manageable and smooth;
- Dry your hair with a hairdryer using a gentle setting and comb the curls.
This is preparation for a classic smooth ponytail, but for a voluminous one, after drying, you need to treat the root zone with a corrugated iron with a fine pattern for 1/3 of the length, and twist the ends onto a classic curling iron. Do not untwist the curls until the formation of the voluminous tail is complete.
Execution technology
Anyone can make a playful ponytail with elastic bands on their own. The installation is unusual, but easy to implement. Doing your hair will take no more than 10 minutes. To work, you only need elastic bands, a comb, and styling products. When performing a classic ponytail, follow the following step-by-step instructions:
- Clean, dry strands need to be pulled into a ponytail. When washing your hair, it is recommended to use products that make further work with the strands easier (mild shampoo, conditioner, mask). For curly, unruly, thin hair, it is recommended to apply a little foam to fix it before drying. Depending on the format of the future styling, when drying with a hairdryer, they try to give the strands the desired position: lift them at the roots, stretch the curls. Dry hair can be combed to obtain additional volume.
- The tail is positioned at the desired level. To secure the element, use silicone elastic bands that match the color of your hair. For children's hairstyles and creating an informal look, ordinary bright fastening materials are suitable.
- Elastic bands are tied at equal distances along the entire length of the element. It is permissible to stretch each section a little, giving the divisions volume.
- The fasteners can really be camouflaged. To do this, separate a thin strand and wrap it around an elastic band. The tip of the camouflage curl is hidden inside, tucking it under the elastic on the back side of the ponytail.
- It is recommended to fix the result with varnish, removing any stray hairs. This action is most relevant for those with unruly curly, frizzy hair or haircuts of uneven length.
The hairstyle looks elegant. The styling does not require additional decoration with jewelry. Although it is permissible to use any techniques to realize the intended image.
Video: original high ponytail in 5 minutes.
Video: weaving with elastic bands.
Step-by-step instructions for creating a hairstyle
There are several options for bows. Each option differs in execution technique and result. They are suitable for hair of different lengths, textures, and thicknesses. You can collect all the curls in a bow or leave some. Laying can be symmetrical or asymmetrical. The bow suits best with long hair, which allows you to create voluminous hairstyles.
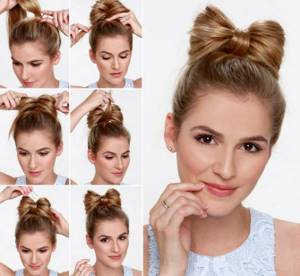
Regular bow
A regular bow involves collecting all the hair. The result is a neat hairstyle for different occasions:
- It is necessary to comb your hair thoroughly and collect it in a ponytail.
- Using the last turn, you need to secure the tip of the ponytail to create a voluminous cocoon at the back.
- The finished bundle in the middle should be divided into 2 parts, pulling the halves in different directions. The result is a bow.
- The remaining ends must be thrown over the middle and secured with bobby pins.
- At the end, the hairstyle is secured with varnish.
The same option is great for medium hair. A homemade bow is great for all occasions:
- Hair collected in a ponytail will help make the bow original. To do this, you need to lower your head down at the back of the head and braid it into a classic spikelet.
- The braid ends at the back of the head, and then the braid is secured with an elastic band.
- Then everything is done the same as with long hair.
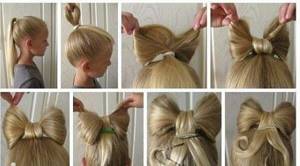
For long hair
Making a bow on long hair is easy. First, it is better to wash your hair, treat it with mousse, and dry it. Wavy curls need to be straightened, and thin ones should be curled with curlers.
In this case, the strands retain their shape and volume:
- Hair should be gathered into a high ponytail and secured with an elastic band.
- Then, with the second elastic band, you need to curl the tail in half and throw it over your forehead.
- Use the tip to divide the bundle into 2 parts.
- The hairstyle at the back should be secured with a bobby pin.
- Treat with varnish.
Low hair bow
In addition to the high version, there is a wonderful low bow. If the previous hairstyle is considered youth, then the second one is just right for girls and women.
To do this, there are the following instructions:
- Your hair should be gathered into a low bun, but don’t pull it out completely.
- Then it is divided into 2 parts.
- The tip needs to be lifted up and secured with an invisible one.
- The hairstyle is secured with varnish.
Evening hair bow
If you are planning an evening event, then you can create a wonderful hairstyle for this occasion. The bow will be with loose hair, which looks very original:
- You need to part your hair evenly.
- You need to separate 2 strands from all sides and put them back.
- From these strands a ponytail with an elastic band is created. It does not need to be pulled all the way through, since the bow needs an original loop. The tail needs to be fixed firmly so that everything looks neat.
- The loop is divided into 2 parts.
- It is necessary to secure each part with a hairpin. The result is an original bow.
- You need to lift the tip up, creating the middle of the bow. Fixation is carried out invisible.
- The hairstyle is secured with varnish.
The rest of your hair should be left straight or curled. It turned out to be a wonderful holiday version of the bow.
Bow made of two rubber bands
There is another convenient way to create a bow - from two elastic bands:
- You need to comb your hair well, divide it into 2 parts: front and back. The bow will be created from the first part, while the second remains free.
- The upper part must be parted and tied into 2 tight ponytails.
- They are then secured with an elastic band.
- The first tail must be bent so that the elastic bands touch. The hair is fixed with an invisible pin. The result was one petal of a bow.
- The same work is done for the second one.
- The ends remain free, the hairstyle is fixed with varnish.
Alternative styling
With this styling option, the bow is attached more firmly, and therefore does not need to be adjusted throughout the day. A simple technology allows you to create a hairstyle with any hair length.
The basis will be a classic malvinka:
- It is necessary to comb your hair thoroughly, divide it into 2 parts: the upper one will be the basis of the bow, and the lower one will remain loose.
- The upper part is divided into 2 parts by a perpendicular parting. You need to create 2 ponytails. It is better to choose elastic bands of the same color as the curls. Using this technique, you can eliminate many hairstyle flaws.
- The tails are divided into 2 parts. You will get 4 similar shares, which should be collected into a tail.
- At the end, you need to wrap the tail so that the lower elastic band coincides with the upper one. The tail should be tucked inward.
- The same work is done with the 2nd tail. The hairstyle is fixed with bobby pins and hairpins, and then with varnish. The end result was a beautiful bow.
The hairstyle looks original with loose curls. This version of the bow is suitable for a holiday and a date.
general description
A sectional ponytail is made from hair of sufficient length. The minimum length of hair is the strands below the shoulders. The optimal length is hair from the shoulder blades to the waist. A variation of short strands looks ridiculous.
To create a hairstyle, it is better to use haircuts of uniform length. Although the principle of obtaining the structure is suitable for masking sections of a cascade or ladder.
Note! The styling is equally suitable for straight, curly, thick and thin hair.
The classic ponytail with elastic bands is a regular ponytail, divided into equal sections. Each division is given a spherical appearance. It is permissible to turn sections inside out, resulting in a semblance of a braid.