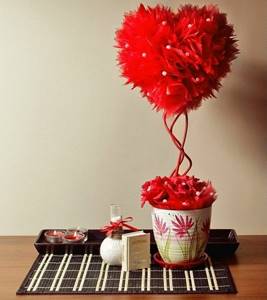
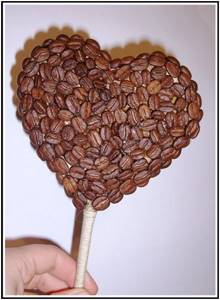
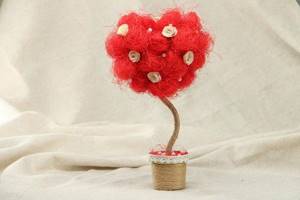
A heart-shaped topiary is perfect as a gift for a loved one.
The “Heart” topiary is an interesting and unusual addition to the interior. Jewelry of this type appeared relatively recently, and over the entire period they managed to gain enormous popularity. This is due to its excellent external characteristics and the ability to create a tree yourself. According to Feng Shui, topiary brings joy, happiness and financial well-being.
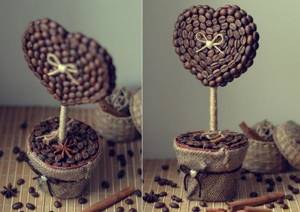
Coffee heart topiary - a beautiful and simple decoration
A coffee heart is an interesting decorative element that you can easily create with your own hands. First you need to prepare special materials and tools.
For this purpose, the following mandatory components are taken:
- Cardboard.
- Wire.
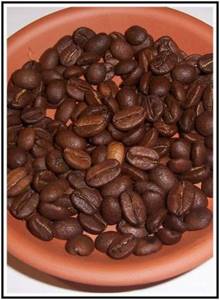
- Coffee.
- Yarn.
- Cotton wool or cotton pads.
- Green paper or paint.
- Pot.
- Glue.
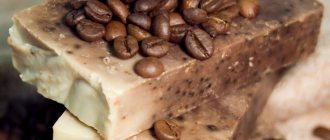
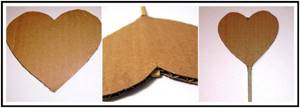
First, you need to draw a heart on cardboard and cut it out; in total, you need to prepare 2 blanks. Cotton wool or cotton pads are glued to one piece of cardboard, then the second piece of paper is applied to them. The resulting heart is wrapped in yarn; it is advisable to pre-treat the surface with glue. Depending on the material, you need to wait some time until the workpiece completely hardens. Then you can begin further decoration. Glue is applied to the surface of the yarn and coffee beans are applied. You can lay them out in solid lines, or only partially cover the workpieces.
The trunk is attached to the top of the heart. It is made from wire; it can be pre-positioned between two pieces of cardboard and cotton pads. This will make it more durable. The trunk is decorated with green paper or paint. You can choose any shades, depending on personal preferences.
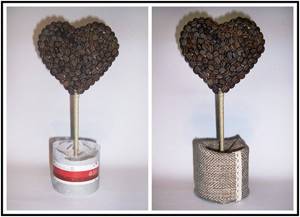
At the last stage, the topiary is installed in a pot. It is advisable to secure the trunk at the base with coins or pebbles. In some cases, building gypsum is used, which is decorated after drying. Thus, a unique coffee tree is created.
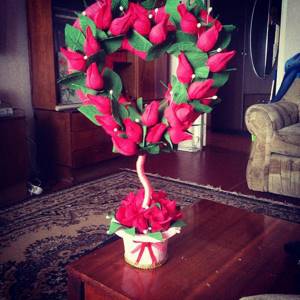
Topiary heart in heart - an unusual design solution
DIY decorative trees are gradually gaining popularity. This is due to the ease of manufacture and the ability to beautifully decorate an apartment without any special financial costs. The trimming technique is especially popular. Thanks to it, you can create interesting compositions, in particular in the shape of a heart.

Trimming is a three-dimensional appliqué based on crepe or corrugated paper. It is quite possible to create an interesting composition from ordinary napkins. It all depends on the person himself.
A topiary made from napkins is the best gift, especially if your financial situation does not allow you to spend money. A heart made of wood is a good way to surprise a person and present him with an interesting gift made with your own hands.
Necessary materials for creating topiary
- Styrofoam.
- Red napkins.
- Wooden skewers.
- Construction gypsum.
- Ribbons.
- Scissors.
- Glue.
It is recommended to create beauty from the ground up. To do this, diluted alabaster is poured into a prepared plastic pot. Then a wooden skewer is inserted into it, and the workpiece is removed to the side until it hardens completely. In the meantime, you need to start creating the heart itself. To do this, the desired shape is cut out of polystyrene foam (using this material will allow you to get a three-dimensional tree). It is recommended to cover the end parts with adhesive tape or paper, this will eliminate looseness.
Next, you need to take napkins and cut them into small pieces. Then, one by one, you need to place a skewer in the center of each square and start scrolling through it. Without removing the shred from the skewer, it must be dipped in glue and attached to the foam blank. This way the entire heart is covered. Then the finished part is attached to the base, the pot is decorated with bright beads, and that’s it, this is where the production ends. The result is an interesting decorative element.
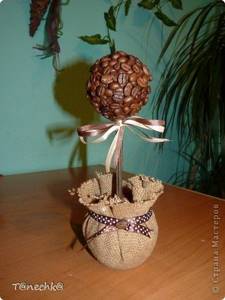
coffee tree
This master class was performed by Natalya Tkachenko from the city of Rodinskoye (Ukraine) as part of a competition of author’s master classes, which is currently taking place on our website. In this master class you will learn how to make a topiary in the shape of a coffee heart as a gift.
If you like this master class, you can express your opinion on our forum in a specially designated topic, the link to which will be at the end of this publication.
Hi all! Here I am with my belated master class! Of the various types of needlework, the ones that work best for me are topiaries or trees of happiness, as they are also called. Such trees are made from various materials, different sizes and shapes. And I'll tell you how I make a heart-shaped coffee tree
. What do we need?
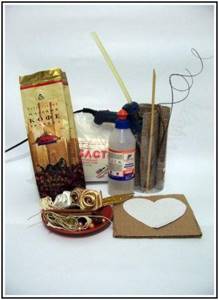
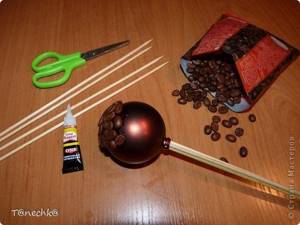
- coffee beans; - “Dragon” glue and glue gun; - barrel (bamboo skewers, disposable sushi chopsticks, wire, pencil, etc.); - corrugated cardboard (from some box); - a pot (you can use a plastic cup); - plaster (alabaster) - sold in a hardware store; - various decor (cinnamon, star anise, beads, roses, ting-ting, lace, waxed cord, heart pendant, fabric for a pot, etc.).
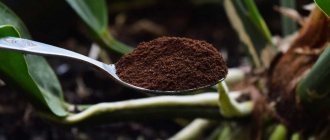
A little advice about choosing coffee - don’t take the cheapest one, the beans are disgusting, most of them will remain unclaimed. And you are unlikely to drink this coffee - the smell is terrible! If you don’t know which company to choose, buy coffee by weight to see the quality of the beans. Before starting work, I recommend sorting the grains. I select the best ones right away, so that later I don’t have to be distracted by searching for the right grain.
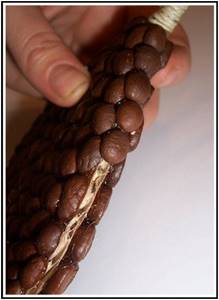
Now that the grains have been selected, we will cut out a heart of a suitable size from corrugated cardboard. Please note that the strips inside the cardboard must be in a vertical position so that we can insert the barrel inside. My barrel today will be a disposable sushi stick. We push it along the entire heart and fix it on both sides with a glue gun. Then we wrap the trunk with waxed cord or twine. In order to hold the cord tighter, I use double-sided tape in some places. We also secure the beginning and end of the cord using a glue gun. The blank for decoration is ready!
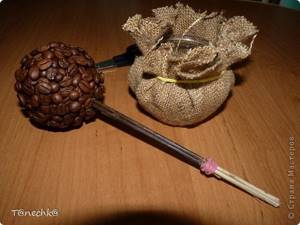
We begin to cover our heart with coffee beans. For this I use Dragon glue. While the glue is curing, I can distribute the coffee beans the way I like. But this trick won’t work with a glue gun. First I glue the grains along the contour, and then chaotically fill the middle. Of course, you can lay it out evenly. It's a matter of your taste and endurance!))
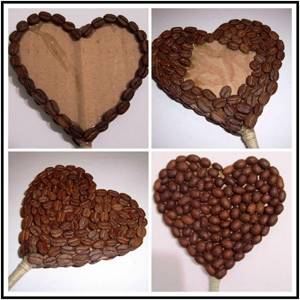
The grains can be glued on different sides, in 1 or 2 layers. There are no rules here, it all depends on your idea. Now, using a glue gun, glue the grains along the edge of our heart, with the convex side up.
Our heart is ready.
Sometimes I coat coffee trees with... uh... nail polish. I dilute it a little with acetone and quickly paint over it with a large brush. The aesthetic appearance immediately improves, but at the expense of the smell. If the beans are laid out in two layers, the smell of coffee will remain due to the first layer. However, you can pour coffee into the pot and the coffee smell is with you again! After all, nail polish wears off pretty quickly. Next, we dilute the plaster with water and “plant” our tree in a pot (I’m not looking for easy ways, that’s why I have a plastic cup from New Year’s beads). In order to lighten the weight of the tree, several pieces of foam plastic can be added to the gypsum solution. We wait 10-15 minutes and start decorating the pot. I use a fabric similar to burlap.
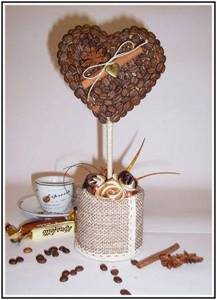
Now it remains to add a few touches that will greatly transform our heart. I usually use cinnamon, star anise, fabric roses, various pendants, lace, beads, ting-ting (twisted spiral), hibiscus (dried flower), rattan balls, floral greenery (gilded) and all sorts of other things that come to hand.

The result is a heart-shaped tree like this. Buy a jar of coffee, a box of chocolates and a great gift for your loved ones!
I hope I explained everything clearly. After all, this is my first master class. I look forward to comments, reviews and your products on this MK! Thank you for attention!
DIY heart topiary: step-by-step instructions
Every housewife can create a unique decorative element. You don't have to have artistic skills to do this. The design and manufacturing process are so simple that anyone can learn this technique.
To conduct a master class you need to prepare the following elements:
- Napkins.
- Glue.
- Heart shape.
- Paper.
- Wire or pencil.
- Beads.
- Nail polish.
- Satin ribbons.
- Cling film.
- Scissors.
- A brush.
- Stones.
- Construction gypsum.
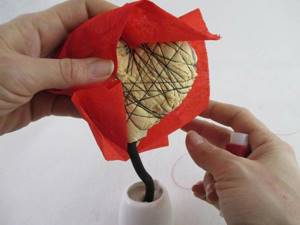
First, a heart is made. It can be made from cardboard and cotton wool, or polystyrene foam. In this matter, everyone decides for themselves what to choose. You need to decorate the heart using napkins. They are glued to the workpiece according to the trimming technique. Additionally, the heart can be decorated with beads, which will give it originality.
The resulting elements are interconnected and complemented with beads, ribbons and stones. In this case, everything depends on the person’s imagination. The process of making topiary is standard.
Then you need to start making the barrel. It can be based on a pencil, wire or wooden skewer. The trunk is installed at the base of the heart and the pot. For strength, diluted alabaster must be poured into the pot. After hardening, it can be decorated with paints, beads, paper and varnish. The trunk itself is wrapped in satin ribbons and painted. You can also decorate the pot.
Master class for beginners
Most types of topiary are made according to the same principle. After mastering our basic instructions, you can create a topiary to your taste.
Materials and tools:
- To create a crown:
- Coffee beans of one type or several (200-300 g depending on the size of the ball).
- A base ball made of polystyrene foam (sold in craft stores), floral foam (can be found in a florist store) or plastic (a ball for a children's dry pool) with a diameter of about 8-12 cm. If desired, instead of a ball, you can use a heart-shaped blank or any other figure.
- Decor (optional): cinnamon sticks, dried citrus slices, clove stars, artificial flowers, satin ribbons, beads, etc.
- Brown acrylic paint or a piece of brown material that can be used to wrap the ball.
- For the trunk:
- Branch, pencil or stick. You can determine the required length using a simple formula: height of the pot + 1/3 of the diameter of the ball + desired distance from the base to the crown.
- Decor (if necessary): paint, twine, satin ribbon or other materials that can be used to wrap or paint the trunk.
- For the base:
- Pot, cup or any other cute container;
- Mounting mixture: cement, gypsum or alabaster. We recommend using alabaster, as it is easy to dilute, it is available, and most importantly, it dries quickly and does not crack.
- Materials for decorating and filling the pot. These can be the same coffee beans, small pebbles, or even better - dry moss.
- Auxiliary tools and materials:
- Hot glue gun and about three sticks of glue or clear Titanium mounting adhesive.
- Scissors.
- Brush.
Instructions:
Step 1. First you need to prepare the ball. Paint it brown and leave it to dry. At this point you can paint the trunk and/or pot.
Step 2. While the paint is drying, start sorting the grains. This stage is not required, but is advisable if you want the crown to be neat and uniform. First, remove any broken or cracked kernels. The remaining ones are divided into 4 groups:
- Beautiful grains of the same size - they will be on the most visible part of the topiary, that is, on its top.
- Round - it is better not to use them for finishing the crown, since on the ball they will be higher than the main mass. If desired, they can be used to decorate the pot.
- Whole, but not very beautiful - they are best used for finishing the lower part of the crown.
- Small ones - they are good for closing small gaps between grains.
Step 3. Now that the ball is completely dry, you can cut a hole in it for the barrel. To do this, first attach the barrel to the ball and trace its outline, then cut a hole 2-3 cm deep in it.
Step 4. Let's start decorating the crown. You can use one of two techniques:
- Technique 1. The grains are glued individually and most often according to the honeycomb principle. You can also glue them with the groove up and/or down, vertically, horizontally or on the edge, alternate light and dark beans, and, if necessary, insert small/large grains or halves into the gaps. Don’t forget that the most beautiful grains should be glued on the top half of the ball. Below is a selection of photos of coffee topiaries, the beans of which are arranged in different ways (scroll through!).
- Technique 2. To use this technique, it is better to use “Titan” assembly transparent glue rather than hot glue. Squeeze a little glue directly from the tube onto the ball and let it spread over a small area (for example, 5x5 cm). Then we sprinkle this sector with a handful of grains and begin to distribute and align the grains across the ball with our fingers. To prevent excess coffee from falling on the floor, place a container under your arms. Titan glue, unlike hot glue, will allow you to move and compact the grains on the ball without fear of getting burned. And, besides, it gives more time for correction. Therefore, using it, you can not glue the beans individually, but sprinkle the ball with whole handfuls of coffee, which significantly speeds up the process. True, the grains in this case will be stacked chaotically, and not in a certain order.
Whatever technique you choose, once the ball is almost completely covered in grains, leave a small area around the hole unshaped. We will finalize it later, when the barrel is installed.
Step 5. If you want to not just paint the trunk, but decorate it with twine or satin ribbon, then now is the time to do it.
- To wrap the barrel with satin ribbon, you first need to wrap it in double-sided tape, not reaching the edges about 3 cm.
- The twine can also be fixed using double-sided tape or hot glue/Titan glue.
Step 6. Insert the barrel into the ball and secure it with hot glue. Keep in mind that the glue quickly melts the foam, so to prevent the hole from getting too deep, insert small pieces of paper into the hole along with the glue. Remember that the barrel should enter the ball about 1/3 of its diameter.
Step 7. Now you can glue the grains in the area around the trunk. If desired, in order for the crown of the coffee tree to have no gaps at all, you can glue a second layer of beans onto the ball. Often, a two-layer crown is covered first with grains with the grooves down (poor quality grains can be used), and then with the grooves up.
Step 8. Hurray, the coffee topiary is almost ready! All that remains is to “plant” the tree in the pot. To do this, first make sure there is no drainage hole in the pot. If there is a hole, fill it with hot glue. Next, dilute cement or alabaster and immediately fill the container with the mixture, not reaching 2-3 cm from the edges. Insert the tree into the center of the pot and hold for several minutes until the mixture hardens. Then leave the topiary for 12-24 hours, that is, until the “soil” dries out.
- As already noted, a mixture of alabaster is best suited for making topiary with your own hands. It is diluted as follows: water is poured into the pot, not reaching 2-3 cm from the edge, then the water is poured into a bowl, then alabaster is gradually poured into the water. The mixture must be stirred continuously until the consistency of thick sour cream is obtained.
Step 9. When the base of the topiary is dry, start decorating it. Alabaster can be decorated with the same coffee as in our master class, covered with dry moss, sisal, filled with pebbles, glass pebbles or beans. Finally, add the finishing touch - a satin ribbon bow.

We also suggest watching a video master class on making topiary from a plastic ball for a dry pool.
Since ancient times, the heart has represented love and tenderness. This symbol is present everywhere, be it a familiar element on everyday objects or maybe an unusual coffee topiary given to lovers for a holiday. Next, we offer you a master class on how to make a heart-shaped topiary with your own hands from various materials.
How to make a heart-shaped topiary or a few basic secrets
Topiary is easy to make, but for this you need to know some nuances. You should pay attention to the main elements and the materials from which they can be made.
These include:
- The basis for the crown.
- Trunk.
- Base.
- Pot.
- Decorative materials.

So, the crown can be based on various elements. It is made from foil, polystyrene foam, old Christmas tree decorations, fabric or a children's ball. The barrel must be strong; a wooden skewer, thick wire, pencil, thin plastic or cardboard are suitable for these purposes. The base is stones, coins, coffee beans, polystyrene foam, polyurethane foam, sponge or alabaster.
The pot is the easy part. It is enough to purchase an ordinary design intended for indoor flowers. Round tanks, wooden boxes and containers are also suitable.
Decorative materials allow you to make your decoration bright, colorful and interesting. For this purpose, coffee beans, beads, multi-colored paper, decorative stones, coins, foil, shells and pebbles are used.
There are many varieties of topiary, it is almost impossible to get acquainted with them all. There are not so few photos on the Internet, but each of the presented designs was created according to a standard algorithm and imagination.
DIY coffee topiary in a bag
To make an original coffee topiary with your own hands, you don’t need any special materials.
DIY topiary made from coffee beans. Photo
The basis for the crown can be a Christmas tree ball , and the trunk can be a wooden kebab skewer.
Coffee beans are glued onto a ball and decorated with a skewer .
cream jar can be used as a container for installation We wrap it in burlap, which we tie with a string around the neck.
Plaster is poured inside to fix the tree. The surface of the plaster is hidden by a cardboard circle filled with instant coffee.
Heart-shaped topiary in the interior (photo)
- Author: admin
Rate this article:
- 5
- 4
- 3
- 2
- 1
(0 votes, average: 0 out of 5)
Share with your friends!