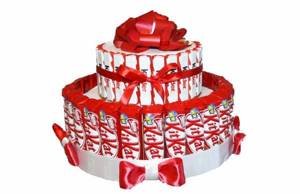
Making a chocolate cake
To make the chocolate cake, prepare the following in advance:
- chocolates and bars in bright wrappers (for example, Mars, Snickers);
- medium density cardboard;
- wrapping paper;
- confetti;
- corrugated paper;
- double sided tape.
Making your own cake from candy bars and chocolates:
- We start by creating a frame. To do this, cut out 2 strips of 10 cm wide from thick cardboard. The length depends on the diameter of your future product, we will make a two-tier cake, so we cut out one strip 50 cm long, the second 30 cm. We glue the ends of the cut cardboard strips so as to get two cylinders.
- Now we make the lid: from the same material we cut out 2 circles with a diameter of 15 and 25 cm. Now we attach them to the cylinders using tape. It turns out two empty round frames.
- Cardboard blanks need to be beautifully decorated. Gift paper will come in handy for this.
- On the lid of a cylinder with a larger diameter, glue the smaller cylinder (lid up) with tape.
- Decorating the cake with chocolates. We glue double-sided tape to the back of the chocolates and bars.
- Then, one by one, remove the protective tape from each element and attach it to the lower tier of the future cake. In this case, all sweets must be placed close to each other. If there is not enough space left to glue another chocolate bar, you can use narrow wrapped candies.
- We decorate the side part of the second tier in a similar way. After this, we proceed to decorating the upper surface of the frame; for this, bright confetti or beautifully cut crumpled paper will be useful.
To make a chocolate cake look harmonious, you need to take bars of the same shape for each tier. A homemade chocolate cake will turn out to be truly unique if you think in advance about how to decorate it.
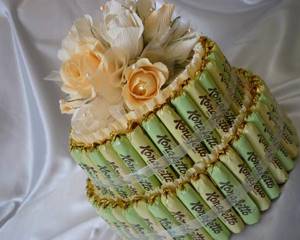
DIY candy cake
Not only cakes made from chocolates are popular, but also from candies. There are many design options; we suggest building a tall dessert of 4 tiers.
- several circles of foam, the height of which depends on the height of the candies used, and the diameter should be 25,20, 15 and 8 cm;
- the birthday boy's favorite candies;
- brightly colored wrapping paper;
- glue gun;
- For decoration you need a mistletoe leaf and a sprig of pine needles.
So, how to make a cake from sweets with your own hands:
- We start by preparing the sweets. We recommend choosing sweets in the same package or color scheme. If necessary, wrap all the candies in wrapping paper yourself.
- We wrap all the foam circles with brightly colored wrapping paper. Use glue if necessary.
- We form the frame. We place the prepared circles one on top of the other. We start with the element with the largest diameter, then take a smaller circle, and end with the smallest one. We connect all tiers with glue.
- On the reverse side of the wrapper of each sweet element, apply a little glue from a gun and step by step cover the entire side surface of each tier of the frame with candies. After you make a cake from candies, you need to decorate it. We recommend decorating a multi-tiered sweet dessert with mistletoe leaves and a sprig of pine needles.
The decor can be at your discretion: ribbons, bows and even small candies.
Making a candy cake will be an excellent birthday gift for your mother, a friend with a sweet tooth, or will decorate a children's party. Separately, we note that if you are preparing a cake from sweets for children, soft toys are perfect as decoration, and the gift itself can be made from Kinder chocolate, beloved by many children.
Barbie cake for a girl
A doll cake decorated with sweets will decorate the holiday of a little princess. Working on the dessert will require a little perseverance and accuracy, but the result is worth it. A Barbie doll can be presented as a gift by adding a sweet candy skirt.

Required:
- Barbie doll – 1 pc.;
- candies like “Fererro Rocher” - 18-20 pcs.;
- bright corrugated paper - enough to wrap a skirt;
- bright foil - depends on the number of candies;
- polystyrene foam - 1 sheet;
- beads – 7-10 pcs.;
- PVA glue and scissors.
Preparing a sweet girlish dessert:
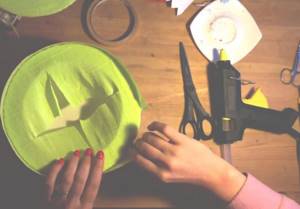
- From a piece of foam plastic we cut out the dome of the skirt in the form of a circular stand and 4 glued holders, between which we insert a toy.
- Cover the workpiece with corrugated paper.
- We make a bright top for the doll from the same paper as the skirt.
- From foil we cut out molds according to the number of candies in the form of flowers with sharp petals. We insert a candy into each blank and glue it with a glue gun.
- Using hot glue, glue the candies tightly onto the skirt.
- Glue corrugated flowers and shiny beads into the gaps between the candies.
A fairy-tale heroine with a candy skirt will definitely delight the little princess with milk chocolate and delicate creamy fillings.
How to bake your own cake from chocolates and sweets
If you love to cook, and baking is something special for you, we recommend making a sweeter candy cake with your own hands using a baked sponge cake. Step-by-step preparation:
- According to your favorite recipe, bake a chocolate sponge cake, which you need to cut into 2 equal parts.
- Start preparing buttercream with cocoa, it is well suited for “gluing” chocolates.
- Grease the surface of the first cake well with cream and sprinkle with M&M's candies. Now cover it with the second cake layer, press it tightly and brush with the remaining cream.
- Be sure to coat the entire side surface well. The result is a classic chocolate pie. Of course, it can already be served in this form, but you can make it a work of art and decorate it with all sorts of delicacies.
- For decoration we will use Kit-Kat wafer chocolate without packaging. We begin to attach chocolates to the side surface of the sponge cake, so that they stick well, you need to generously grease the sponge cake with butter cream. If, in your opinion, the chocolate does not hold well, then you can tie a satin ribbon around the entire perimeter of the cake.
- Decorate the top with M&M's or multi-colored chocolate dragees, and then sprinkle with coconut flakes.
Useful tips
We offer some useful tips on how to make an original cake from sweets and chocolates with your own hands:
- If the cake is intended for children, then cut out any shapes from cardboard: a flower, a car, a Christmas tree, a star.
- For a children's cake, in addition to chocolate bars and sweets, you can use juice in small packages.
- Try to experiment: use wafer bars, marshmallows, dragees, cookies and even chewing gum. Even alcohol can be used for adult gifts. The choice of decor should largely depend on the wishes of the birthday person.
- Make a frame and measure its height and width. This way you can calculate how many sweets you will need.
- The cardboard frame may become deformed during transportation; we recommend replacing it with tin boxes for cookies and sweets.
- You can even use a canned food box as a frame; after decorating, no one will even guess about it.
- To attach chocolates, sweets and other decor, it is better to use non-toxic silicone glue in rods. A glue gun is also convenient, but with a low melting point.
- You can even stick candles or fireworks into a children's cake; for this you need a foam frame and a floral sponge.
- Pack the cake beautifully, wrap it in transparent packaging and tie a satin bow, so it will look more presentable.
Manufacturing process
Now we will do everything step by step.
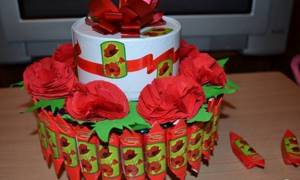
1. Cut a blank of the required diameter from penoplex 5 cm wide. This will be our basis. Cover it with corrugated paper on all sides: white on top and bottom, red on the side. It should look like this.
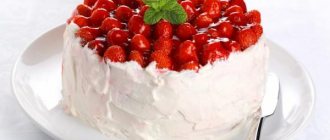
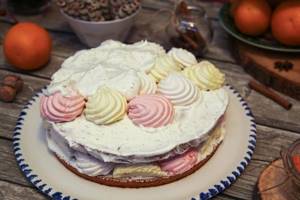
2. Our cake will be summer, berry, strawberry.
Therefore, you need to make several strawberries, also sweet, with “Hazelnuts in Chocolate” sweets inside. And to go with them, make white flowers from corrugated paper with a fluffy center, as in the following photos.
3. Decorate the base of the cake with the resulting strawberries and paper flowers.
It’s better to place the composition not in the center, but a little to the side, so everything will look more harmonious.
If desired, decorate the “berry meadow” with artificial small flowers and green leaves. And don’t forget to make organza pound cakes.
If anyone has forgotten how to easily make them, then this video will help you
4. Now it's time for our Kinder chocolates.
You will need several packs of them.
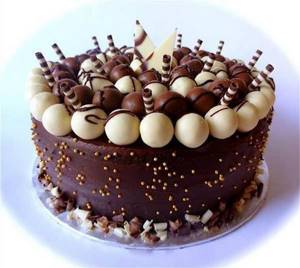
Chocolate cake
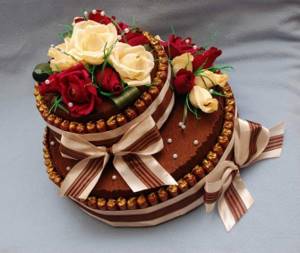
Who hasn't dreamed of receiving original gifts for their birthday or New Year? However, choosing such a gift is not at all easy, especially when it comes to children. Most people in this situation prefer a standard set: adults - flowers and a cake, and children - sweets or candies. You can, of course, bake pies and decorate them beautifully, but not every housewife is a pastry chef, and not everyone has a suitable cake recipe. But if you wish, you can combine these gifts and make an unusual present with your own hands - a chocolate cake decorated with a flower arrangement. Moreover, this beautiful treat can be not only a gift, but also an original dessert decorating the festive table.
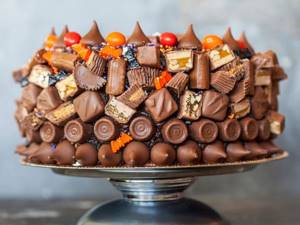
DIY “Box of Chocolates” cake for children for beginners for their birthday: description, photo
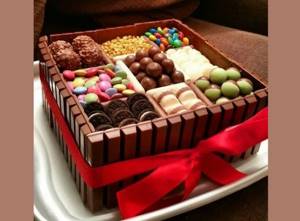
DIY “Box of Candy” cake for children for beginners for their birthday.
For such a beautiful and unusual cake you need to stock up on different sweets:
- Oreo cookies with filling
- Sweet dragee
- Chocolate dragee
- Chocolate covered candies
- Candies covered with colored glaze
- White chocolate candies
- Cookies for creating crossbars between cells
- Chocolate Kitkat
Also prepare a red ribbon and a square-shaped dish on which the dessert will be placed. We also need sponge cakes. You can bake them yourself or buy them ready-made. Here is a description of making a DIY “Box of Chocolates” cake for children for beginners for their birthday, as in the photo above:
- Make cream from cream, sugar and mascarpone cheese. Find a description of the process of its preparation in the text above. Add cocoa to the cream and mix well.
- Now assemble the cake on a square flat dish: frost the cakes, placing one on top of the other, and then coat the top and sides.
- Break or cut the chocolate into strips.
- Place them around the perimeter of the cake.
- Immediately place the crossbars for the cells.
- Now start filling the cells.
- Tie a ribbon around the cake and you're done.
This cake delights everyone who receives it as a gift for a birthday or other occasion. It looks like a real box of sweets, and when children or adults realize that it is a cake, the admiration becomes even greater.
How to make a candy cake with your own hands
For those who are already tired of the traditional serving of candies and sweets, you can make a candy cake with your own hands. Of course, you will have to choose a design, then put in a little effort to create a sweet masterpiece, however, the joy from the end result is worth it.
Next, in detail about how to make a candy cake with your own hands, step by step:
- First, you need to cut out circles from polystyrene foam - the base of the cake. The bottom tier should be slightly larger than a cookie jar. Then the edges of the base are sanded.
- The next tier will be a cookie box, previously covered with fabric. The second tier is fixed with double-sided tape.
- Cut a thin strip of corrugated paper measuring 4 cm wide. After that, it is glued to the second tier so that it looks like a frill along the edge of the product.
- Now the candies are glued to double-sided tape on one side, and on the other side the tape is attached to the side of the box in a circle.
- We cut out a strip of corrugated paper for the first tier of the cake, and use double-sided tape to secure the ribbon to the base. Stretch the edges of the paper at the top a little to create wavy frills.
- After this, the paper frills are decorated with beads, which are attached using hot-melt adhesive.
- At the next stage, candies are attached to the edges of the foam base using double-sided tape.
- Then the top of the craft is decorated; for this, the Raffaello box is covered with textiles.
- A wide strip is cut out of corrugated paper and fixed along the edge so that you get a three-layer, beautiful cake. After this, each base needs to be tied with ribbons and bows tied on them.
- The lower part of the product can be decorated with candles, securing them with tape, and the upper part with foil flowers. In order to create a bud, you need to cut small petals from foil, which are connected with tape. If you plan to decorate a gift effectively, make more petals.
You will need
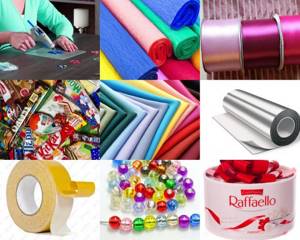
Having decided to make your own chocolate cakes, you need to carefully prepare for this, think through the concept and prepare the necessary tools and decorative elements.
To make a chocolate cake, you will first need scissors and a hot melt glue applicator. The materials you will need are: corrugated paper and candies or several chocolate bars; for decoration you can also use Kinder chocolate, polystyrene foam, beautiful candles, foil and toothpicks, ribbons and beads, brightly colored textiles, double-sided tape for fixation. In addition, a round box from Raffaello and another box of cookies of a similar shape, as well as a cardboard circle that will serve as the base for the entire structure.
Instructions for implementation
You need to start creating a chocolate cake with a stand for it. This is done as follows: a circle of the required diameter is cut out of cardboard, wrapped in foil and secured with tape.
In order to make a candy cake with your own hands, it is best to watch a master class, in which it is recommended to first stick a strip of double-sided tape to the box and glue it to a cardboard circle. And then both boxes are glued to each other with tape.
Next, you need to decorate the base with candies or bars, forming the bottom layer. After this, candies are glued to the next layer.
You can put surprises in the boxes in the form of sweets or small gifts.
How to make kinder surprises
Decorating a cake with Kinder surprises will delight your child, as the sweets are distinguished by their bright wrapping and delicate milk chocolate inside.
You will need:
- kinder chocolate - the amount depends on the size of the cake;
- Kinder chocolate eggs – 3-5 pcs.;
- round cardboard cake packaging – 1 pc.;
- thick cardboard - 1 sheet;
- colored cardboard - for gluing the base;
- thick red ribbon – 1 m;
- double-sided tape - ¼ roll;
- glue gun
Cooking process:
- We adjust the cardboard base to the desired diameter of the cake and the height of the kinder chocolate. We cover the blank with colored cardboard.
- Using double-sided tape, attach the chocolate to the mold in a circle, pressing it tightly together.
- We tie the cake in a circle with a ribbon and tie a bow.
- We decorate the upper surface of the lid with a soft toy and chocolate eggs.
If desired, fill the inside of the box with cookies and candy bars so that they become an additional bonus after eating the main part of the cake.
Original ideas for cakes made from sweets and chocolates
If you are planning to give unique gifts to your loved ones, then the most suitable option would be a chocolate cake for the holiday. Moreover, today there are a huge number of master classes on creating this masterpiece. And then you will need tools, design elements and your imagination.
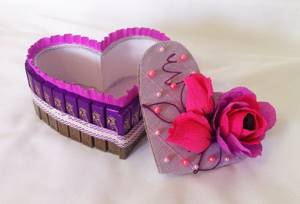
Romantic design. In order to prepare a gentle, romantic, sweet gift, you will need: large foam plastic, a glue gun, scissors and decorations for a chocolate cake, including a satin ribbon, beads, paper for packaging in soft pink or light blue colors, as well as oblong-shaped candies.
First you need to cut out 2 pieces of different sizes from foam plastic, which will become the basis of the product. Each piece is then wrapped in wrapping paper and held together with a glue gun. Next, both parts are connected, and candies are attached to their walls using double-sided tape.
Now all that remains is to decorate the gift; to do this, it is wrapped in ribbon and decorated with pre-made bows and beads. Next, buds of artificial or fresh flowers are attached to the cake decorated with chocolates.
Idea for a birthday. This solution is not only good in itself, but can also serve as a box for a souvenir given as a gift.
For work you will need: large foam plastic, scissors, double-sided tape, ribbon and paper for decorating gifts, corrugated paper, glue and candy.
First, 2 fragments of the same size, round shape, and the required diameter are cut out of polystyrene foam. Then they are covered with paper for a gift. The color scheme for this can be used either in a single-color version or in a combined form.
Gift for newlyweds – candy cake
If you decide to give the newlyweds an unusual gift for their wedding, make a wedding cake out of sweets with your own hands. To prepare it, you do not need to buy expensive components and spend a lot of time, just prepare the following materials:
- Styrofoam;
- glue gun;
- beads and satin ribbon for decoration;
- pink, blue or white wrapping paper, as well as with a pattern;
- ribbons and corrugated paper for flowers;
- elongated sweets;
- scissors.
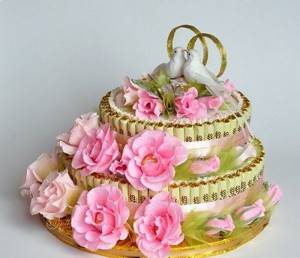
We cut out two bases from foam plastic - one is slightly smaller than the other. We cover them with wrapping paper using a glue gun, and then connect them. Now we decorate the cake - we attach the candies to double-sided tape.
All that remains is to decorate our cake. Tie both bases with a satin ribbon; this will help secure the candies more securely and will look very festive. Make beautiful bows from ribbons and sew beads on them, place decorations in random order.
If desired, you can include artificial or fresh flowers in the composition, but remember that the latter will quickly wither, so it is better to learn how to make compositions from corrugated paper.
The work is finished, you can go to the wedding and give the newlyweds an elegant and original gift, made with love and care.
Useful tips
You can decorate a cake made by yourself not only with candies and sweets, but also with ribbons and beads. To create a romantic look, you can add buds of artificial flowers.
In order for beautiful cakes to be suitable for children's parties, you need to use cardboard to give them the shape of a car or a flower. And brightly colored paper will make them memorable.
When choosing sweets for a cake, it is best to combine chocolates with bars and candies.
A bright candy cake is an original sweet for any occasion!
When planning to give someone a gift, we very often think about making it unusual, joyful and original. You always want to leave pleasant memories with a loved one. Even if the event is not grandiose, and the gift is just symbolic, by showing a creative approach, you can deliver a particularly vivid and memorable experience. For example, give an unforgettable candy cake...!
Perhaps you have long wanted to learn how to make a cake from candy, but it seemed difficult? The website bystryerecepty.ru has prepared the best master classes on making a candy gift. You will understand that making a candy cake is easy!
Additional design options
- An age number or birthday date looks great on the top tier of the cake.
- A toy at the very top of the cake will delight the child, but this option is better used for older children who understand that the toy should go to the birthday boy and will not be upset because they also did not receive a gift.
- To prevent the cake from being damaged during transportation, you can use gift wrapping paper or transparent film. It can also be decorated with ribbons, bows or flowers.
As it turned out, making a cake from juice and sweets for a children's party is not difficult; you just need to show a little imagination and find out the children's preferences. Nowadays, it’s difficult to surprise someone with store-bought sweets, but thanks to this presentation of treats, your baby’s birthday will remain in the memory for a long time.
We also suggest that you familiarize yourself with other tips and recommendations for parents whose children are going or are just about to go to a preschool educational institution. Read these articles:
- Why go to kindergarten and does your child need it?
- How to choose a good kindergarten?
- When is it better to send a child there, at what age?
- Degrees and stages of adaptation, how to help a child get used to kindergarten?
Cooking recipes:
By letting your imagination take flight and putting in a little effort, you can present a special and exquisite gift to your loved one. Using your favorite sweets, create a simple and completely unique surprise that will definitely be appreciated.
DIY candy cake
Required:
- a piece of foam plastic or any other dense material;
- corrugated paper of various colors and shades;
- PVA glue (you can take a hot gun);
- double-sided tape;
- candies (absolutely any to your taste and color).
How to assemble the cake:
We cut out a round base of the required diameter from foam plastic. It is not forbidden to use any other dense material, either to make a base from cardboard, or to take a ready-made one, for example a cookie box. As for the shape of the product, there are also no restrictions - round, square, oval and even triangular, if you wish.
We paste the resulting blank with paper using glue. We choose the color of the paper depending on the tone of the candy labels. Instead of paper, you can also use colored foil. After pasting, we leave our future cake to dry for several hours.
To make the cake look more neat, tightly twist the ends of the candy wrappers on both sides. They shouldn't be visible. You can choose the sweets as you wish, the main thing is that they match the size of the shape.
We take double-sided tape and stick it to the side surface of the base. We will attach our candies to it.
The protective paper from the double-sided tape can not be removed all at once, but as the sweets are glued. This way we will avoid the sticking of unnecessary debris, and the adhesive base will not dry out.
To make the cake smooth and beautiful, the confectionery products must be placed tightly to each other. We do everything diligently. We use all our imagination to decorate. You can use various decorative elements: paper or fabric flowers, figurines, soft toys, etc. Don’t forget about the event on which you are going to congratulate and choose jewelry with the appropriate motif.
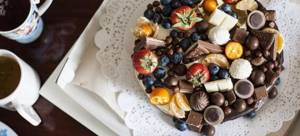
Cake decorated with sweets and chocolates
Ingredients:
- ready-made biscuit;
- cream 33% –120 ml;
- vanilla curd – 200 g;
- canned peaches or pineapples - 1 can;
- butter – 100 g;
- dark chocolate – 100 g;
- powdered sugar – 120 g;
- 2 packs of M&M candies,
- 8 packs of Kit-Kat bars,
- colored ribbon.
Cooking method:
Whip the cream, pre-chilled in the refrigerator, with powdered sugar until fluffy. Then mix the mixture with baby curd and mix with a whisk or pastry mixer. Cut the finished biscuit into 3 layers.
Grease each cake with cream and add canned pineapples or peaches. Do the same with the rest of the cakes. Prepare the ganache: take a chocolate bar and melt it in a water bath with butter.
Brush the top of the cake with melted warm chocolate until smooth. You need to decorate the baked goods before the chocolate hardens - place the Kit Kat bars vertically against the sides along the entire circumference. Place a packet of M&Ms on top and tie the cake with a colored satin ribbon.
Chocolate cake decorations
Anything will be suitable as sweets for such an original gift. The main thing you need to know is the taste preferences of the person for whom this cake is being prepared.
Ingredients:
- Kinder chocolate;
- Kinder Surprise;
- Barney bars;
- small juice packs.
For older children:
- Chupachups,
- MMDems,
- chewing gum and much more.
Cooking method:
Having prepared the base frame of the desired shape, we give it color using corrugated paper. Cut a strip 4 cm larger than the width of the base. Glue it with glue and smooth the joint thoroughly.
We wait a little for the glue to set, and carefully stretch the side sticking out at the top. This will create a wavy edge on the bottom tier of the cake, which can be filled with small multi-colored candies or other decorations.
With marshmallows and cookies
A delicious cake that children love is prepared from a minimal food set:
- 1 kg marshmallows;
- 300 g sugar;
- 2 eggs;
- 250 ml milk;
- 300 g butter;
- 6 pcs. cookies.
Cooking method:
- Beaten eggs with sugar are combined with milk, after which the mixture is cooked until thickened (not brought to a boil).
- The custard is added to the butter, after which everything is whipped until fluffy.
- The marshmallow is divided into flat pieces, which are laid out on a dish. Then they are covered with cream and crushed with cookie crumbs.
- The entire cake is formed in a similar order so that the crumb is the last.
- The dessert is refrigerated for 12 hours.
For decoration you can use grated chocolate or nuts.
Secrets of decorating a cake with chocolates and sweets
- M&M-type dragees can be randomly scattered over the surface or pressed with the palm of your hand.
- The candies must be attached to a glaze that is still warm and not cooled; buttercream, condensed milk, jam, preserves, and caramel are quite suitable.
- Distribute large candies in the appropriate order, give them a certain shape and pattern.
- Chocolates are good not only on the outside, but also on the inside of the cake.
- Lollipops with intricate shapes and figures will look beautiful as decoration. You just need to attach them to the top of the cake.
- You can decorate the dessert with chocolate bars such as “Kit-Kat”, “Mars”, “Snickers”. Attach around the perimeter of the cake, like a chocolate “fence”, press them onto the cream or icing on the sides.
- The bars can also be cut in half and used as a layer for a culinary product.
- After decorating the cake, put it in the refrigerator: this way the candies will stick to the surface better.
After your first homemade candy cake, you can easily make more complex compositions. As it turned out, it was very easy, and the result was simply stunning.
Decorating cakes with mmdems
Ingredients:
- Marshmallows – 2 white pieces;
- Marshmallow – 1 package;
- Food coloring red, yellow, brown, pink;
- Powdered sugar for rolling out mastic - about 100 grams;
- 130 gram pack of M&M candies.
Cooking process:
- Cover the finished round cake with a diameter of about 26 centimeters with icing or cream.
- We form a “fence” on the sides using long chocolate bars or cookies. To prevent it from falling apart, you can tie it along its entire length with decorative ribbon.
- Pour a pack of sweets inside onto the surface of the cake and smooth it out with your hands.
- Prepare the mastic: melt the marshmallows in the microwave, mix with powdered sugar to form a plastic mass.
- Divide the mass into 5 parts and add dyes, knead on a board until the color is uniform. Leave one part white.
- We cut one marshmallow into a circle, the second into an oval shape.
- We cover one with red mastic, the second with yellow.
- Using pink fondant we attach arms and legs to the M&M figures, make eyes, boots, a nose, a mouth and an inscription.
- We “seat” the figures directly on the poured candies. The cake is ready!
We recommend: Ideas for creative cake decorating