Homemade topiary is a wonderful gift, which is quite easy and simple to make.
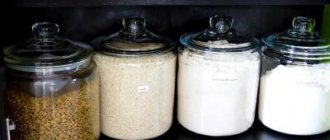
A beginner will make a stylish topiary in a few hours. An unusual composition is a wonderful decoration for a residential or office space and an unusual gift. To make it you will need patience and some materials: coffee beans, twine, glue and a number of tools that can be found in a hardware store. You need to start the creative process by choosing a composition design.
Topiary “Flying Cups”: searching for inspiration
Coins, seashells, buttons, beads, pearls and coffee beans are used to create creative crafts. When choosing a material, you need to build on your own preferences and available resources. Another reference point will be the upcoming occasion: Easter, birthday or February 14th.
Regardless of the occasion and materials chosen, topiary is initially created on paper. Unlike real materials, you can design a composition on a sheet as many times as you like. If thoughts don’t come to mind, then a master class will come to the rescue. Watching video fragments will not take much time.
As an additional means of finding inspiration, it is recommended to use:
- View thematic catalogs.
- Visiting handicraft shops.
- Watch programs about design.
- Poll of friends and so on.
After analyzing the various options, you can choose the one that best fits into the interior. It must be remembered that flying compositions are selected taking into account the prevailing color in the interior. Once the project is approved, work can begin. Before going to the store to buy a list of necessary materials, it is better to think in advance about what you will need. Regardless of the size of the composition, it is imperative to purchase a cup and saucer. It is desirable that they combine harmoniously.
How to make a beautiful topiary magnet is described in this material:
Varieties of floating topiary and materials for their manufacture
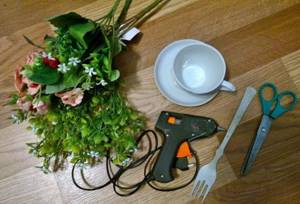
Topiary flying cups can be very diverse in their design, but the shape is always the same: the mug seems to float above the saucer. It is held in this position thanks to a curved fork (or a strong rod) disguised with decorative elements. When conducting a master class on creating such souvenirs for beginners, experts recommend the following list of necessary materials:
- cup and saucer (preferably from the same set or a suitable color scheme);
- a fork (or a stable rod that can be bent with some effort);
- gypsum;
- hot glue;
- decorative materials.
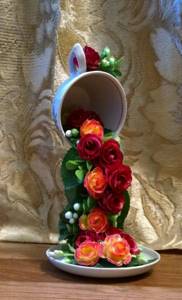
DIY Easter topiary “Flying Cup”
It is more fun to celebrate a holiday when it is decorated with stylish compositions. One of the most common is the “cup of abundance.” It is done in light colors, using shards or pebbles. Designers urge not to limit the flight of imagination. The main thing is to adhere to a sense of proportion, otherwise the composition will not stand still.
An Easter floating mug is created in a few hours.
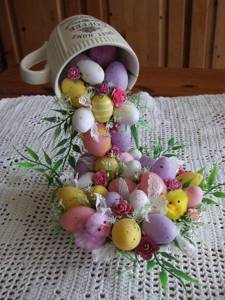
To do this you will need the following materials:
- Painting tape.
- Shards from an old pot.
- Sisal green.
- 20-25 pieces of plastic eggs.
- Artificial roses or a set of flowers.
- 3-5 branches.
- Thermal glue.
- 3-4 small chicken figures.
- A fork that needs to be bent using pliers.
To avoid accidental damage to the dishes, the place of contact between the bent fork and the cup and saucer must be covered with tape. Carefully stick the fork with its tines to the bottom of the saucer. Glue drying time is 35 minutes. After making sure that it is really dry, you should fix the fork handle on the bottom of the cup.
When creating a composition with your own hands, you need to remember safety precautions. Immediately after securing the cup at the top, it should be supported with a thick, high box. A simple technique will not allow the composition to fall apart until the glue dries. Attention and accuracy will be needed when decorating the lower part of the composition.
It is necessary to choose it wisely - the stability of the base ensures the durability of the composition. For these purposes, decorative pebbles are used, on top of which sisal is laid out. Masking tape will help to disguise the fork, onto which the sisal is attached with a glue gun. Using a similar tool, the upper part of the inner surface of the mug is decorated with decorative branches.
Topiary made from money and coins will perfectly complement the interior of your home:
The design of the saucer includes decorative Easter eggs, which are fixed with a glue gun closer to the rim of the base. The eggs are laid out in such a way that the roses fit into the gaps. If desired, the composition is complemented with lace or sequins.
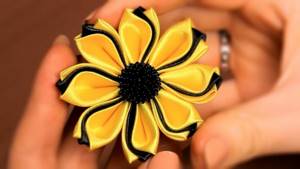
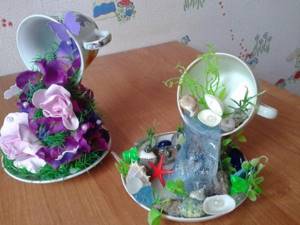
Topiary floating cup: master class in kanzashi style
A self-made topiary, symbolizing good luck and prosperity, fertility and well-being, will be a welcome gift for friends and family.
You only need to start work in an excellent mood, then the process of creation itself will turn into a holiday and fill the product with positive energy.
A flying cup in the kanzashi style has a special charm and originality.
For flowers using the kanzashi technique, a satin ribbon is suitable
Take:
- Coffee steam (you can use tea);
- Multi-colored ribbons 5 cm wide;
- Stamens and beads;
- Floral felt;
- Fork, sponge;
- Glue gun, tweezers, soldering iron. Instead of a soldering iron, you can use a regular lighter.
Everything is prepared so that in the process you will not be distracted from creating a man-made miracle.
Let's get started with the creative process:
- Cut out leaves from felt or ribbons.
- For the flower you need five pieces of ribbon;
- To assemble the petal, you need to draw it along the connection line with a lighter. We prepare the number of petals we need;
- We collect the centers of flowers from beads and stamens;
- We connect the saucer and cup using a fork and glue. After ten minutes, apply another layer of glue;
- As a load for the stability of the structure, select and place a heavy object on the saucer;
- Mask the fork and weight with a sponge and cover with felt or tape;
- Collect flowers from petals and stamens;
The created flower should be as light as possible so as not to load the base of the topiary
The final chord is decor with leaves and flowers made of fabric. The result is a beautiful and sophisticated gift.
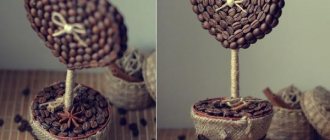
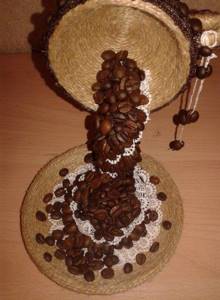
Coffee topiary “Flowing mug”
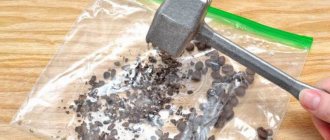
Fans of the strong drink will please themselves or loved ones with a stylish interior detail. To make it you will need materials, as in the previous case. The only exceptions will be a few moments related to the main decorative element - coffee beans. You should choose them not in the market, but in the store. In this case, the special aroma will remain for a long time.
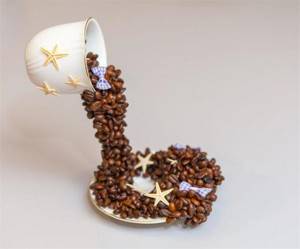
Designers do not recommend taking goods that have been lying on the counter for a long time. Such grains are heavily saturated with atmospheric moisture and odors. In order for a flying coffee composition to be truly spectacular, you will need 500 - 700 grams of beans to make it.
The further procedure is as follows:
- Choose a geometric shape for the composition: ball, heart, etc.
- Find a stick or pencil that will act as a base.
- The craft can be installed in any container the size of which matches the design.
- Mix the fixing solution in a pot and quickly insert the base of the composition into it.
- Make a hole in a pre-selected geometric shape that is used for fastening to the trunk.
- Cover the base with masking tape.
- The first layer of coffee beans is applied with the strip down, and the second - up.
For beginners, it would be useful to know that after each stage of pasting, at least 30 minutes pass before the next one begins. The specified time is enough for the glue to dry. The creative process is completed by fixing a wire that is strong in its structure on the cup and saucer. To do this, you need to bend both ends of the wire by 4-5 cm, moistening them with thermal glue.
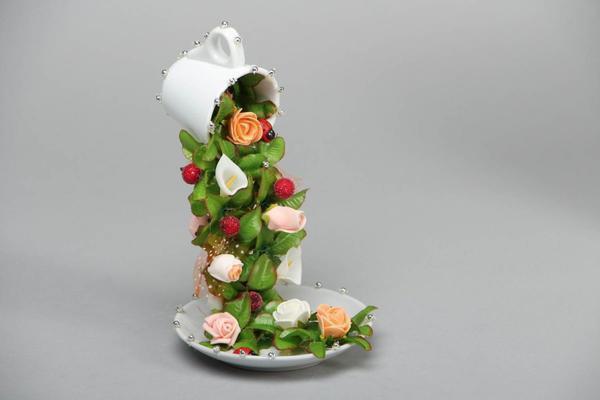
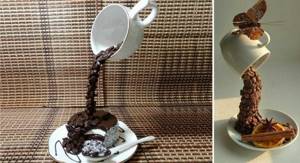
Secrets of creating a flying mug topiary.
Making topiary with your own hands is a fun and interesting activity that can generate income. In this master class we will tell you how to make one of the most popular types of topiary - a flying bowl. It is also called the floating bowl, as well as the bowl of abundance. The master class is also suitable for beginners.
For work we will need: a glue gun, artificial flowers, any old cup and saucer, scissors, a fork (preferably aluminum).
First, thoroughly wash your cup and saucer; you can degrease them with cotton wool and alcohol or alcohol wipes. Let's get to work.
We need to bend the aluminum fork as shown in the photo. With its serrated end it will rest against the saucer.
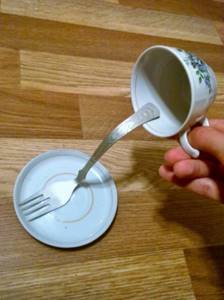
Next, you need to glue the fork to the cup. Don't skimp on the glue here! It may take you several rods, but the structure will hold up and please you for many years. If you have not worked with a glue gun before, we remind you that it is powered, so you must take precautions when working with it, avoid overheating and do not put your fingers under the leaking glue - you can get burned. So, let the glue dry for a few minutes and check whether the fork is well glued to the cup. If everything holds together, then glue the other end of the fork to the saucer.
This is the most important stage in the work. We need to find a balance in our product and choose a place for the fork so that the mug does not outweigh and the topiary does not fall. This is usually the center of the saucer. But it all depends on the length of the teeth, the size of the saucer and cup. After we have found the balance, glue the fork, again sparing no glue. That's it, the base is ready. The best part remains - the decor.
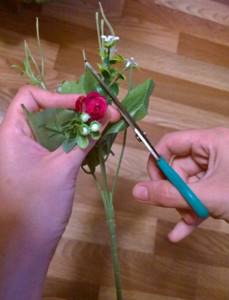
Take a branch of artificial flowers and use scissors to separate the inflorescences and leaves from the branches. We will place them inside the bowl, on the fork and on the saucer. In our case, these are burgundy-orange roses. First we apply it to see if we like the result, and then we glue it.
Decor options can be very different: flowers, fruits, a combination of flowers and fruits, coins, candies, feathers, beads and much more. Handicraft stores provide a huge selection. This is the pleasure of making topiary with your own hands, rather than buying it in a store.
In our case, we combine flowers and leaves, with flowers from one branch and leaves from the other. The leaves that were with the roses on the branch turned out to be unsuitable.
Don't forget that our product has not only a front side, but also a back side. It also needs to be covered with decor so that the fork is not visible.
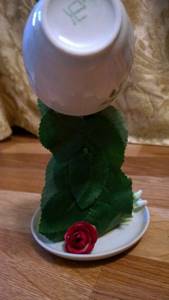
So, the flowers are pasted. What else should I add? You can glue a bird figurine inside, or stick a flower on the handle of the cup. It all depends on your imagination! If the design of the cup does not match the color of the decor, you can tint it with acrylic paints or make decoupage by gluing a fragment of a special napkin.
The flying bowl is not only a decorative item, it is an amulet that brings prosperity and abundance to the house. It can be placed in the wealth zone according to Feng Shui. And it is much more effective when such an amulet is made with your own hands.
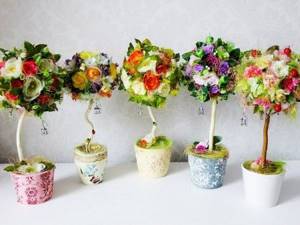
Children's topiary “Floating Cup”
The flowing compositions, unusual in form and content, will delight both children and adults. Light and calm tones are chosen for it, for example, blue, orange or burgundy. As a basis, topics related to the child’s favorite animated characters, literary heroes or hobbies are chosen. Photos of finished options will give you some ideas.
We also recommend learning how to create a topiary from corrugated paper:
The designers have developed recommendations to help you make your choice:
- If we are talking about a girl, then samples of princesses or a fairy house are chosen as a blank.
- Boys will be easily impressed by a hovering alien flying saucer, a super hero or an airplane.
- Baby wants a pet? Then a figurine of a psi, cat or bird is taken as the basis.
Do-it-yourself topiary floating cup: first steps to mastery
A flying cup is an original type of topiary that allows you to create coziness and comfort in your home and office. At first, working with non-standard materials can scare away beginners, but the desire to make topiary and give joy to loved ones will help overcome fear. Beginning needlewomen find inspiration in photographs of other people's work, try to repeat it and bring something of their own.
Coffee beans can decorate your craft and make it more original
Experienced craftswomen recommend starting with classic models. They also always advise beginners not to be afraid of mistakes.
Once upon a time they took the first steps in creating topiary and today they share the secrets of their craft:
- Create a folder on your computer and collect absolutely all the photographs you like, instructions for implementation and master classes that interest you:
- Stock up on materials. To do this, just look around. You will need absolutely everything - artificial flowers, shells, pieces of fabric, coins, old newspapers. The list is endless, as is your imagination;
- Buy several pairs of tea or coffee at once, stock up on forks. It is quite possible that you will not need to go to the store - everything for creativity can be found on the mezzanine;
- You may still have to go to the store to get a glue gun and glue sticks;
- Don't be afraid to experiment;
- Observe nature. This will help you avoid a common mistake made by beginners when choosing colors. It is the world around you that will tell you the ideal color combination.
Repetition of already created works will also help you achieve mastery in creating this handmade masterpiece.
Designers recommend decorating the topiary saucer with various sweets
A flying mug looks incredibly beautiful and unusual. The unique composition delights and fascinates - the cup seems to be hanging in the air by itself.
Creating a topiary is a very interesting and inexpensive activity. The endless presence of themes and variations will inspire you to create new works and give joy not only to yourself, but also to those around you.
Topiary for beginners (photo)
- Author: admin
Rate this article:
- 5
- 4
- 3
- 2
- 1
(6 votes, average: 3.7 out of 5)
Share with your friends!