How to use nail sliders
Before starting use, choose a nail coating base:
- Natural coating is a suitable option for transfers or stickers. Then just apply the fixative.
- If the coating is gel polish, then it is also decorated with decor and then with a fixative.
- If the nails are extended, then before applying the last layer, attach a transfer and rhinestones.
Before applying the design slider, not only the nail coating is prepared, but also the required shape of the sticker is cut out:
- When gluing to the full surface of the nail plate, the size of the film should match the shape of the nail. The width and depth of the installation are considered important, and the length is adjusted after application.
- If the film has a transparent base, then you need to decide on its size, that is, will it cover partially or the entire nail. After this, the desired size is cut out and applied.
- If the pattern is tightly folded, the preparation process is the same as in the examples already given.
We advise you to look at the technique of applying a slider to the nail:
What are nail sliders and what types are there?
The term “slider” is borrowed from English; translated this concept means “slide” or “slide.” Before applying the finished design pattern to the prepared nail plate, the picture with the image must be moved from the base. If you are concerned about how to use slider nail designs, you will need to study the issue in more detail. Despite its apparent simplicity, making a fashionable manicure with your own hands will not be easy.
To decorate your nails with a sticker, choose one of three types. Modern application techniques are divided depending on the type of sliders, which can:
- cover the entire nail;
- have a transparent base;
- have a dense pattern.
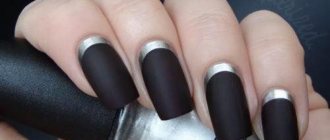
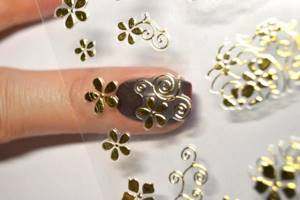
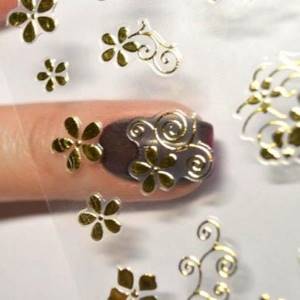
Sliders for the entire nail
These stickers are applied to the entire surface of the nail. The decorative image is fixed due to the tight fit of the base to the base coat and thanks to the transparent varnish on top of the slider. The application technique does not limit the use of any shades of nail polish, and the “transfer” will last longer than in other cases. When choosing this slider design, upon completion of the manicure procedure, the surface of the nail will be completely covered with a decorative image.
On a transparent basis
Sliders with a transparent film base look impressive under certain conditions. The transparent base limits the options for use, since this type is not suitable for bright shades of varnish, but only for the light or white ones for which it was originally created. But stickers on a transparent backing help you create original compositions on any topic, which makes your manicure noticeable.
With a dense pattern
To use a slider with a dense base, you must carefully prepare the nail. The advantage of this type of stickers is the unlimited scope for experimentation; they are often used for French manicure and as a replacement for hand painting. The sticker will look equally good on light and bright shades of varnish. The combination with additional decorative elements in the form of sparkles and rhinestones makes this type of sliders so popular.
Working with a picture
There are two options for preparing a slider for design. In the first case, it is cut out on one side according to the approximate shape of the base of the nail and the width, and then the protective film is removed and dipped in a container of water so that the working film is easily separated from the paper backing. However, professionals in the field of nail art note that this technique is inconvenient because it can wet the front side of the sticker. This is undesirable, as it may affect the durability of the fastening.
The best option, in their opinion, is to moisten the cut-out picture on a wet napkin for 30 seconds. This time is enough for the film with the pattern to move away from the substrate
In addition, its front side will remain dry, which is important for the durability of the design. It is pulled up with tweezers and immediately transferred to the accent nail.
You don’t have to worry that the length of the slider is longer than that of the nail, because after drying you can remove it by filing the edge of the plate with a file. When straightening the slider, it is important to remove as many wrinkles as possible that form during long-term work with the film. After this, the coating is dried in a lamp.
If the decorative layer is not completely dried, the coating will begin to chip within a couple of days from the moment of application.
In order for the slider to lie flat on the surface, you need to use a flat brush, using it to expel any air pockets that may form during transfer. A layer of undried substrate will be of great importance in this case. It is necessary not to recess the picture, but to straighten it, achieving a uniform and even coating without wrinkles.
All excess is removed with a cutter (at the base) and a file (at the edge). To avoid cutting off the edge with the picture, you need to hold the file at an angle. If small wrinkles have formed during the work, you can get rid of them with a primer. However, this composition is not so simple and can completely dissolve the sticker. To remove only wrinkles, you need to barely touch the brush with the composition of the working surface.
Step-by-step nail design with stickers
If we compare water sliders and photo pictures, the former are distinguished by their lightness and simplicity. The film, after peeling off from the base, does not tend to curl and does not stick to the fingers. And when gluing it to the nail plate, in case of an erroneous position, there is time for quick movement and smoothing.
Having such properties , the product is available for use by beginners who are just getting acquainted with this technique and wondering how to use nail sliders correctly.
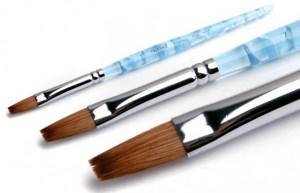
For design, it is recommended to arm yourself with:
- The slides themselves;
- Nail scissors;
- Manicure tweezers;
- A glass of plain warm water;
- Use a stick or toothpick to smooth the slide;
- Degreaser.
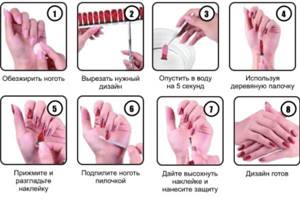
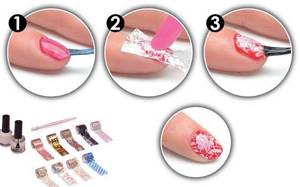
The procedure for applying a sticker consists of the following steps:
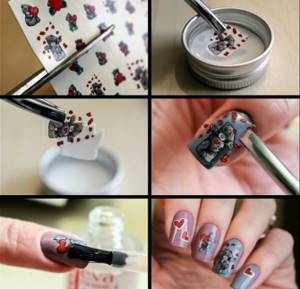
- Having selected the desired picture, cut it to the shape of the nail and hooked it with tweezers, now you need to dip it in a container with warm water and hold it for 20 seconds.
- Having placed the element in one place, with the base facing down, then you should move it to remove the base. After this, using a stick or toothpick, you need to smooth out the sticker. After choosing a place for the slider, you need to press it with a cotton swab for 5 seconds, sufficient for the sticker to stick tightly.
- At the end of the procedure, treat the nail plate with protective varnish.
Provided that your hands are in perfect condition (no need to remove cuticles, file them, etc.), decorating the design with such water drawings will not take time. And when your hand is already full, such a manicure can be done within a matter of minutes.
When applying a slider with an adhesive base, it will be even easier to transfer the design, because ... Immersion in warm water is not provided here.
An unpleasant moment can be the formation of air bubbles between the surface of the nail and the sticker, which occurs as a result of the sticker not being tightly pressed. To avoid this, the sticker should be carefully smoothed starting from the middle towards the borders of the picture. After this you need to press it tightly.
The accuracy of the design depends on the quality of polishing. So, with roughness, the picture will lie unevenly.
Affects the beauty of the manicure and the accuracy of the cut element.
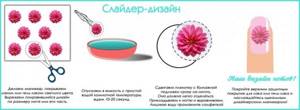
If you want to cover the entire surface of the nail with a sticker, this can be done using two methods:
- Cut out a piece from a napkin that follows the shape of the nail. To do this, you need to attach it to the nail and outline the shape. Then, you should cut it to the desired size. Having attached it to the slider, you need to cut off a suitable part from it.
- A clipping from the slider itself. Here, too, the shape of the plate is outlined and cut directly from the film with the sticker.
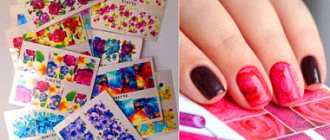
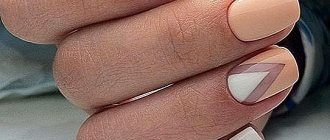
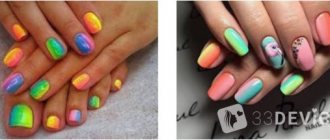
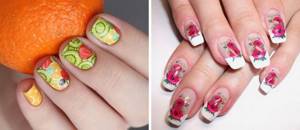
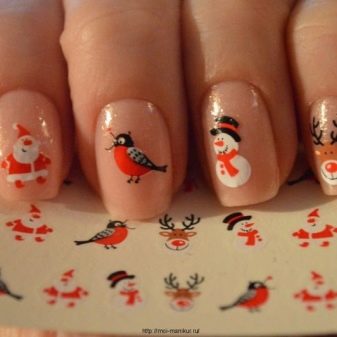
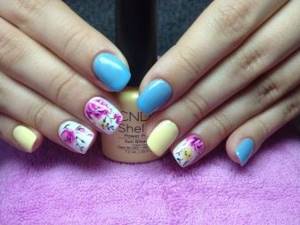
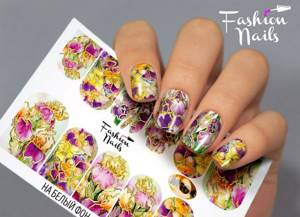
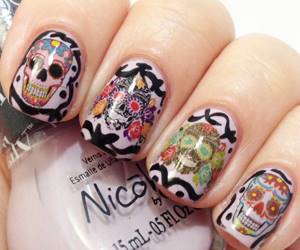
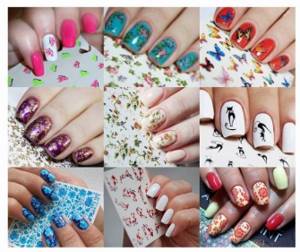
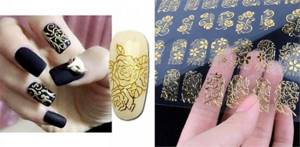
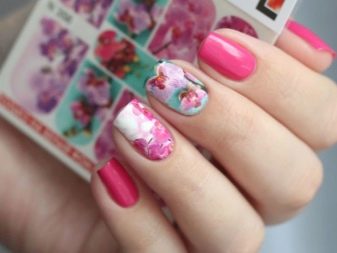
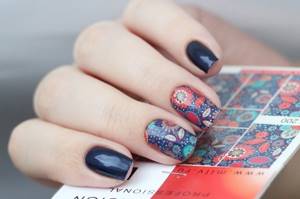
Photos of works with slider design stickers
The variety of nail sliders can surprise even people with a rich imagination. The skill of the professionals who improve the technique and develop this direction of nail art is even more amazing. Transfer stickers on various themes help you decorate your nails with a spectacular manicure in a short period of time, following fashion trends or choosing an always up-to-date classic. The photos below of works with stickers for slider design clearly demonstrate what heights masters reach and what is accessible even to beginners. Find out what European manicure is.
Kinds
Slider design includes several types of water stickers. All of them require preliminary soaking of the decorative element before separating it from the paper backing. Otherwise, the products are divided into two lines: options for the entire nail and pictures for a small part of it.
Regardless of the type, aqua pictures can have different thicknesses, which determines the difficulty of fixing the decor to the nail coating. There are options with elastic film. It is convenient when you need to tighten the slider a little, covering the light base on the nail plate. Analogues with greater thickness are more difficult to work with; it will take longer to give them the desired shape and concavity.
Based on the type of background, nail sliders are divided into two categories: they come with a pigmented and transparent base, on which a drawing or photo printing is applied. Transparent options are used to cover the main background. Due to this, they create the effect of hand-painting; such varieties are in price today. Analogues with a color base are convenient because, without unnecessary persistence, they allow you to create the effect of a pattern applied to a nail evenly painted with pigmented varnish.
Regarding films with a color or monochrome background, it is worth noting that it is here that the determining factor of the technology is the thickness of the slider. The fact is that a thin film cannot completely cover the original color of the nail plate. In addition, such a slider will look clear and rich only if you first put a white backing underneath it. It is useless to glue such pictures onto bright and dark tones of varnish: this will cause the image to fade and may lose its original attractiveness.
A thick film will be the best solution here, because you don’t need to paint your nail white under it. This can reduce the precious time it takes to apply and dry a single layer, simplifying standard slider design technology. As for the differences between pictures on the entire surface of the nail or part of it, partial images are made on a transparent basis, although some masters, for any special idea, painstakingly cut off the slider motifs in order to glue it only to part of the nail.
The main types of sliders include options with solid fill and applications. However, both options can be made in the spirit of airbrushing. This is achieved through a three-dimensional image or the so-called 3D effect. For example, sliders can convey a gradient effect and the illusion of volume. This type of decor is applied to any background background.
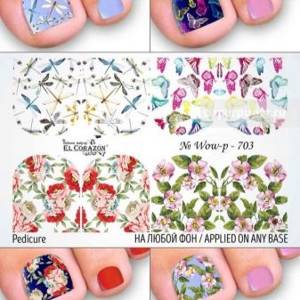
It is also worth considering that sliders are not universal pictures for arms and legs. In fact, companies produce different versions, which is usually indicated by the product labeling, and often by a special picture. In addition, the number of pictures for feet is smaller, because in pedicures, water-type stickers are usually used to decorate mainly the nails of the big toes. These images are larger than the hand images.
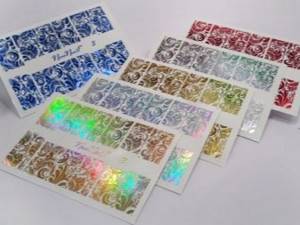
Sliders can have a glossy or foil surface. In addition, they come in monochrome, color, holographic and even somewhat voluminous. At the same time, the design itself may differ: in addition to photo printing, manufacturers create designs for real watercolors, made using wet techniques. This type of picture looks very beautiful; it is often used to imitate hand painting.
Why doesn't the slider design hold up?
So, you've got the manicure of your dreams, but the joy is overshadowed by slider peeling or other problems:
- The gel polish itself does not last: problems can arise at the stage of performing a manicure (wrong technology or skipping steps), or in the deplorable condition of the nails: for example, they delaminate. In the latter case, we recommend visiting a therapist, perhaps he will prescribe treatment;
- the film comes off along with the top: perhaps air has gotten under the slider;
- the slider is erased: most likely, you forgot to cover it with top;
- the manicure is “soft” to the touch and comes off in layers: the problem may be that you did not dry one of the layers well enough, or you applied the coating in a very thick layer;
- manicure chips or comes off: perhaps you work with aggressive liquids without gloves or constantly keep your hands in water.
Also, the reason for a short-lived manicure may lie in low-quality coatings or even fakes. Be sure to purchase all materials only from trusted stores that sell exclusively certified products!
We hope our review was useful to you, and you can easily decorate your manicure with the most beautiful slider! Well, if you want to become a real professional and learn all the intricacies of nail design, master a new profession and earn money, then we are waiting for you at the courses at the ParisNail manicure and pedicure school!
How to transfer self-adhesive stickers with a backing onto your nails
Transferring stickers with a backing and sticky base to nails should follow the required steps:
- Apply a color coating to the base in 2 layers, dry both times.
- The picture is removed from the backing, which should come off easily.
- Then it is applied to the nail, straightened, and fixed.
- All that remains is to cover the nails, not forgetting the end sides, with two layers of top (or first the base and then the finish), polymerize each one in turn.
This is how they work with expensive stickers and material from Aliexpress. But if the decor doesn’t stick well, after fixing it, you should coat it with a thin layer of base, dry it, and only then apply the top coat. For the same purpose, a primer is used as an intermediate. Take very little liquid and barely touch the nail with a brush moistened with it. Otherwise, the decor may get wet.
How to glue sliders onto gel polish
There are several types of sliders, once you decide on the design of which, you can start manicure. There are several nuances in the technique of applying a slider design to gel polish:
You should prepare the nail coating: remove the cuticle, degrease the surface with nail polish remover and level the surface of the nail with a buff; apply a base coat under the varnish and dry the layer thoroughly in a lamp; after the base has dried, a paint layer with a sticky layer is applied, it is important to dry the acrylic a little before gluing the decal, otherwise it will lie unevenly and bubbles may form; Next, you should separate the slider from the paper base; to do this, place the cut-out design in a container with water for a few seconds. After peeling off the film with the pattern from the paper base, the pattern is applied to a sticky colored coating layer; as an auxiliary design, you can apply a dot pattern with acrylic paints, or put rhinestones or bouillons; after drying the sticky layer, it is necessary to apply a transparent finishing layer;. If you want to apply a design to the entire nail and cover it with finishing gel polish, then you should apply the base sequentially, a thin layer of a sticky acrylic layer, and then stick the image, straightening it with a cotton swab
You should step back one or two millimeters from the edge, then the image will be smooth and without bubbles. Applying a finishing layer will consolidate the result and add shine to the coating.
If you want to apply a design to the entire nail and cover it with finishing gel polish, then you should apply the base sequentially, a thin layer of a sticky acrylic layer, and then stick the image, straightening it with a cotton swab. You should step back one or two millimeters from the edge, then the image will be smooth and without bubbles. Applying a finishing layer will consolidate the result and add shine to the coating.
It is not necessary to apply sliders to all nails; you can select a couple of nails and work on them thoroughly. This design looks beautiful and even an experienced author cannot distinguish a high-quality slider design from an acrylic painting. A wide selection of transfer designs allows you to create a unique look on your nails every day.
How to work with 3d sliders
Nail sliders, the designs of which can be very diverse, also include the latest development - 3D stickers. The volume effect is created due to the fact that the lines and image patterns of the drawing are formed in such a way that they form a visual phenomenon of the volume of the image. It looks especially unusual on nails.
This aqua sticker covers the entire nail. Among the many sets of sliders that are sold in cosmetic stores, you need to choose those that guarantee a 3D effect. The slidet is applied in the same way as all other aqua stickers of this type.
After the sticker has dried, a dotted pattern is applied with gel polish over the entire surface of the nail, which, in combination with the existing pattern on the slider, will create the necessary shape in 3D style.
note
Most often, a set of nail stickers includes instructions for use, but sometimes they may not. That is why it is necessary to know the recommendations for the use and application of nail sliders.
Before starting a manicure, it is important to prepare all the necessary tools in advance so that nothing interferes with the successful completion of your nail decor:
- When applying water-based stickers, it is best to use warm water to speed up the process of peeling them off from the base.
- If the sticker cannot be fixed in the desired position, do not try to move it. Try to correct the shortcomings by adding other decorative elements, otherwise you will have to apply the slider again.
- It is worth remembering that you are not limited in choosing the location of the sticker on the surface of the nail, and this makes it possible to create a truly unique composition.
- After completing the slider nail design, avoid contact of your hands with water for at least half an hour.
Thanks to the large selection and ease of use of sliders, more and more nail art lovers prefer this method of nail decoration. They do not give the effect of extended nails, so your nails look as if they have only one layer of varnish. Such stickers are perfect for those who do not want to weigh down their nail plates with a large number of decorative elements. Sliders do not have a negative effect on the structure of the nails, which allows you to use them regularly.
The main reasons for peeling nail stickers:
If the quality of the slider leaves much to be desired or the varnish fixation does not adequately protect the design from external influences, the manicure will become unusable in a fairly short time. If you make a mistake when applying the sliders, then the nail decoration will also become unusable very soon.
When applying nail stickers yourself, it is very important to thoroughly dry both the base coat and the slider itself. Don’t forget about the quality of the varnish fixation, which protects the design.
Why sliders can peel or peel quickly
How to use a slider design for nails so that it does not peel off or peel off quickly? There are two main reasons that lead to such unpleasant phenomena: violation of technology or poor quality material. To avoid peeling, when applying the sticker, carefully walk over its surface with a cotton swab, leveling and removing any irregularities. It is better to glue the decal onto the dried second layer of varnish.
Sliders peel off or peel off quickly in cases where they are not covered with topcoat or clear varnish. The durability of the decal is affected by the base film, elasticity, thickness of the sticker and how well the base is dried. Fulfilling the last condition helps to securely fix the slider and eliminate the option when the picture starts to “crawl”.
- Hypertension - what is it?
- Find an Android phone. How to track a switched off or lost Android phone via IMEI or computer
- How to gargle for pain
How to stick a slider design on the entire nail
To achieve a perfect slider design, you need to cut the slider exactly to fit the nail plate. How to stick a slider design on the entire nail? What tools for slider design do nail art professionals recommend?
You will find answers to these questions in the video at the end of the article, with the help of which you will learn the intricacies of the slider design technique and achieve success in performing such a manicure.
Water decals are very good because they can be combined with any nail covering, but the slider design technique has its own differences. As with any other method of decorating nails, first of all, a hygienic procedure is carried out to prepare the nails for further operations. Then the nail plate is covered with a layer of varnish or acrylic.
A slider with a design you like is cut out exactly to fit the shape of the nail bed.
The sticker is dipped in warm water for a couple of seconds, and then detached from the paper base and applied to the nail with already dried varnish. Using small pressures on the slider, drops of water are removed, after which the surface is smoothed with a cotton pad.
As already mentioned, slightly heated water works best for water decals.
Water-based stickers are in no way inferior to sliders with an adhesive layer. They go very well with light shades of varnish, and due to their ease of application and ability to stay on the nails for a long time, they are in great demand among nail designers.
Features of working with water stickers
Depending on the basis on which the sticker is placed, the correct application technology must be selected.
- If the water slider is located on a self-adhesive base, they need to be separated from the base, placed on the nail plate, and a cotton sponge pre-moistened with water should be placed on top. It only takes two minutes for the sticker to take off. Afterwards, the disc needs to be removed and the nail covered with a finishing layer. The slider is perfect for both regular and gel polish.
- To apply regular water-based stickers, you will need a container of water. At the first stage, such sliders are not separated from the base. You need to cut out the design you like from a common sheet and soak it in warm water for 20-30 seconds. For convenience, tweezers are used. Next, the design is dried with a napkin, the base is removed, and the image is applied to the nail. Afterwards the finish is applied.
Advantages and disadvantages
Nail stickers for gel polish have many advantages. Almost all varieties are easy to use, which is good news for those who do their own manicure at home. Moreover, the products have a fairly affordable price, and therefore each of us can buy them. The images themselves are distinguished by the clarity of their lines and the brightness of their shades. This is also true for manicure, since clear lines give the design a neat look.
Given the rich range of themes and colors, choosing the right options will not be difficult. Today, the list of prints of all kinds of nail stickers is so diverse that even the most discerning woman can find ones that match, say, her handbag, neckerchief, jewelry or shoes. In addition, the desired print may have several color shades. Due to this, you can choose a product both in a range similar to the accessory and in tone.
Stickers are also good because they save overall manicure time. At the same time, some varieties can be disguised as artistic painting, thereby increasing the status of manicure. This technique is used by nail professionals when their clients are running late but ask for artistic designs on accent nails. Moreover, some stickers can be combined with each other to create interesting compositions.
Today, the nail industry is trying to simplify any work of the master, and therefore we have the opportunity to purchase auxiliary substances that allow us to correct minor flaws during the work process. For example, the same primer can dissolve folds and cover protruding elements with topcoat. Otherwise, translation requires a minimum of tools.
As for the shortcomings, they can all be associated with the nuances of work and the quality of the stickers themselves. For example, this could be the quality of the film itself and its thickness. There are cases when it simply breaks during the process of straightening the nails. It is impossible to say unequivocally that all budget options are bad, because the main part of the quality of work depends on the accuracy of the master. And a thin sticker can be glued well, without tearing.
If we talk about nuances, we rarely listen to the recommendations of specialists. Therefore, in case of detachment, we attribute the flaw to the shortcomings of the material
It is important to understand that when working with stickers there are a number of rules that must be followed.
The second nuance leads to the formation of folds, which significantly spoil the visual perception of the design.
Stickers on extended nails
When working with extended nails, decorating with sliders also works without problems:
After giving the nails the desired shape, they should be cleaned of dust.- If gluing is planned on acrylic nails, the placement of the picture must be precise.
- When using gel extensions, nails should be placed under a lamp to dry. It will help the slider quickly attach to the nail.
- After completing the design on all fingers, you need to go over it with a finishing coat (especially when applying gel extensions).
How to use it correctly
Don't try to separate the image from the cardboard backing with tweezers, scissors or your fingers - the manufacturers have thought out the system in advance.
To create a design with sliders you will need:
- base and top;
- gel polish for the background. If the pattern is solid, then it is better to choose white gel polish;
- sliders. They are offered by the brands Irisk, Freedecor, Vogue Nails;
- orange stick;
- scissors;
- nail polish remover;
- cotton pads;
- a small bowl or other container with warm water. Do not use too hot water - the patterned film may shrink.
Prepare your nails for coating in any way - using a machine, cutting or any other technique.
Preparation
Choose sliders according to size.
- if we are talking about single designs on a transparent base, make sure that the image fits completely on the selected nail;
- If the slider has a solid pattern or image, alternately place your finger on the image. The width of the picture should be 1-2 mm wider than the nail plate.
Cut out the pictures with scissors and arrange them in the order in which you will transfer them to the nail.
Design creation
- Cover your nails with base and gel polish, drying each product separately. It is better to choose gel polishes in colors that contrast with the pattern so that the image stands out;
- Separate the picture from the backing. You can dip the selected fragment in water or place it on a wet cotton pad. The option with a cotton pad is more convenient - the pattern is separated just as effectively, but does not force you to immerse your hands, already covered with color, in water;
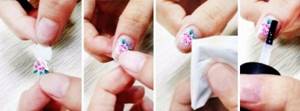
- Transfer the drawing. After contact with water, the film part is easily separated from the paper part - do not pry it with tweezers or try to hook it with your fingers - bring the slider to your nail and slide the film;
- Gently straighten the film and make sure that it completely covers the entire nail plate. Using smoothing movements, squeeze out water and air bubbles from under the slider. Make sure there are no folds - they will stand out strongly against a light background;
- Remove excess. Fold the film hanging from the side of the free edge along the end and, with a careful but sharp movement, pass it along the crease with a file or cut it with scissors. Fold the remaining bumps on the edge under the nail to seal the end. Press the edges of the side rollers with an orange stick so that the top does not flow under them;
Completion
Wait until the film dries a little
While it is wet, it easily moves along the nail and can slide off when covered with top;
Secure the design with a finishing coat, paying special attention to the side bolster area and the end. If these areas are not treated, the film will quickly come away from the nail and ruin the design.
Pictures in combination with regular varnish
You can decorate your nails with a manicure with sliders using a base coat of regular varnish.
To do this you need:
- After treating your nails and putting them in order, sand the surface of the nail plate well.
- Apply a base layer over the nail.
- Cover the nail plate with one layer of colored varnish. After thorough drying, apply another layer of varnish. This is necessary to obtain a bright and expressive color. Finish by drying the varnish.
- Paste the picture, smooth it well, and press it to the nail.
- Secure the slide with a finishing coat.
Flaws
You might be interested in:❶ How to paint toenails
We can talk for a long time about the advantages of stickers on gel polish at home or in a nail salon. But what are the disadvantages of this method of nail decoration? And are there any negative factors at all in using such a technique for decorating the nail plate?
Rather, it all depends not on what such a decoration element is in nail aesthetics
Here you need to pay more attention to how to apply stickers to gel polish or any other base surface correctly. Without following the appropriate recommendations on the sequence of correct application of illustrations in the form of such translations, you risk spoiling the overall appearance of the manicure
Take your time, try to transfer the adhesive blanks onto your nails carefully. And then you won’t have to think about whether this attribute of nail aesthetics has any disadvantages at all.
What coating to apply and how?
The slider design can be applied to any coating or to a grease-free surface of the nail plate, without the use of additional coating.
When gluing a slider decal, you should always remember the need to prepare the surface. The nail plate should be leveled, the cuticle should be pushed back or trimmed. The nail should be given the desired shape with a file. When gluing the slider onto an uncoated natural nail, you should degrease the surface and remove any remaining hand cream with nail polish remover, then the image will lie flat and last a long time. It is worth remembering that the decal is fragile and you should not press it too hard with your finger or a sharp object so as not to damage it. Instead of sharp objects, use tweezers to separate the design from the paper in water, and press and dry the design, the field of gluing on the nail, with a cotton swab.
When applying to a finished varnish coating, you need to dry the design and then apply a transparent fixative to the image. You should not use express drying for manicure. When applying extensions, the transfer design is applied to the filed nail, covered with a thin layer of adhesive layer, and then dried and a finishing layer is applied. When applying an image to acrylic, you should be extremely careful; the design cannot be moved, it can float and dissolve under the action of the gel.
3D slider design
Slider design is not always the simplest sticker; 3D sliders are gaining more and more popularity in the nail industry. They differ from ordinary ones in their structure - the sliders are voluminous and convex, which creates an interesting effect.
The 3D stickers are glued to a clear base so they can be easily tried on before gluing to visualize the final result.
Otherwise, their application is exactly the same as working with a slider that has an adhesive base. You need to cut out the design of interest, remove it from the base, carefully, using tweezers, apply it to the manicure and smooth it out. It is impossible to complete the entire process with a topcoat, because then the desired volumetric effect will be lost.
To remove a 3D slider yourself, you need to know certain nuances. When applied over regular nail polish, nail polish remover is used to remove it, but it will only remove the design.
To get rid of the adhesive base, you need to use an orange stick: it does not scratch the plate, but at the same time effectively removes glue residue.
Kinds
Today the choice of such products is quite wide. There are many varieties of nail design stickers.
Water
Water stickers are a thin film placed on a white paper base. A special feature of decals is that they need to be based on a translucent base, so they require careful selection of the shade of varnish. The background should be in harmony with the color palette of the pattern and not merge with it into a single incomprehensible spot.
The disadvantages of this type of stickers include the likelihood of damage to the workpiece during the process of adjusting it to size and shape.
Self-adhesive
Such drawings are photodesigns (fragments with an adhesive surface located on a special substrate). Their feature is independence. In order to glue them, it is enough to separate the sticky layer and stick the fragment onto the surface of the nail.

The stickers themselves can represent individual objects of a specific design or be a full-fledged object. They come in a variety of sets of 10 plates designed specifically to cover the entire area of the nail. Sets created for French are made in the form of stripes.
3D
Stickers of this type differ in volume. They are slightly convex, unlike regular flat pictures. This type of slider can be a full-fledged decorative element or a nail accent.
These stickers are either water-based or adhesive-based. In general, they are not difficult to work with, although sometimes difficulties may arise (when designing a manicure over the entire area of the nail). The presence of a small relief (bulge) does not interfere with everyday life; it does not scratch or cling to clothes and other objects.
The advantages of 3D stickers include the ability to combine them with other decorative design elements (for example, with regular stickers). They are easy to use and often look more beautiful than their counterparts. The disadvantages include the difficulty of removing the sticker when removing the coating. Special liquids for removing gel polish are not intended for such procedures, so this sticker will have to be scraped off.
How to use nail transfer stickers
There are two ways to use transfer stickers for nails, the first is as follows:
- The selected shade of gel polish is applied to the base and dried.
- Next, use a special glue, which is applied in a thin layer and evenly.
- Then you need to wait a few seconds for it to become transparent.
- The wrong side of the sticker is pressed against the nail and smoothed.
- Then it is sharply removed from the surface, and the design is imprinted on the gel polish.
- All that remains is to coat the nails with the finish and dry for the required time.
The second method is similar to the first; almost all actions are repeated. But it is not the glue that acts as a fixative, but the sticky layer of the base. It is applied to polymerized gel polish, dried, but the surface is not wiped with a cleaner. Thanks to the sticky layer, the decal is clearly imprinted on the nail. It is secured on top with a finishing agent.
Benefits of using nail sliders
Sliders have many advantages over regular nail painting, and even professionals often use ready-made drawings in their work, but for beginners and for those young ladies who do their own manicures, sliders are a real salvation. Let's figure out what is the secret of their popularity^
“Predatory” print is the most effective version of slider design
- Aesthetics. Sliders guarantee a clear, symmetrical design that does not need to be corrected or adjusted.
- Wide choice of designs. There is no need to think about the decor option in advance. You just need to choose a suitable design from a wide variety.
- Ease of use. Using sliders does not require any special skills. The scheme of working with them is clear even to beginners.
- Availability. The price of sliders is quite affordable, and they can be found in any store.
- Persistence. The design with sliders applied to gel polish is no different from a regular gel manicure, both in durability and longevity.
- Execution speed. Manicure using sliders significantly speeds up the decorating process.
Interesting
If you decide to decorate your nails using sliders, but later change your mind, then you can easily change the design by simply covering the old pattern with a new sticker, which is then also fixed in the lamp. However, you should not do this more than once, otherwise you will get excessively thick nail plates.
How to use it in design?
Nail sliders are unique in their self-sufficiency. However, despite this, they allow further nail decoration. In addition, experienced craftsmen often use such pictures when their clients are late, but ask for a special accent design. And here acrylic-based paints, thin brushes and all sorts of sparkling elements come to the aid of the master.
Due to the small image in the pictures, rhinestones for them should also be selected in a tiny size. It’s even better to combine rhinestones with bouillons (microscopic beads for manicure). This will allow them to fit into the design more organically. Rhinestones can decorate images in spots. For example, these could be:
- eyes on butterfly wings;
- the body of a dragonfly or spider;
- the glare of a cat's eyes;
- middle of flowers;
- grains of a wheat ear;
- peculiar buds or buds on branches;
- crown bases;
- imitation of a highlight on the logo of a Fashion House.
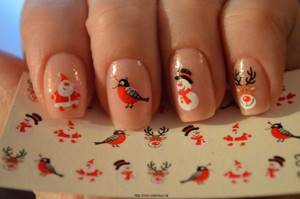
In addition, sliders can be used as a tool for creating seasonal designs, which is one of the fashion trends this season. It is pictures that, better than any decor, can convey the right mood of the season. For example, an autumn manicure can be decorated with prints of orange-fiery leaves and ripe berries, and drawings of a rainy city. It is worth supporting the winter design with patterns with a knitted texture, as well as pictures of snow-covered frosty patterns on the windows.
How to make a continuous coating
This technique is quite applicable to both long and short nails. This includes extended nails, which can also be beautifully decorated with designs, ornaments and patterns. However, we must remember that those girls whose nails are not naturally straight and strong should not use transparent stickers
Slider design for nails: how to use with gel polish and how long it should last on such a coating - there is a clear answer to this question. The sticker will easily last 2-3 weeks, which is enough for most women. Usually, it is after 3 weeks that the manicure has to be renewed, since the nail plate grows strongly and the cuticle needs care.
On regular varnish, the slider will last up to 5 days. If you want to extend the wear period, you can additionally apply a fixative every other day.
To prevent detachment, it is important to follow several rules:
- careful application of the pattern prevents the appearance of air bubbles, which can cause damage to the sticker; careful smoothing from the center to the edges will solve the problem;
- One should not forget about proper drying of the varnish under the slider, otherwise the risk of damaging the design increases several times;
- coating with a top or finish is mandatory, it prevents mechanical damage, the sticker cannot be accidentally torn or peeled off, it will not become wet or peel off;
- you need to forget about steaming your palms, washing dishes or washing floors without gloves.
Features and Benefits of Slider Design
Slider design for nails (how to use with gel polish will be discussed later) is a manicure technique with a special sticker that is attached to the nail plate. In appearance, the technique is in no way inferior to hand painting, but at the same time saves time. The procedure takes little time, and the customer receives a beautiful manicure, even if the master does not have artistic design skills.
The advantages of slider design are as follows:
- such drawings do not need to be redone or adjusted, unlike hand painting, the main thing is to apply the sticker correctly and accurately;
- no need to think through the design, just choose a ready-made ornament from a huge variety of options;
- quick and extremely simple application process that even a beginner can handle;
- the cost of design is much lower, because the artist spends more time and effort on artistic painting;
- the slider design significantly allows you to complete the procedure much faster;
- A properly applied coating with stickers will last for a long time; such a manicure will delight you with its durability.
There are 2 main types of slider designs: water-based stickers and self-adhesive. Completely different technologies are used to apply them.
| Water stickers | Photo design |
| This material is easier to work with. Firstly, it does not need to be cut to the shape of the nail, it fits easily and does not have a hard base. Secondly, sliders are suitable for any technology, be it working with regular polish, gel or extended nails. That is, you can use water-based stickers both in the salon and at home. Thirdly, the variety of designs and ornaments is much wider than that of self-adhesive images. | Self-adhesive stickers are very durable to wear; they will last a long time, on average 2-3 weeks. And, despite the fact that creating a manicure with a photo design will take a little more time, it has another undoubted advantage: by ordering stickers with your own design, you can create an absolutely unique manicure. |
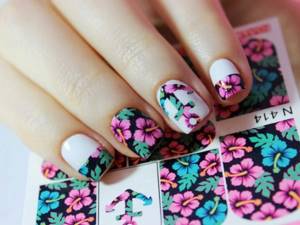
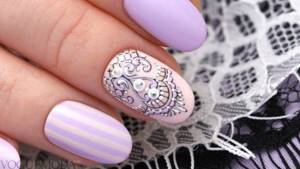
The most popular among women who choose a slider design are stickers with abstract, geometric, plant and animal designs, as well as portraits of famous people, popular cartoon characters, hearts and flowers.
Advantages and disadvantages
Nail sliders have many advantages. They can have different textures, so you can enrich your manicure design with an unusual effect. In addition, coatings can have different techniques, which allows them to create the illusion of hand painting. It is often difficult to distinguish whether a woman has a slider on her nails or a design applied with a thin brush.
The decorative elements themselves can be called a real design boon. Working with them is not difficult, and therefore every woman who has a basic manicure kit at home can create a beautiful design for her fingers. The sliders are highly appreciated by professional craftsmen. To date, they have tried all known varieties and came to a unanimous opinion about the exclusivity of this decor.
It is impossible not to note the richest assortment of such material. This fact allows you not to limit yourself in the flight of creative thought, embodying the most daring and extraordinary decisions in life. There is no need to come up with a pattern or ornament yourself: you can select ready-made pictures that will match specific clothes or existing accessories. At the same time, design solutions can be the most unexpected.
Slider colors can be very diverse. In this case, the coating does not change the color intensity as long as the sliders are on the nails. The pictures are UV resistant and have clear lines.
There is no need to undergo any special training: the fixation process takes no more than a minute. Compared to other types of decor, this is the fastest method for decorating accent nails. In addition, the price of the sliders is quite affordable. Applying such a design in a salon will cost less than artistic painting on accent nails. The aqua stickers themselves are harmless to the skin and nails. They do not provoke allergic reactions and do not destroy the nail plates.
If all the nuances of the technology are observed, such decor is held securely and firmly. It does not need adjustment if it is sealed well on all sides. It is impossible not to mention that you can apply pictures not only when creating a fresh design. Sliders can be used to decorate a laconic design without decoration, which can be worn for more than a week. For example, you can stick pictures on the nails of a classic manicure.
Despite the fact that the fixation itself is simple, you can tear the picture when spreading it over the surface of the accent nail. In addition, the roundness of the nail plates can become a problem. On convex nails, the image does not lie so smoothly, and therefore it is necessary to supplement the technology with the stage of correcting some defects.
Other disadvantages include not always high-quality film with a printed pattern. Some samples tear or even crumble when they try to stretch them, eliminating folds. Also, someone may find it a disadvantage to have to adjust the slider to the shape of a specific nail. However, you need to understand that everyone’s nail plates are different, and therefore the manufacturer offers pictures with different sizes. Some of them allow for size adjustments and adjustment to the shape of the nail.