Using an Inkjet Printer
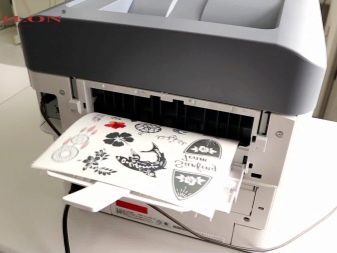
Transfer paper is not the only option for transferring a design to the skin. There is an easier and less expensive way to beautify your body at home. To do this you will need adhesive paper and a printer. You will have to go to the store to buy adhesive paper, but today there is a printer in almost every home. If this office equipment is not available, you can go to any copying station to print the desired picture.
Before applying the finished sketch to the skin, it is important to understand that such a tattoo will last no more than a week. After 6-7 days, almost all of it will be washed off. You can save the picture for a longer period if you try not to wet it with water when washing or taking a bath.
It is proposed to get acquainted with step-by-step instructions for transferring a tattoo to the body using plain paper and a home laser printer.
- It is important to remember: you should use adhesive paper for this work. A printer sheet covered with tape will work as an analogue.
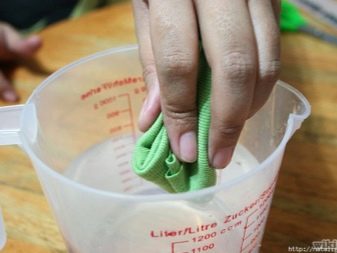
- In addition to paper, you need to prepare several auxiliary items: a sponge or a small piece of cloth, water in a small container, hairspray and alcohol.
- Now you can begin the main steps. It is necessary to treat the area of skin where the temporary image will be applied. To do this, use alcohol and a small piece of cloth. Perfume will work as an analogue of alcohol. Eau de parfum contains the same alcohol, suitable for disinfection.
- Then take the printed picture, attach it to the treated area of skin, and press. Go over the top with a sponge dipped in water. This process requires special care and precision. The sheet of paper should not move.
- After applying the design to the skin, the paper must be removed. The temporary tattoo should be covered with hairspray. Varnish is a kind of fixative, protecting the body image from rapid deterioration.
The presented method of applying a temporary tattoo does not require the use of powder for drying the skin and tracing paper. And there is also no need to waste your time going to a tattoo artist.
How to make at home
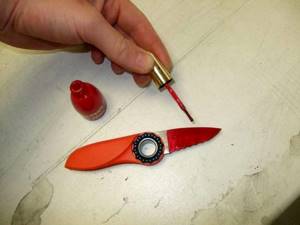
Engraving the blade or handle of a knife can be done at home. The master must have a sharp eye and steady hands. It will take a long time to acquire these skills. Therefore, it is better for beginners to try the chemical method of etching metal in an aqueous solution.
Required materials and tools
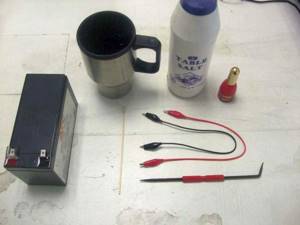
For chemical etching of metal you will need:
- glass bath;
- car battery;
- wires for connection and clamps;
- spoon;
- saline solution;
- tsaponlak.
To get a beautiful drawing, you can first create a blank in a computer program or find it on web resources. The paper used for the stencil is thin and glossy.
Application technology
All work must be carried out with rubber gloves. Step by step execution:
- Prepare the electrolyte: pour water into the bath, add salt depending on the volume (2 teaspoons per glass of water).
- Cover the material with varnish and wait until it hardens. Draw the outline of the future image with a sharp needle. Exposing the metal is necessary for contact with the electrolyte.
- Place the electrodes in the saline solution. The downside is a pre-prepared spoon; the upside is a knife blade.
- Apply electricity. After 5 minutes, turn off the current, remove the product, wash off the remaining varnish, rinse under running water and wipe dry.
There are many methods for engraving knives. The above is one of the most common and simplest. It is ideal for inexperienced or novice craftsmen.
We cover with varnish We make a saline solution We make an inscription on the blade We apply electricity We erase the varnish
How to use tattoo transfer paper?
- To retake an image, you need to transfer it to a sheet of tracing paper. However, you can put a printed source instead. There is no need to redraw it;
- the picture is placed under the second tracing paper and its outline is outlined with a regular or special pencil so that a clear outline is obtained;
- when the image is transferred to the skin, transfer gel is smeared;
- a sheet with an outlined outline is placed in this place so that the coloring layer adheres to the skin;
- the sheet can be slightly wetted with a damp cloth, pressed and smoothed out the picture;
- then pull the edge up and make sure that the image is printed;
- Now you can remove the stencil and wait until everything dries.
Transfer paper is usually sold multi-layered and consists of lining, carbon paper, tracing paper
If, after lifting the picture, you see that its edges are not completely printed, return it back and wet it with liquid again. If any ambiguities appear, the drawing can be removed with any alcohol composition and repeated all over again. Materials can be used several times.
The easiest way to make a temporary tattoo without a printer is with a gel pen

Tattoos can be made not only with the help of perfume and printouts. There are also simpler ways to decorate your own body with a temporary tattoo, for example, with a gel pen.
Simple and banal tattoos can be made at home with a regular pen. This method is safe and even a child can get such a tattoo at home. For the drawing you will need a gel pen, drawing skills and parchment paper/tracing paper.
Sequencing:
- decide on the drawing;
- draw it on parchment paper;
- completely fill the drawing with color, preferably saturated;
- attach the drawing to the place chosen for the tattoo;
- dampen a cloth and press the tattoo to the skin;
- hold the wet rag over the tattoo for at least 40 seconds.
Make sure the design is printed. To do this, you should lift the edge of the design and check whether the tattoo is dry. If the picture is completely printed, remove the rag and paper. For the first couple of minutes, do not touch the drawing so that it dries properly.
A transfer tattoo at home using a gel pen and parchment paper, although it seems elementary at first glance, requires consistency. Only in this case can you get a high-quality drawing that will last on the skin for several days.
Instructions on how to make a temporary tattoo using a printer and perfume

There are several types of temporary tattoos that can be done at home. They all differ in the method of application, the amount of materials required and the life expectancy of the design.
One of the common methods of applying a temporary tattoo at home is the perfume and water tattoo. A few days before applying the design, the skin must be cleaned with a scrub and hair removed. This will ultimately help you get a high-quality and even pattern that will last longer.
For a temporary tattoo using a printer and perfume, you will need the following materials:
- a sponge, or it can be replaced with a piece of cloth;
- laser printer;
- glue paper;
- container with water;
- Polish for hair;
- perfumes that contain alcohol (can be replaced with cologne).

So, to make a temporary tattoo at home using perfume, you need to follow these steps:
- prepare a laser printer and adhesive paper;
- print the picture you like on a printer so that the picture turns out to be a sticker;
- Wipe the area of skin on which the temporary tattoo will be placed well with perfume;
- attach the sticker to the place where the tattoo will be placed, with the side on which the design is applied;
- wet the sticker with a wet sponge or rag;
- Wet the sticker for several minutes, gently holding it with your hand so that it does not move;
- remove the paper from the application site - the tattoo is ready.
The tattoo must be fixed. To do this, use hairspray, spraying it on the tattoo site. To make the design last longer, it is better to apply several layers of varnish.
Such a tattoo, made at home, will last on average about a week, depending on how often the skin comes into contact with water.
This type of temporary tattoo is most preferable for application at home, since there is no need for additional powders and paints.
Transfer paper for hand printing
A sketch correctly transferred to the body is the key to success in creating an even and beautiful image in the end. For this, transfer paper is used, which consists of several layers: tracing paper, a protective sheet and a base. It comes in two types:
- Film-based – for printers;
- On paper - for manual work.
A picture transferred using film transfer paper is quite easily erased from the skin, but with a paper-based transfer you can firmly fix the design on the skin.
The printed drawing is applied to the transfer and outlined with a special transfer pencil. And then the paper is applied to the skin, pressed for 20 seconds and the resulting impression is fixed with Vaseline. This is the salon method. But there are also options for creating an impression at home:
- Using carbon paper and alcohol. The selected sketch is placed on the ink side of the carbon paper, and all details and contours are outlined with a sharp pencil.
- Using a sheet of tracing paper, soap and a gel pen. Place tracing paper on top of the sketch, trace the contours and paint with colored gel pens inside the contours (optional). And apply the already received transfer to the skin generously lubricated with soap, secure it (you can use a band-aid) and again trace the contours with a sharp object.
DIY tattoo transfer paper
To transfer a tattoo from paper to the body you will need transfer paper and transfer gel. Transfer paper is basically the same as carbon paper, only more convenient to use. Therefore, if you have a carbon copy, you don’t have to look for it and don’t buy it.
A correctly transferred contour is the key to creating a clear, stylish image. At home, you can use 2 ways to create the perfect contour:
- We take a carbon copy and cologne or vodka: we place the image on the ink layer of the carbon paper, and outline the contours with a pencil;
- using tracing paper, gel pen and soap. We place tracing paper on the image, trace the contours, and paint inside with pens. Apply the resulting transfer tightly to the soap-lubricated skin. The picture can be glued with adhesive tape or tape and the contours can be traced again with the sharp end of the pen.
If you are not ready to get a real tattoo, but want to experiment a little, then these methods will come in handy.

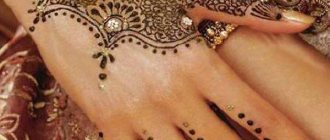
Temporary tattoos have been popular at all times. At first they were made with henna, which stayed on the body for about a month, and then they began to produce special sets of decals. But in fact, you can make a tattoo yourself, even if you don’t know how to draw at all. We'll tell you how to make a temporary tattoo at home quickly and easily.
How to replace tattoo transfer paper?
However, special paper for transferring tattoos may not always be on hand. Of course, you can use any paper, for example, for a printer, but, unfortunately, it will not give the desired clarity.
If you have an inkjet printer with liquid ink on hand, you can try to transfer the image using it. You will need some adhesive tape to print the image. The principle of transfer is that when it hits the film, the ink will not be absorbed for some time and will not dry out. The printed image can simply be applied to the skin and it will be printed.
It is important to print a mirror image of the design on a printer so that when transferred to the body it becomes correct
You can simply take a drawing printed with liquid black printer ink, apply it to the body and wet it with acetone. The drawing will be transferred to the skin. It should be taken into account that printer paint is not intended for body painting, is harmful to the skin and contains carcinogens. Therefore, this method cannot be used often.
- Sawing with a jigsaw, transferring drawings for a miracle jigsaw onto plywood
Another option for transferring a pattern can be used if you have the most ordinary tracing paper for cooking or for patterns. First, the sketch is transferred to tracing paper using a gel pen. Before this, the desired area must be disinfected and soaped. Press the tracing paper and trace the contours with an object with a not too sharp end. For work, choose gel pens of different colors. After transferring the contours, you can start making a tattoo.