Varnish application technique
For proper distribution of varnish:
- Start painting your nail from the middle, spreading the polish towards the base and tips of your nails. There should not be too much varnish on the brush; excess should be removed from the brush by wiping it on the thread of the bottle;
- Use only fresh varnish; thickened old varnish is almost impossible to apply evenly, because its structure is damaged and the emulsion clumps;
- Under the main varnish, it is advisable to apply a layer of special medicinal varnish to the nails, which will nourish the nails, fight subsequent yellowness and improve the adhesion of the color coating to the nail plate;
- It is advisable to paint your nails with two layers of cosmetic varnish. The first layer is very thin, tinted, and ensures that the tone adheres to the natural structure of the nail. The second layer is thicker and denser, closes unwanted gaps, gives richness and gloss to the coating;
- It is advisable to apply a simple colorless varnish over the main tone, which will provide additional shine and protection for greater durability of the manicure;
- Dry your nail polish naturally to prevent dehydration of the polish, and therefore premature cracking and peeling of the coating.
Editor's choice: Geometric manicure 2021 with photos, nail art trend
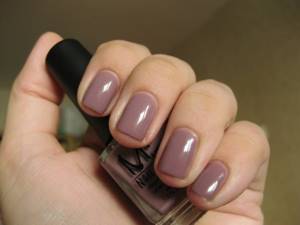
Without a good polish there won't be a perfect manicure.
You can’t skimp on your beauty. Therefore, when you go for your next bottle of varnish, take its purchase seriously. We do not urge you to overpay for a well-known brand, because many good products are also in the budget category. However, you should definitely avoid buying cosmetics in passages, dubious stores and on trays in the middle of the street. The likelihood that you will be given a very low quality varnish is huge.
To paint your nails accurately, the polish must be uniform, fresh, and sufficiently liquid.
- The thick coating lays down unevenly, forming stripes
- The presence of small lumps in the varnish can ruin any manicure.
- If the varnish is expired or has lost its original appearance, feel free to throw it in the trash.
Remember that bad polish will not only leave uneven marks on your nails, but will also significantly deteriorate their condition.
Preparatory stage
Before painting your nails, you must carefully prepare their surface. Only a few people can boast of an ideal nail plate. In most cases, there are small cracks that will be clearly visible under the glossy finish. Simple manipulations will help you carefully paint your nails:
- Give your nails the desired shape using scissors and a nail file. Make sure all nails are the same length.
- Now it’s time to take care of the cuticle. We recommend steaming your hands in a warm bath with oil, and then pushing back the cuticles with an orange stick. It is better to do a trim manicure in a salon. If you don't get rid of the cuticle, the varnish will cover it and it will look terrible.
- Using a polishing block, thoroughly polish the surface of the nails.
- Degrease the surface of the nails with a soap solution or nail polish remover.
- Be sure to apply a base coat, because this is the key to an amazing manicure. The base heals nails, protects them from the effects of decorative varnishes and evens out the surface.
Don't forget to make masks for your nails to improve their health and bring them into proper shape.
How to paint your nails correctly. Tricks and secrets
“Teach me how to paint my nails beautifully!” Well, for the life of me, I can’t paint my nails evenly. Even light varnish comes out crooked, let alone red! In general, give advice on how to paint your nails correctly . Best regards, Olga"
Well, Olga, you are not the only one tormented by this problem. And if you can still paint long nails neatly, then you have to tinker with short ones. As someone who has short nails (for a number of reasons), I know first-hand how difficult it is to paint your nails evenly without hurting the cuticles and the area around the nail.
So, the women's site Sympaty.net tells you how to paint your nails correctly so that your manicure looks beautiful and your hands look well-groomed.
How to paint your nails evenly: general rules
Before you start painting your nails, treat the surface of the nail with nail polish remover, or wash your nails with soap and dry well. On clean, grease-free and dry nails, the polish will last a long time without peeling or bubbling.
Next, apply the first layer of varnish - a transparent shade or a special base for varnish. This will make the surface of the nail smooth, which will allow the polish to last longer, and will also provide the nail plate with additional nutrition - vitamins and other useful substances.
ALWAYS apply 2 coats of colored varnish , be it translucent or a bright, rich shade. Only two layers will allow you to enjoy the true color of your nail polish, this is the only way the polish will lie smoothly without streaks, and your manicure will look complete and perfect. As a rule, one layer of colored varnish does not turn out saturated, making the nails look faded.
You can also apply a special fixative on top of the colored varnish (second layer). This is done to keep your nails from peeling for as long as possible, and sometimes it gives extra shine to your nails. Although, if you have already applied 2 layers of colored varnish, and underneath there is a transparent shade, this may be enough. So decide for yourself whether to apply a fixative. Personally, I get along just fine without it.
Dry your nails as long as possible! You can dip them in cold water and wave them around with your hands, but wait at least 20-30 minutes after applying the last coat. Otherwise, fingerprints of everything you touched will remain on your nails. Remember - the more layers of varnish, the longer the nails take to dry.
After your nails are dry, use a toothpick (a match and a cotton swab are too thick) and wrap a small piece of cotton wool around the tip. Dip a toothpick into nail polish remover and wipe off any polish smeared around the edges of your nails. Please keep in mind:
- It is advisable to wash off any polish that gets on your skin after your nails are completely dry. This way you won't ruin your manicure if you accidentally touch your nails.
- Try to paint your nails evenly, without getting them on your skin. Because even after erasing the flaws, the manicure will no longer look 100% neat.
That's all. Now let's move on to the technique of applying varnish.
Apply polish to long nails
There is nothing complicated here. Indeed, it is easier to paint long nails beautifully than short ones. The women's site Sympaty.net tells how to do it right:
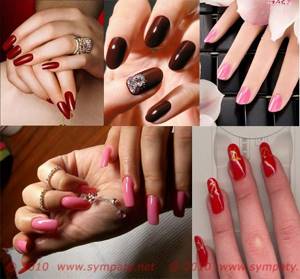
- For long nails, any color of varnish is suitable - from bright to discreet, which cannot be said about short nails. As you can see in the photo, all shades look amazingly chic. The main condition: for the polish to look good on the nails, there must be a manicure!
- If the colored varnish has thickened , then one layer is enough. If you see that it has thickened so much that you can’t paint your nails accurately, dilute it with a special product.
- Before applying nail polish, warm the bottle in your palms and shake well. The varnish will become a homogeneous consistency, mix and thus lie more evenly.
- Start painting your nails from your little finger. Place your fingers on the edge of the table so that your palm hangs down and your fingers are stable and comfortable for you on the edge of the table. The light on your nails should fall from the top left (if you are right-handed).
- Dip the brush into the varnish so that it is completely immersed in it. Then wipe the brush against the edge of the bottle, leaving most of the polish on the outside of the brush. And start painting your nail with this side.
- Mentally divide the nail crosswise into 3 parts. And stepping back one part from the cuticle, lower the brush with varnish onto the nail (so as not to stain the cuticle). Next, with quick, confident movements, sweep the brush to the tip of the nail in the middle, and then another 2-4 brush strokes along the edges. If there is not enough varnish , dip the brush into the bottle again. If, on the contrary, you see excess polish on the nail , carefully brush it there, removing the excess.
- After painting one nail, dip the brush into the polish again , renewing it on the brush each time.
- Paint all nails and leave to dry.
Only after the first layer of colored varnish has dried, apply the next one, otherwise your nails will take a very long time to dry.
How to check if the varnish is dry? Use the nail of one hand to touch the other, as if lightly patting. If the nails do not stick together, the polish is dry.
When you're done with the colored polish, apply nail dryer or sealer .
IT IS BEAUTIFUL!!!
How to paint short nails
Don't confuse short nails with medium length nails! The latter are just as easy to paint as long ones, but when the nails are short, it is difficult to paint them neatly and beautifully.
For short nails, always use a thin enough polish . On long nails, thickened varnish is easy to apply evenly, and a second coat is not required, but on short nails, thick varnish will definitely stain the skin around the nail.
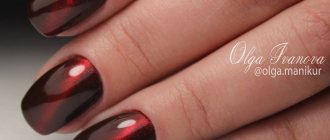
Also refrain from bright colors - red, black, yellow, fuchsia. As you can see from the photo, it looks quite untidy . Pastel shades and translucent nail polishes are best for short nails

IT'S NOT BEAUTIFUL!!!
The principles of applying varnish are the same as for long nails, but with some nuances:
- Apply a little varnish to the brush to avoid excess and smearing of the varnish along the edges.
- If you leave unpainted edges on the sides of the nail , short nails will visually appear longer and more graceful.
- If, while trying to paint short nails, you still get caught in the area around the nail, and at the same time you understand that you won’t be able to wipe it off carefully - only remove large stains of varnish. In the gaps between the skin and the nail itself, the varnish will come off on its own when you wash your hands or dishes . The main thing is not to get the varnish on the cuticle; it’s better not to paint 1 mm before it than to touch it))
That's all the subtleties that will help you paint your nails correctly. Have a beautiful manicure!
—— Author – Khoronzhevskaya Evgeniya, website
To copy this article, you do not need to obtain special permission, however an active link to our site that is not hidden from search engines is MANDATORY! Please respect our copyright .
Manicure of short nails
Painting short nails is not an easy task. To do this you will need varnish with a fairly liquid consistency. Otherwise, it will be possible to stain both the cuticle and the side ridges around the nail.
When it comes to choosing colors for short nails, you should choose pastel colors. Bright colors will look untidy and untidy.
In order to apply the polish more evenly on short nails, you need to take just a little bit of polish onto the brush. Otherwise, excess varnish will be smeared on the sides and cuticles. You can visually lengthen your nail if you leave a slightly unpainted space at the base of the nail, from the cuticle.
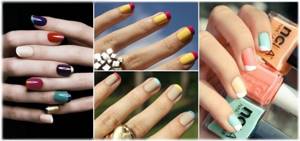
Varieties of nail painting methods
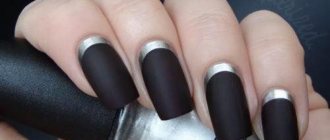
Sometimes the monotony of the same tones gets boring and you want something new and bright. This is where variations of French manicure will come to the rescue. In fact, this is covering your nails with two colors of varnish. One goes as a base - it covers the entire nail. And the second (brighter) one is to paint the tip of the nail plate with stripes. The stripe at the end of the nail can be either straight or oblique. The closer summer is, the brighter your version of French manicure can be.
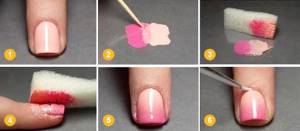
If with such a clear transition from color to color everything is quite clear and understandable, then how to make a smooth transition is not very good. So, let's figure it out:
– First, you should choose two varnishes that will be combined with each other - a base and a secondary tone. It is necessary to cover the entire length of the nail with the main varnish;
– Using a toothpick, mix two varnishes on any surface, in the order in which they should go;
Editor's choice: Nails 2021: fashion ideas of the season with photos
– It is necessary to lubricate the entire skin adjacent to the nail with a rich cream;
– Next, the mixture of varnishes is applied to the nail using a sponge. It is first blotted in mixed varnishes, and then the color scheme is transferred to the nail with light touches;
– Use nail polish remover to remove excess nail polish from the skin;
– All that remains is to apply the top coat.
Long nail plates
It is easier to paint medium and long nails than short ones. And absolutely any shade will suit here. We do everything as described above, but completely immerse the varnish in the bottle, and carefully run one side along the wall in order to remove the excess. It turns out that on one side of the brush there will be almost no varnish, but on the other there will be plenty of it - this side should be painted. Before painting each subsequent nail, you should renew the varnish on the brush.
Editor's choice: How to remove gel polish from nails: 3 ways to remove durable coating
The varnish is applied to extended nails in exactly the same way as to long nails. The main thing to remember is that you should not use acetone on gel nails, as it destroys it.