Where to start preparing for work?
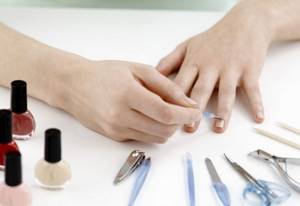
Of course, it’s worth getting all the necessary materials:
- Base coat is a clear strengthening or nourishing varnish.
- Varnish of the desired color.
- Removal fluid.
- Cotton pads and cotton swabs.
- Hand cream.
- Tassels.
- File and buff.
Now, as it would seem, the question of how to do a manicure with regular varnish at home should not arise, however, when doing it for the first, second, or even fifteenth time, problems still arise that can be solved by following the instructions given below .
The most important thing is that this kind of activity should take place a long time after taking a shower, bath or simply washing dishes. The thing is that moisture on the nails prevents the material from applying properly. In this regard, the result obtained will not please the hostess.
How to make an easy and beautiful manicure: preparation
Before decorating your nails with bright decorative varnishes, let’s put them in order. The complete set of tools for a “general” manicure is as follows:
- hand steam bath and sea salt,
- nail files (for grinding and filing),
- cuticle remover or orange stick,
- nail scissors,
- cuticle oil,
- moisturizing hand cream,
- decorative nail polishes
- colorless base
- colorless varnish for manicure
- nail polish remover and cotton wool
How to prepare your nails for a manicure?
It is necessary to erase traces of the previous varnish from the nails, if any, and begin to create the desired shape for them.
Choosing the shape of the nail plate is easy; it is important to adhere to several criteria:
- Oval nails are suitable for those with long fingers, giving them a graceful and graceful look.
- For wide nails, a round nail shape is perfect; besides, it is durable and, due to its slight protrusion beyond the contour of the finger, rarely breaks off.
- Round nails will be very useful for ladies with thick fingers. However, in this case, you should abandon the square shape - this will shorten your fingers even more and make them coarse.
- Square ones will be much more appropriate for women with thin and long fingers. Pointed nails are also suitable for them.
Next, having decided on the shape, you need to look at the condition of the skin around the nails - if it is dry, you should take a bath and soften the cuticle, and then carefully trim it.
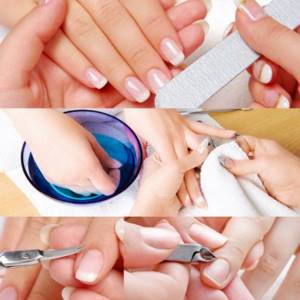
Having sharpened the nails to the desired shape, the surface of the nail plate is sanded and polished with a file and buff. The resulting dust is washed off and the nail is degreased (alcohol is also suitable for this).
Manicure with regular polish at home
Regardless of the type of nail polish applied, preparatory steps are needed. Nail specialists give some tips on how to properly paint your nails with varnish at home. Here are the step-by-step instructions:
- Prepare your nail. Polish the plate and file the free edge. The movements of the nail file are at the free edge from the edge to the center. Shape all your nails, making sure they are the same.
- Treat the cuticle. Cut off hangnails and apply cream to the skin around the nail. Before the procedure, you can steam your hands in a bath with salt and oils. ATTENTION! Steamed, wet nails cannot be painted or filed: the varnish will not stick, and the nail will be injured by the file. There are many ways: you can push the skin away with a pusher, the smooth metal end of a nail file, or an orange stick. If necessary, trim the cuticle with scissors, a machine, or a special socket (they are usually done at the opposite end of the nail file).
- Degrease the nail with alcohol, nail polish remover, or an alcohol-based lint-free wipe.
- Apply base. If you don't have one, a clear varnish will do. It is needed so that the colored layer does not stain the nail itself. Many bases contain vitamins for nails; they can be found at the pharmacy.
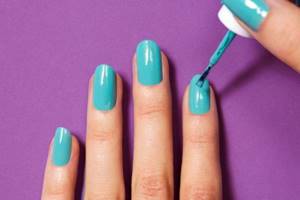
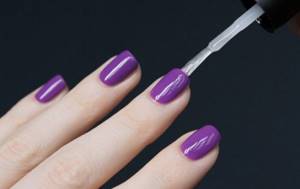
- Spread one layer of color. It must be thin, otherwise there is a high probability that it will not dry out and will become covered with bubbles. Push back the cuticle and apply polish directly underneath. The outer end (if the length of the nail allows) also needs to be painted over so that the varnish film does not lag behind the edge.
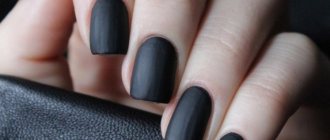
- Secure the colored coating with a topcoat. It can be glossy or matte, strengthening, with a diamond shine (if there are none, then replace it with colorless varnish). The top will make the manicure matte or more shiny and protect against wear.
Experts advise taking your time when performing a home manicure. It is important to let the layers dry thoroughly. If time is running out, then dip your fingers in cold water - the varnish will “set” faster.
How to start direct painting?
It is very important that the elbow does not hang down; support is needed; a table is best suited. This is important because it is difficult to do such work while suspended, and the final result may suffer greatly.
At the very beginning, a base is applied - a transparent coating that promotes a better connection of the varnish to the nail, preventing the colored varnish from being absorbed. This will allow you to remove the coloring agent after some time without turning your nail yellow, red or purple.
It is better to start applying the color layer with your working hand - left for left-handed people and right for right-handed people. What is important is that you need to start with your little finger. This will make it much easier to achieve the result without spoiling the already applied coating in the process.
It is better to warm the tube or bottle of varnish in advance in your hands or shake it (not too much). Do not overdo it with shaking, because the resulting bubbles can subsequently spoil the quality of the work being performed even before it begins.
If, upon reading, the reader thought that this is all there is to know about how to do a manicure with regular varnish, then no. There are a couple more nuances.
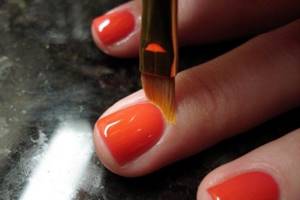
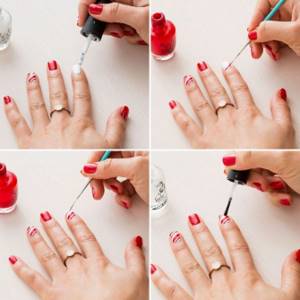
You need to paint this way: take a little viscous liquid onto the brush, leave some of it on the neck of the bottle and draw the brush from the middle of the nail plate to the end and back to the hole. Then go along the sides and finally paint the main middle part of the nail.
If varnish remains on the skin, you can wipe it off with a cotton swab dipped in the solution or with the nail of the other side and immediately wipe it on a cotton pad soaked in acetone.
If the varnish becomes faded, you can also apply a second or third layer. When the nails are dry, take a clear setting varnish and apply it using the same technique discussed above.
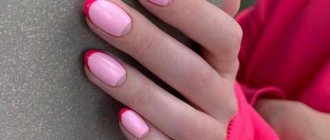
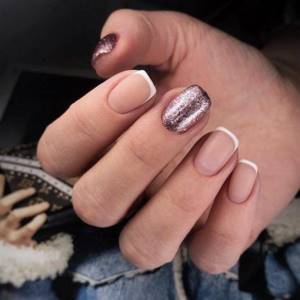
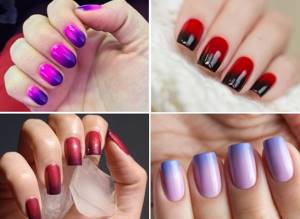
What color should I choose for a simple manicure?
The peculiarity of manicure with simple varnish is monotony. Therefore, you should carefully consider the shade that will be applied to your nails. Most often, they choose it according to seasonal and style preferences:
- spring and summer – priority is given to bright and sunny colors with the whole range of yellow, green, red and pink shades;
- autumn – beige-brown and orange colors begin to predominate;
- winter – favorites are all cool blue and silver shades, as well as colors that correspond to the spirit of the New Year.
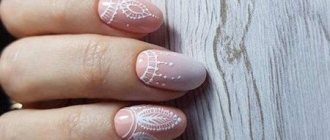
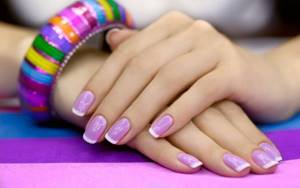
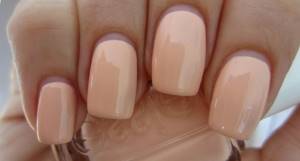
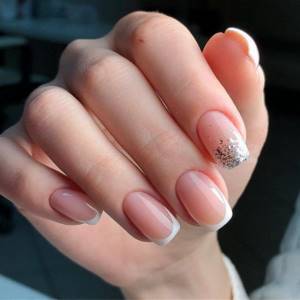
Separately, you can think about choosing a nude manicure to decorate your nails. This simple but fashionable trend looks great in any situation, and especially when creating a business image.
Manicure with simple varnish - despite all the opinions of skeptics - is an excellent choice for many ladies. It does not create any labor during creation, is easily and quickly updated, and most importantly, it is always neat, beautiful and elegant, which is important!
What to do if the varnish does not dry?
This is a standard problem with all conventional varnishes - they often take a very long time to dry. For each layer to dry thoroughly, it takes, on average, 10 to 30 minutes.
If you don’t want to wait a long time, special sprays or liquids distributed over the plate using a brush can be useful.
It is also possible to use a drop of vegetable oil within a couple of minutes after applying the varnish; this greatly increases the speed of drying of the varnish.
Even taking a regular hair dryer and turning it on without the heating option, you can easily speed up the drying process.
Home manicure options
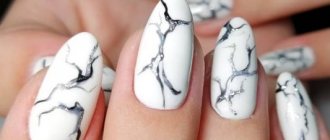
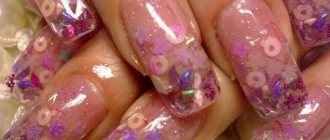
An original manicure is born not only in beauty salons, but also in a cozy home atmosphere. Here are some interesting ideas:
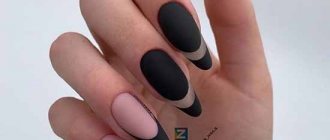
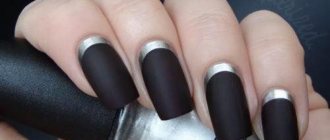
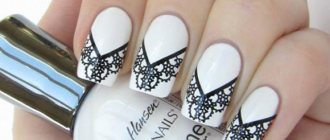
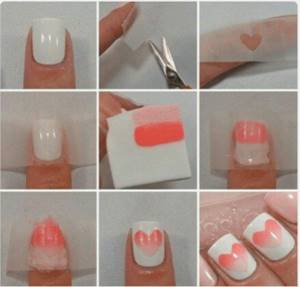
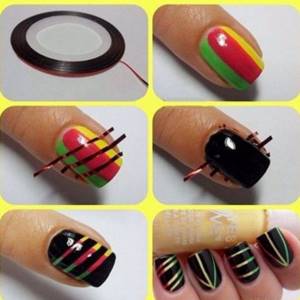
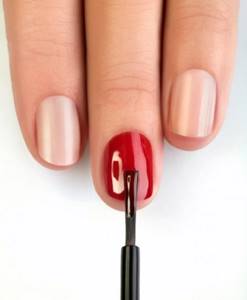
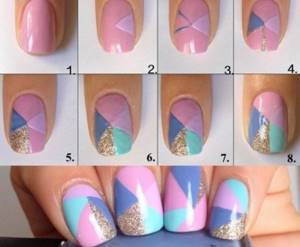
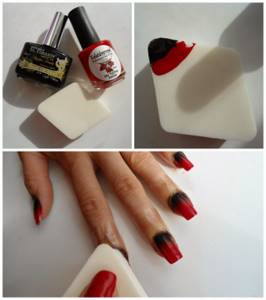
- Graphic manicure (geometric shapes on nails) is easily created using two or three shades of varnish and tape. To do this, you need to cover the nail with the main color (for example, black), wait until it dries, and then stick small pieces of tape onto the plate so that a square (or triangle) is formed. Paint the free part with a different color (for example, gold).
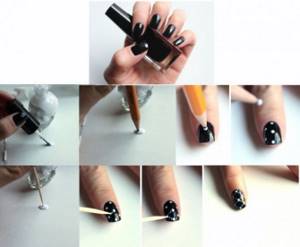
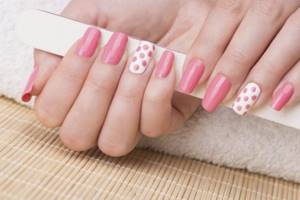
- “Polka dots” - creating multi-colored polka dots on the nail plate using varnishes of different shades and a regular toothpick. Apply droplets of a different color to the nail covered with the main shade using a toothpick (or other thin device).
- Newspaper manicure - news feed right on the nails. To do this, place a small piece of newspaper soaked in alcohol on your nails covered with white enamel and press firmly. Remove excess and coat with clear varnish to seal.
You can come up with original designs yourself and implement them on your own nails! As soon as you learn how to beautifully and carefully paint your nails at home and create your own original designs on your nails, you will no longer want to “return” to a salon manicure.
Jaay - Mobile - Content - 250*360 - 8
How to make an unusual manicure?
Of course, the Internet is full of manicure ideas with regular varnish, but some of the simplest ones will be written here:
For this option, use a newspaper. The nails are covered with a strengthening transparent layer and then with white varnish. After letting it dry for 10-15 seconds, pieces of newspaper are moistened in water and immediately applied to the nail, pressing down slightly. Immediately after, a layer of clear varnish is applied.
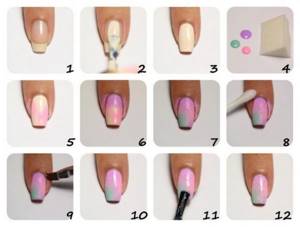
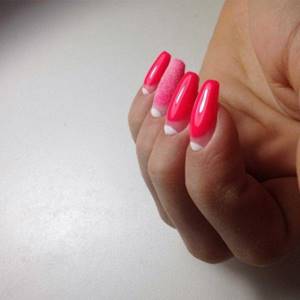
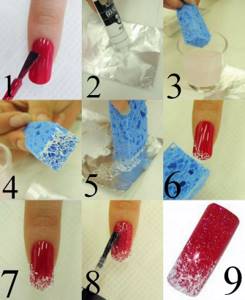
The gradient effect can be achieved with an ordinary small kitchen sponge. To do this, it is dipped in several varnishes of different colors. The surrounding skin is protected with PVA glue or cling film with a nail shape already cut into it. After making the prints, the nail is covered with transparent varnish.
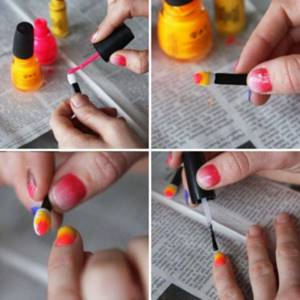
Using a toothpick, you can make some kind of pattern on your nail. Having applied a little varnish of a color completely different from the main one, it is applied to the nail at different angles and distributed in an unusual way over the surface. For example, the thickest points are at the edge and decrease towards the middle of the nail.
How to apply varnish correctly
An important point - before applying varnish, the nail must be degreased. For example, using a regular remover liquid that does not contain oils. Never apply nail polish if you were using hand cream or cuticle oil a few minutes ago. Also, avoid painting your nails immediately after washing your hands. The nail plate has a porous structure and absorbs liquid well. The ideal interval between water procedures and applying varnish is 15-30 minutes. If possible, after degreasing the nail plate, do not touch it. All moisturizers for hands and nails are applied at the very last stage, when the varnish has already “set” well.
Almost all varnishes must be used in combination with a base and top coat. This is necessary to maintain the health of the nail plate, to improve its smoothness, and also to ensure that the colored varnish lasts longer. Bypassing the base, but using bright shades of polish, you risk getting yellow, flaking nails. The absence of a topcoat will increase the drying time of the polish and will also reduce the time it remains on the nails.
Classic regular nail polish should be applied in layers. Moreover, the thinner each layer is, the better. For example, varnish applied in one thick layer will take a very long time to dry, may be distributed unevenly, and the durability of the manicure will definitely disappoint you. Try to apply varnish in 2-3 layers so that the nails are not visible and the shade is uniform.
The durability of the varnish is not only about compliance with the application technique, but also about certain characteristics of the product. For example, you shouldn’t count on high durability if you like quick-drying varnishes. A large number of volatile components make the varnish very unstable. In addition, varnishes with effects, for example, “fur”, velor, matte, are the most short-lived. They dry instantly, but by the evening the first imperfections may appear.
When painting your nails, be sure to “seal” the end of the nail by running the polish over it. This is often done when creating a gel or gel polish manicure. The free edge of the nail is the weakest part; this is where the polish begins to come off first. By the way, if you urgently need to update your manicure, just touch up the ends of your nails and apply a fresh layer of top coat to the nail itself, which will quickly restore the shine to your nails.
Let's summarize the 5 secrets of using regular nail polish:
- Before applying varnish, the nail must be degreased
- use varnishes complete with base and top coat
- Nail polish should be applied in layers
- do not choose quick-drying varnishes, as they are not durable
- do not forget to “seal” the end of the nail
Natalya Karpova , etoya.ru
What are the defining advantages of such a varnish?
Short application time.
Great choice - no need to combine nail design with clothes, since the color can be changed at any time. You can even do a manicure for the holiday - a New Year's manicure with regular varnish is a good idea, since there are plenty of examples on the Internet, both in photos and in tutorials.
Less damage to the nail plate - there is no need to heavily grind and polish the nail, or expose it to the rays of a UV lamp. Gel polish, on the other hand, means long wear and therefore firmly connects to the plate, thinning it.
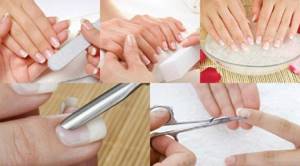
Preparatory stage
Before any manicure - at home or in the salon, you need to prepare the surface for the procedure. This way you will prevent premature removal of the decorative coating, ensuring long-term preservation of the work result.

Before using the varnish, it is recommended to prepare tools and consumables; be sure to treat them with an antiseptic for complete safety of the technique.
After this, start working with the surface:
- Wash your hands thoroughly and use an antiseptic to degrease them.
- Remove the previous decorative covering. If regular polish was applied, use a cotton pad soaked in the solution to remove it. Treat all nails; there should be no color left on them.
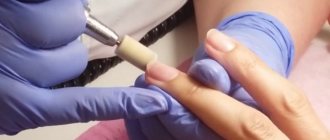
- Remove the overgrown free edge with a file and adjust the shape of the nail. You should not use scissors, as they can disturb the location of the stratum corneum.
- Use a buff to polish your nails.
- Clean the natural nail from excess filings.
- Apply a cuticle softener (it can be replaced with hydrogen peroxide) for 3-4 minutes.
- Use an orange stick or pusher to push back the epidermis and then cut it off with wire cutters.
- Remove dead particles from the nails, wipe them with a cotton pad soaked in an alcohol degreaser.
As a standard, preparation needs to be given the most attention, since insufficient surface treatment can reduce its adhesion to the decorative coating, causing the design to last less.