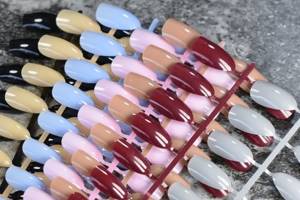
Long, well-groomed nails are a wonderful attribute of a beautiful and feminine look. Unfortunately, not every girl can grow her natural nails to the desired length, but sometimes you want it that way! It's good that there are nail extensions. This procedure requires accuracy, but at the same time anyone can learn how to do extensions. You can create a gorgeous manicure with long, flawlessly shaped nails at home. Are you ready to gain new knowledge and save on trips to the salon? In this article we will tell you how to make your nails longer at home and what materials you will need.
There are several ways to build up. You can lengthen your nails using acrylic, fiberglass in combination with other materials, or extend them onto forms or tips; in this case, gel is usually used. The last method is one of the simplest and most popular. This is what we will talk about today.
The choice of material depends on your individual characteristics and preferences. Both forms and types have their own advantages and disadvantages. Let's take a closer look at them.
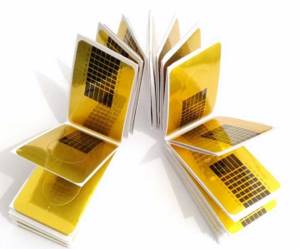
Form extensions
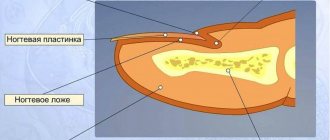
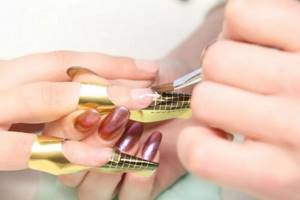
Extension forms are stencils with markings and a window. The markings allow you to calculate the appropriate length and width of the nail. The templates are applied to natural nails, covered with gel and hardened. Unlike tips, the forms are removed at the end of the procedure, so the nails are less thick.
Forms are disposable and reusable. Disposable forms are also called soft forms and are made from paper or flexible plastic. The advantage of these forms is that they are very pliable and easily take the desired shape. On the other hand, they may become wrinkled during the procedure.
Reusable molds are made of metal or hard plastic. They are more expensive, but quickly recoup their cost. The convenience of these forms is that they do not deform during operation, gel does not leak through them, and they eliminate gaps. If you choose the most suitable shapes for each nail, you will not have any problems. It is important to remember that reusable forms must be disinfected before each use.
What is needed, besides shapes, to create a chic length?
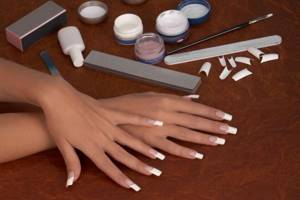
Materials for extension onto forms
To apply nail extensions to forms, we will need the following set:
- Antiseptic is an indispensable item for any beauty procedures.
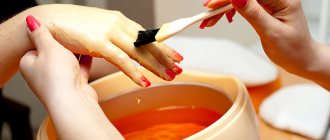
- Remover or other product to soften/remove the cuticle. You can also simply make a hand bath.
- Pusher or orange stick to push back the cuticle and pterygium.
- Nail scissors and tweezers to cut cuticles and side ridges.
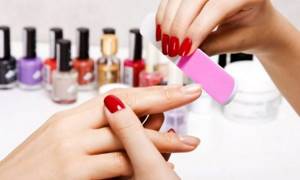
- Files and buffs with varying degrees of abrasiveness for shaping and polishing nail plates, both natural and artificial.
- Brush for removing nail dust.
- Dehydrator for degreasing natural keratin and removing the sticky layer from gel polish.
- Primer to improve the adhesion of natural nails to artificial material.
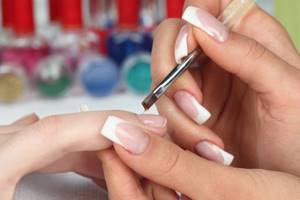
- Gel coatings - base and top.
- Modeling gel for creating artificial nails.
- Brushes for applying gel.
- Colored or camouflage gel polish for creating a design, optional decorative elements.
- Lint-free wipes for removing the sticky layer and degreasing the nail plate.
- UF lamp.
Attention!
Nail modeling gel polymerizes only under the influence of UF radiation; an LED lamp is not suitable for extensions. You can use an LED lamp to design your nails with gel polishes.
At first glance, it seems that you need a lot of materials, but most of them are universal and, if you love manicure and do it yourself, they will be useful for other purposes.
Important!
You can't do without antiseptic! Remember to disinfect. Untreated nails, hands and tools are a risk for fungal infections. Medical alcohol, chlorhexidine or lotion with an antibacterial effect are suitable as an antiseptic.
So, we have everything you need for nail extensions on forms. It's time to figure out how to do this.
Extension on forms. Step-by-step instruction
Stage 1
Any beauty procedure begins with disinfection. We treat our hands and nails with an antiseptic.
Stage 2
We perform a manicure, trim the cuticle and remove the pterygium. We file the free edge, then use a buff to remove the gloss from the surface of the nail plate. Using a brush, remove nail dust.
Stage 3
Degrease your nails using a dehydrator. We apply a primer for better adhesion of the material to the plate.
Stage 4
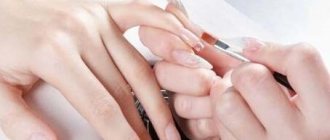
Cover the nail with a very thin layer of base coat. Dry in a UF lamp for at least 2-3 minutes (depending on power).
Stage 5
This is the most important step, where you need to show skill and maximum accuracy. The final result depends on the installation of the forms. We install the forms using a metal plate and tubes to press the “arch”.
If you are completely new to extensions, we recommend using solid forms. When working with them, you just need to choose the right size and carefully adjust them to each nail.
If you are working with soft forms, first adjust the window to the size of the subungual arch. Make sure there are no gaps, otherwise the gel will leak into the holes, and this will be noticeable during regrowth.
What if you get very soft shapes? In this case, we recommend gluing the two forms together so that they are denser and do not wrinkle.
Important!
Extend your nails into shapes using the following pattern: 4 nails on one hand, then 4 nails on the other hand, then thumbs. If this is your first time doing this, the best option would be to work on each finger individually.
Stage 6
We form an artificial nail using modeling gel.
How to apply the gel? To do everything correctly, we divide the nail into 3 zones:
- cuticle zone (⅓ of the natural nail from its base);
- stress zone (if you press on the tip of the nail, part of the plate will turn white - this is the stress zone, it bears the main load);
- free edge (this is the remaining part of the form).
Next, we proceed to the direct application of the gel:
- Base layer .
Apply a thin layer of gel to the cuticle area, thickening it slightly where it approaches the stress area. Dry for 30 seconds. - Base layer. In the stress zone, we thicken the layer of gel, especially in the place of transition from natural to artificial nails - here we apply the gel very thickly. Dry for 3 minutes, if necessary, adjust with a buff and nail file.
- Final layer .
We form the future free edge of the nail with a thin layer. Dry in a UF lamp for at least 2-3 minutes. If stickiness remains after drying, you can remove the top film using a remover that does not contain acetone.
Stage 7
Now we remove the sticky layer so that the dispersion does not prevent us from adjusting the surface of the plate and the free edge. Next we remove the forms. We grind the resulting nail so that the surface is as smooth as possible, and correct the shape of the free edge. Usually, dispersion is needed for materials to adhere, but in our case, the materials will be fixed by grinding the surface.
Stage 8
Apply camouflage gel or colored gel polish in 2-3 layers (depending on the density of the pigment). Dry each layer in a UF lamp.
Stage 9
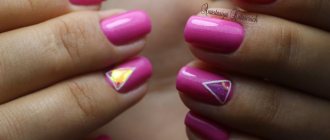
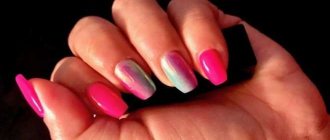
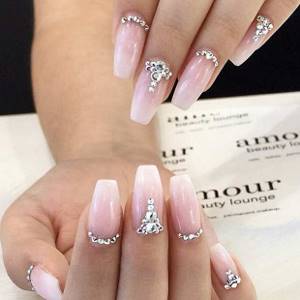
We decorate the nails in accordance with the chosen design, adding decorative elements if desired.
Stage 10
Apply top coat and cure. Preferably twice as long as in the previous stages.
Stage 11
Remove the sticky layer. We treat the cuticle and periungual ridges with oil.
Advantage of extension
Before you decide to do your own nail extensions, you need to study the advantages of this event , and of course, do not ignore the disadvantages. Let's look at the positive aspects:
- The procedure is easy: after several trainings, extensions are available to any savvy girl who has not previously had anything to do with nail procedures.
- With the help of the gel, it became possible to give your nails a well-groomed appearance and hide small defects in the plate.
- The gel does not emit any odor either during application or during wear.
- Most manufactured gel products contain a safe composition . The gel does not cause general allergic reactions: individual intolerance is possible.
- Gel extensions are considered one of the most long-lasting: nail plates are difficult to damage due to the thick layer of artificial material.
- Extended nails look beautiful and aesthetically pleasing: skillful and careful extensions do not distinguish artificial nails from natural nails.
Another main advantage that requires special mention: gel extensions help overcome the habit of biting fingers and free edges of the nail plate. After the first wear you can see the result.
As with any cosmetic procedure, there are several disadvantages , which we will discuss below:
- Materials and tools for extensions are quite expensive : it cannot be said that the procedure will be much cheaper than in a salon. Savings occur due to the exclusion of payment to the master from the pricing chain.
- Extensions damage the nail plates, despite the fact that almost all masters convince you otherwise. A long absence of oxygen access to the nail plates cannot have a positive effect on the tissues of the body.
- Do-it-yourself nail extensions take 1.5 times longer to do in a salon. This is due to the inconvenience of applying the composition to the non-dominant hand.
- Too frequent correction - the extension becomes visually unusable already in the third week of wearing.
- If extensions are not applied correctly, voids may form under the nail plates. This is a potential focus for the development of infectious inflammation.
When making a decision, weigh both sides of the scale: think about whether you are ready to sacrifice time or the health of your nails for the sake of a beautiful shape and well-groomed hands.
Types of gels for nail extensions
Before considering the types of gels, we note that the extension can be single-phase, two-phase or three-phase.
- Single-phase thin coating. Contains three layers and has a liquid consistency. Great for beginners.
- Three-phase material. On the contrary, it is used by professionals. Includes base, sculpting and protective layers.
- Camouflage polymer. Used to hide imperfections of the nail plate.
- Gel chewing gum. Similar to plasticine, it is used to lengthen its own plate, as well as to create a colored stained glass manicure.
The result depends on the quality of the material, so approach this issue responsibly. The choice of extension gels is very wide.
Nail care after extensions
Any type of nail extension allows the owner to get a neat manicure. But in order not to waste money on early correction, you need to take care of your hands and, if possible, take care of them.
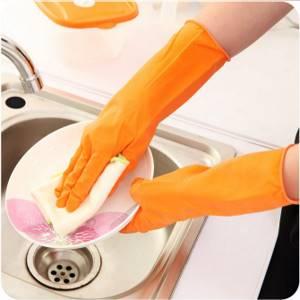
The service life of artificial nails will increase if:
- Wear rubber gloves when washing dishes or floors;
- do not try to pry or open anything with your nails;
- keep your nails and hands clean, remembering to moisturize the cuticles;
- have a special glue with you that allows you to get rid of small cracks before going to the specialist;
- For more serious damage, contact a specialist.
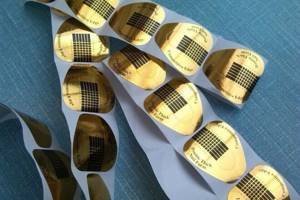
Extensions with tips
Tips are plastic false nails that are glued onto natural nails. They can be transparent, white or colored and are selected individually for each nail.
Tips are ideal for short, narrow or irregularly shaped nails. Tip extensions can also be performed in one, two or three phases.
To make your manicure look truly natural and aesthetically pleasing, you need to choose the right tips.
How to choose suitable tips?
Here are some recommendations for wisely choosing tips:
• The plastic from which the tips are made must be elastic and thin. • The size should correspond as much as possible to the size of natural nails. • For convex and flat nails you need to choose special tips. • For uneven, wavy nails, it is recommended to use a gel adhesive that fills in the unevenness.
You can buy tips using our website with delivery throughout Russia.
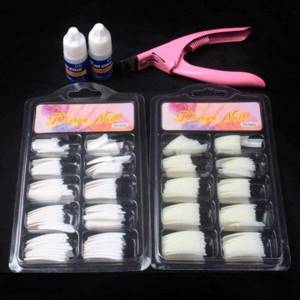
Materials for extensions onto tips.
For extensions using this technique you will need the following materials:
- cuticle softener;
- orange stick or pusher;
- nail file or buff;
- the tips themselves;
- type cutter;
- glue for tips;
- lint-free wipes;
- UF lamp;
- modeling gel;
- brush for treating nails after filing;
- tassels;
- liquid to remove sticky layer;
- primer;
- degreaser;
- cuticle oil.
Extension with tips. Step-by-step instruction
Stage 1
We prepare the workplace, disinfect hands, tools, materials and surfaces. To make it more convenient to work, you can select tips and immediately arrange them in the order of gluing on each nail. Tips should not exceed 2/3 of the natural nail. The excess must be carefully cut off. You cannot glue tips that are narrower than the nail. It is better to choose the one that is wider and carefully file it to the size of the nail.
Stage 2
We perform a manicure, trim the cuticle and carefully remove the pterygium. If pieces of skin remain, this may cause the gel to peel off. We cut off the free part of the nail to 0.5 millimeters and process it with a file. Use a buff or file to remove the glossy surface from the nail plate. Clean it with a brush.
Stage 3
Apply glue to the tip up to the step line, which is applied to the edge of the nail. To improve adhesion, you can apply glue to the area where it joins the tip. Apply the tip to the middle of the nail at a slight angle and press the rest of the nail. The line of the step should coincide with the edge of the nail. For gluing, hold for 15 seconds. If you find bubbles between the tip and the nail, try to squeeze them out or re-glue the tips.
Stage 4
Using a tip cutter, we remove the excess length, giving the nail the desired shape. Using files with large cells, we file the tips for leveling. Using a buff or the same file, we treat the surface of the tips for better adhesion to the gel. We pay special attention to the junction of the tip and your nail. Using a file, we clean this place as thinly as possible so that the transition is invisible. Remove dust from nails and finger skin with a brush. We treat the nails with a degreasing solution, apply a primer and polymerize.
Stage 5
Let's start working with the gel. Apply the first thin layer. Be sure to retreat about a millimeter from the cuticle and side ridges. Dry in a UF lamp for 2-3 minutes. Apply a thicker layer to the middle of the nail, gradually reducing it towards the sides. Dry at this stage for at least 3 minutes! If you experience discomfort from heating your nail, you can take a break and then continue drying. When interrupting drying, turn the nail down so that the unformed layer of gel does not spread. After drying, remove the sticky layer.
Stage 6
Now we give our nails the final shape. Using a file or buff, we process the surface of the nail, removing any unevenness in the arch. We clean the sides and the area of the nail near the cuticle, reducing the coating to nothing as much as possible. We file the tips of the nails so that they are as thin as natural nails. We process irregularities on the free edge. We wipe off the dust with a brush.
Stage 7
We're almost done! Apply the final coat so that it lays on the nail in a thin, even layer. This time we also cover the places left earlier along the side ridges and cuticle. Dry in a UF lamp. Some manufacturers produce a topcoat that does not have a sticky layer. If there is such a layer, then it must be removed.
Nails are ready! We treat the cuticle with special oil.
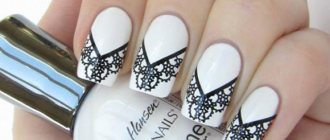
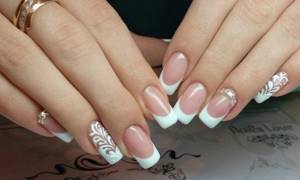
Tip extensions are also used to create a beautiful French manicure. A tip is attached to the base of the nail with glue, then gel is applied to the artificial material. The gel nail is dried in a UF lamp. Depending on your wishes, a smile is painted on top of the gel, or between layers. Beauty!
Varieties of forms
There are several types of form templates:
- Disposable items are made from flexible and soft materials. This simplifies modeling, but after the procedure the template becomes unusable.
- Reusable types have a plastic or metal base, so they last a long time. They are convenient to use, but are much more expensive.
- Round templates are suitable for working on short nails.
- Oval and almond shapes have smooth lines and are suitable for nails of any length.
- Square shapes are the most versatile and practical, also suitable for long and short nails.
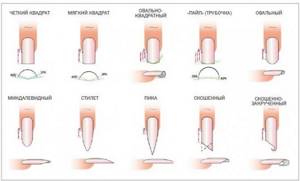
- Pipe, stiletto and edge are distinguished by their pointed tip and unusual shape. They are suitable exclusively for long nails.
- The bottom and top views differ in how they are used in modeling.
Forms or tips – which is better?
Both types and forms have their advantages and disadvantages. First of all, it is worth taking into account individual characteristics. Tips are recommended for those who have short, narrow or irregularly shaped nails. And for nails that grow downwards and bend, shapes are more suitable.
Tips are easier to use and easier to handle at home. But the shapes look thinner and more natural.
In addition, forms have several other advantages:
- they do not cover the main part of the plate, so the natural nail has access to oxygen;
- extensions on forms strengthen brittle tips on short nails;
- with this method of extension, correction can be performed without the need to completely remove the extended layer;
- The cured gel polish perfectly complements the natural nail without any obvious transition.
Whatever you choose, in any case, when adding extensions, you need to take care of your nails and make corrections regularly.
Features of extended nails
It is advisable to entrust nail extensions to a professional who will do everything carefully. A specialist can do everything quickly and, at first glance, even beautifully, but there is no need to rush here. Properly prepared handles are already half of successful extensions. Not removing the cuticle can cause the gel or acrylic to lie unevenly, and it will not look very attractive.
If extended nails visually resemble natural ones, then the manicure will be more durable. Girls usually decide to get extensions when their own nails are constantly breaking or peeling. In addition, they are attracted by the opportunity to wear a beautiful pattern for a longer time. Also, with extended nails, the good news is that if one of the nails breaks, it is enough to redo it. In the case of natural nails, it becomes necessary to trim the rest.
Such nails also have negative qualities. Usually the extension and correction itself is not cheap, and failure to follow the basic rules can lead to peeling of the substance and even allergies. But beauty requires sacrifice, and therefore girls boldly go to a beauty salon or a familiar manicurist.
To prevent the coating from starting to peel off, you must follow these rules:
- The previous coating must be completely removed.
- Nails should be well sanded and treated with antiseptics.
- Before applying extensions, it is advisable not to wet your hands again, and especially not to smear them with creams. Pairs of the latter can be released, thereby contributing to rejection.
- Before applying gel or acrylic, nails must be degreased.
- Correction must be done in a timely manner.
Types of tips
Tips are divided into several types:
- Classic tips are the most versatile. Thanks to their smooth curve, they fit most nails. The cost of packaging is 200 - 300 rubles, making these tips economical.
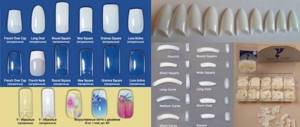
- Direct or non-contact tips are distinguished by the absence of a contact zone. They are recommended for use when creating a French manicure.
- Tips with a curved frame are used in American extension technology.
- Tapered tips allow you to create stiletto and pipe designs. They are distinguished by a narrow oblong tip.
- Almond tips are suitable for giving your nails an almond shape. This is a combination of a classic oval shape with a tapered tip.
Tips vary in color:
- White.
- Transparent.
- Flesh tone.
- With a single color coating.
- With design.
- With French design.
Types are distinguished by material:
- Polyflex, which is flexible and durable. They are best suited for adhesion to drugs and are also resistant to acetone.
- Tips made of soft plastic are mostly elastic and of good quality. They have strong adhesion to materials and are also resistant to damage.
- Nylon tips are most convenient for use in the modeling process. They are impact-resistant, flexible, but require professional skills when gluing.
- Liquid tips are made of polymer gel. Their advantage is that there is no need to use glue.
When choosing tips, it is important that they are elastic and bend well. They should also match the width of the natural nail. If the tips are slightly wider, they should be filed down. Narrow tips should not be used for extensions. This will cause the materials to peel off.
How to extend nails with acrylic on top forms
Acrylic has several advantages over gel.
Firstly, you don’t need a special lamp to polymerize acrylic: it hardens in air.
Secondly, it is much stronger than gel. The disadvantage is an unpleasant pungent odor.
Acrylic extensions can also be done on lower forms or tips, similar to gel extensions. But, since these methods have already been described above, let’s consider extensions using upper forms.
What is it: the top forms are very similar in appearance to tips. The only difference is that they do not have a recess for gluing at the tip, and they have small “antennae” on the sides.
The technology is as follows: a small amount of material is placed inside the mold and leveled with a brush. This design is then applied to the nail.
After the acrylic hardens, the mold is removed and can be reused. The result is an extended nail with a perfectly smooth surface. This technique is quite simple, and even a beginner can handle it.
What is required for nail extensions on the upper forms
- Acrylic Powder;
- Monomer (liquid) is a special liquid that starts the hardening process at the moment of mixing with acrylic powder;
- Primer;
- Brush;
- Set of top forms for extensions.
To apply nail extensions on top forms you will need: acrylic powder, monomer, primer, brush, a set of top forms for extensions.
Home extensions: advantages and features
Artificial nails resemble a natural plate. They should be strong, smooth, glossy. The thickness is adjusted during operation; the more layers, the denser and stronger the artificial nail will be.
High-quality artificial nails are practically indistinguishable from real ones.
The advantages of this manicure include
- safety;
- ease of implementation;
- possibility of carrying out at home;
- ease of correction and restoration;
- the ability to create various designs.
Acrylic or gel is used for work. Acrylic coating is easier to spread and is suitable for creating the perfect nail shape. However, this material is too dense and does not have a beautiful translucent finish that imitates natural nails. In addition, acrylic is considered toxic; during operation it emits a strong odor that can cause headaches. Professional artists recommend performing acrylic extensions only in a salon environment.
For home correction, gel is more suitable. It is more flexible and soft, suitable for multi-layer application; during the process, the coating can be easily touched up with a metal tool or an orange wood stick. The inexpensive gel has a very beautiful translucent finish that completely imitates a natural nail.
Before starting work, you need to make sure there are no contraindications. Extensions in the salon or at home cannot be done with
- allergic reaction to gel, varnish or other materials;
- pregnancy;
- diabetes mellitus in severe form;
- circulatory disorders;
- herpes;
- bronchial asthma;
- the presence of fungal and skin diseases.
It is not recommended to carry out extensions during treatment with antibiotics and other potent drugs.
Extension options
There are two ways to do nail extensions
Tips - similar to artificial plastic nails. They are glued to the surface of your nail using a special glue, and then its shape is adjusted depending on your preference.
Don't miss: Bright manicure in everyday life (55 photos)
On forms - Thanks to such forms, the master models the nail directly on them, and then, when the gel has cooled under the lamp, removes them and files them.