Content
- What is ombre manicure on nails
- Design Benefits
- Disadvantages of ombre nails
- What techniques exist for creating ombre nails?
- Ombre manicure with brush
- Gradient with sponge
- How to do an ombre manicure: step-by-step instructions
- Gradient on nails with gel polish with a brush: step by step
- Step-by-step instructions for creating a gradient with gel polishes
- Expert opinion
[ads-pc-2][ads-mob-2]
If you like ombre manicure on your nails, then you are a girl with a bold character, ready to keep up with current fashion trends. Gradient design remains trendy in 2019, so your favorite manicure can decorate your fingers for a long time. The color palette of nails can be completely different: from bright flashy shades to neutral colors, which, by the way, can even be worn to work.
What does ombre go with?
- To create an ombre manicure, you have the opportunity to use any colors in any quantity, as well as implement horizontal or vertical design.
- Ombre is a universal technique. Similar manicure suitable for any age category, any clothing style and for any event in life. For example, if you use delicate pastel shades to create ombre, you will have no equal at a business meeting, but bright colors in ombre will be very relevant for a party or going out.
- Ombre color stretch will add zest when creating a moon or French manicure. French manicure is implemented in this way: from dark shades at the base we move to light shades at the tips, and moon manicure – from light shades at the base we move to the dark tips of the nails.
- Don't forget to combine manicure with ombre pedicure.
Our conversation has come to an end. I really hope that you found useful information in my article, and it was not in vain that I decided to share it with the general public. Do not forget that a positive result will depend only on your diligence and desire. If you have any questions or disagree with something while reading the article, write, I will definitely respond and communicate with you. In addition, I am very interested to know what successes you have achieved, share your victories with me. Feel free to try new experiments! Always remain the most beautiful!
What is ombre manicure on nails
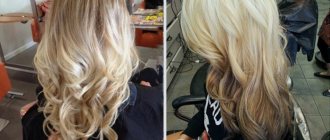
Manicure using the ombre or degrade technique remains one of the most popular trends in recent seasons. A fashionable gradient decorates not only nails; makeup is done in this style, hair is dyed, and clothes are made.

Gradient ombre manicure involves applying one or more colors of varnish with smooth transitions from light to more saturated shades. Usually two colors are used, but you can complicate the process and paint your nails in four shades, resulting in a unique and eye-catching design. If you apply more than four varnishes, the picture will turn out not entirely clear and inorganic.
“The color palette of nails can be completely different: from bright flashy shades to neutral colors, which, by the way, can even be worn to work.”
Lyudmila Ivanova
Ombre or gradient: features of the technique
"Ombre" is translated from French as "darkening." The technique means creating blurred boundaries between shades. More often they use the flow of a light tone into a darker one.
This effect is sometimes called "degradation" or "gradient". The difference between the concepts is minimal:
- Ombre implies different color saturation and smooth transitions.
- Having a visible boundary between tones or using different shades on each finger to create a consistent range is suitable for defining a gradient.
The application technique is almost the same. Only professionals in the field of nail art can discern the nuances.
Design Benefits
- Ombre manicure visually lengthens the nail plate by stretching from a less to a more saturated shade of varnish.
- Ideal for short nails.
- There are many options for creating a degrade that can be successfully combined with other designs. You can create a completely unique design for your nail plate that you won’t see on your friend.
- Using different shades of shellac, you can create a design for a holiday or everyday wear. Red, blue, and purple rich colors are suitable for a festive manicure. Calm nude shades will look harmonious with business-style clothes.
- The universal ombre manicure can be combined with other techniques, for example, French or moonlight manicure. The result is an unusual and original design.
- You can paint your nails at home or use the services of a nail artist. If you want to do an ombre manicure on your nails yourself, there is nothing complicated about it.
Flaws
- high cost of high-quality cosmetic products;
- You can’t do a manicure on a nail surface that has a weak and thin structure;
- requires certain skills and abilities to create a truly chic manicure.
To ensure that your efforts are not wasted, before you start creating an ombre manicure, take care to thoroughly clean the nail surface to perfect condition. It is also necessary to take a responsible approach to choosing the shape of your nails and carefully removing cuticles and hangnails in order to get an impeccable ombre manicure that will not go unnoticed by the people around you. If you don't take these tips seriously, your ombre look will look messy and untidy.
Disadvantages of ombre nails
- Painting your nails using a fashionable technique requires a lot of time and patience. In addition, when doing an ombre manicure, you need to apply the varnish extremely carefully, otherwise you will be dissatisfied with the result of the work.
- It is difficult to decide on the color scheme for an ombre manicure. On your nails, it’s better not to take risks and not choose colors yourself. Find a photo of the design you like and do a manicure based on it, or ask the master to repeat the effect from the picture.
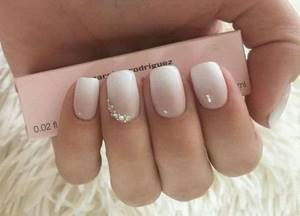
- When creating a complex manicure design: ombre plus rhinestones, for example, it is important not to overdo it. Nails with a gradual color transition, decorated with stones or stickers can look awkward, so be careful with your choice.
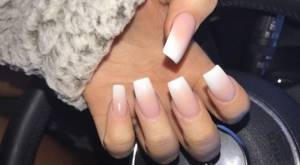
French manicure using ombre technique
Women have long loved the French jacket due to its combination of neatness, style and complete lack of intrusiveness. The most successful choice for an ombre manicure is considered to be varnishes of similar tones, preferably they should be the same color scheme. In this case, the effect will be perfect. The peculiarity of application lies in the method of coating distribution. The sponge absorbs the prepared varnishes, distributing them on the surface of the nail without a noticeable border. Several touches result in a mixture of colors and a blurry border.
The gradient technique is used in several ways:
- vertical;
- horizontal;
- diagonal.
What techniques exist for creating ombre nails?
There are three main techniques for applying varnish in ombre manicure:
- Using a sponge (sponge). To create a smooth transition, you can use a porous sponge to blend the colors. The varnish can be applied directly to it or transferred from the palette with a sponge.
- Using a brush. To do an ombre manicure on nails at home, you need to use a brush with natural bristles, since other tools will leave grooves when applying varnish to the nail plate.
- Using an airbrush device. A special device allows you to get perfect coverage, but purchasing it will not be cheap. Airbrushing on nails is done by professional nail technicians, so it’s better to do a gradient in a salon.
Nail art options
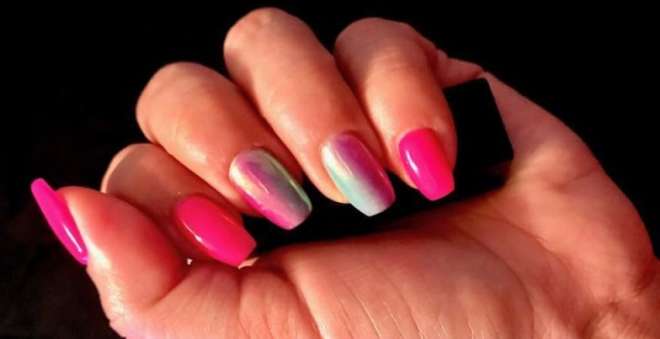
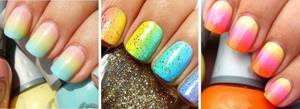
There are several types of ombre manicure. Some of them create a stunning look on the nails by smoothly transitioning shades of the same color, others play on contrasting tones, and others create an ombre effect on fingers painted in a similar palette. Ombre with sparkles looks interesting and original. To achieve this, shiny elements are applied to the top of the nail using a sponge on the base color. All types of nail art with gradient transitions have one thing in common - they look amazingly beautiful on the hands. Let's look at the features of popular ombre techniques.
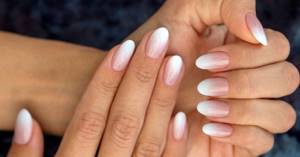
Smooth transition from light to dark
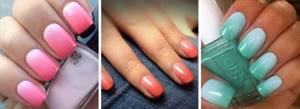
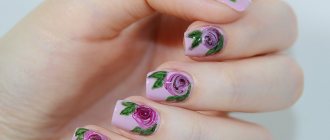
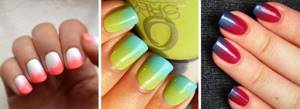
Color transitions using ombre technology can be carried out within one shade (from light to dark). This type of nail art can be horizontal (it is performed with a transition of colors from the base of the nail to its tip) or vertical (shades change into each other from left to right). For a gradient flow of colors, use either 1 varnish, which is diluted to obtain less bright shades, or 2 nail coloring products of a similar tone. For this type of manicure, scarlet and soft pink, light green and pale light green, light blue and turquoise are suitable.
If you want to make a gradient transition in one palette, then prepare several varnishes that are similar in color. Next you need to go through several steps:
- First, do a hygienic manicure and lubricate your hands with cream.
- Then paint the nail plate with a transparent base.
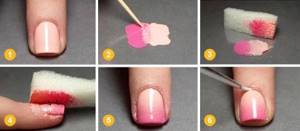
- On a sheet of foil, paint stripes with different varnishes that are similar in palette.
- Next, take a sponge and dip it in this blank of different shades and apply it to the nail, patting it lightly.
- To design each finger, you need to draw new stripes on the foil, dip the sponge in paint and reprint them onto the nail plate.
- After painting all your nails, let them dry thoroughly, and then use a cotton swab with acetone to remove excess paint.
- The last stage of this design will be to apply clear varnish to the entire surface.
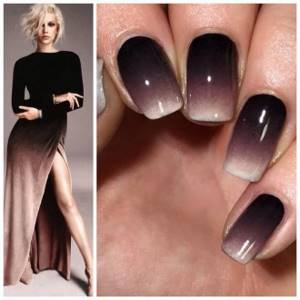
Two-color contrast transition
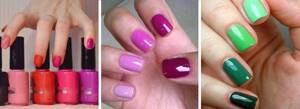
To perform an ombre manicure, 2 contrasting colors can be used. To make a two-color contrasting transition, first choose two well-combined varnishes. So, lilac and yellow, dark blue and orange, light green and scarlet look harmonious together:
- The first stage of this type of gradient begins with completely painting the nails in one of the selected shades, which, according to your idea, will cover the tips.
- When the first layer dries, the sponge is moistened with a different color and applied from the base to the middle of the nail plate.
- Next, use a brush with nail polish remover to stretch the second layer to the length of the nail.
- When everything is dry, cover the surface of the nail plate with a hardener.
A two-color contrasting manicure looks elegant and bright, so it’s suitable for both everyday life and creating a festive look.
- Difficulty nasal breathing without runny nose
- Why do fingers crack and how to treat them?
- Treatment of joints with the best non-steroidal anti-inflammatory drugs
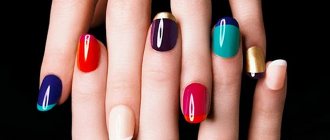
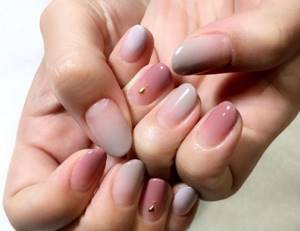
Transition of colors on each finger
The gradient transition of colors on each finger looks unusual, but harmonious, provided that the shades are chosen correctly. The technology of this nail art is that each finger of the hand is painted with a color specially selected for it, which differs only by a few tones from the shade of the others. In this case, a more saturated color is applied to the thumb, and the most delicate and light tone is applied to the little finger. The border between shade transitions is not clear, but blurred.
So, a gradient manicure made using 5 shades of beige (from brown to light nude) will look impressive on your hand. It will be easy to make a smooth gradient of colors on each finger at home. To perform this ombre technique, you need to choose one polish with a rich color. Let's take a quick look at how to make the transition from red to soft pink on your hand:
- First, degrease and cover all nail plates with base. Then paint the thumb red.
- Then pour a little scarlet varnish into a glass plate and add 1-2 drops of white thinner to it, stir. Use the resulting mixture to paint your index finger.
- Next, again add 1-2 drops of white thinner to the already lightened red varnish and paint the next finger with it. We do this every time before applying paint to the next nail. By adding a light product, we lighten the red tint, turning it first into a less saturated scarlet, and then into a soft pink.
Multicolor Gradient
Rainbow nail art looks bright and impressive. To create this type of ombre, up to 5 colors can be used. The shades of varnishes are chosen either in the same or in a contrasting palette. To create a multi-color gradient, you will need a sponge on which strips of different varnishes will be applied one above the other, and then a sponge with paints will be applied to the nail and the overlay of shades will be adjusted using it. Detailed instructions for performing a rainbow manicure are given below.
Ombre manicure with brush
The following types of brushes are used to apply varnish using the degrade technique:
- With flat pile – suitable for horizontal gradients. Choose brushes with short and dense bristles. Place the strips of varnish very close to each other, and then brush the brush from bottom to top to blur the boundaries.
- With fan fibers – designed for vertical stretching of varnish shades. Such a brush should have long and soft bristles that look like a fan. Stretch vertical strips of varnish along the nail in the direction from one edge to the other.
Gradient with sponge
Don't know how to work accurately with a brush? The ombre sponge technique is for you! This is a simple and effective way to create a fashionable manicure that any girl can master. There are two ways to apply varnish and do ombre:
- Using a palette. Apply shades of varnishes onto a previously prepared palette, immediately overlapping. Use a wooden stick to connect the borders. Touch the resulting blank with a porous sponge and transfer the pattern onto the nail.
- Immediately onto the sponge. Cover the surface of the sponge with the selected shades of varnish and imprint the product on the nail, moving the sponge along the nail plate to create an ombre effect.
“An ombre manicure visually lengthens the nail plate by stretching from a less to a more saturated shade of varnish.”
Lyudmila Ivanova

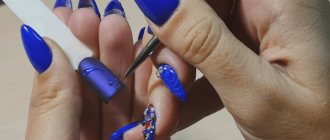
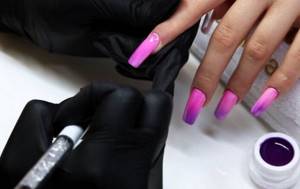
Gradient pigments
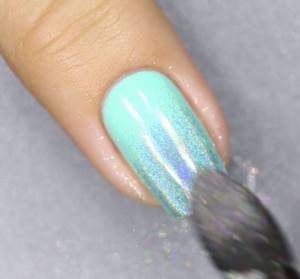
For the base, use white gel polish or just a base. If pigments are used to create the entire gradient in two shades, and not half of the nail, then a silver layer of varnish or just a base will be enough. The sticky layer does not come off.
- We cover the nail with two layers of colored blue or turquoise varnish.
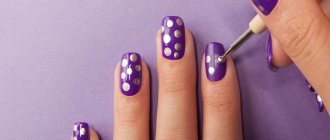
- Using a flat or round brush, select the pigment and place it on the sticky layer using small strokes and lightly patting movements.
- We move from the zone of maximum color intensity to the transition zone, depending on how you arrange the shades.
- We make the layer of pigment thin but dense.
- If you combine two pigments, then start applying it in the same way from the edge to the middle of the nail. In the middle, where two pigments meet, carefully mix them with a brush, drawing one into the other. We get the pigment and put it where the bald spots form.
- We seal the result with topcoat.
- We process the cuticle.
Options for applying a “cat eye”, what 3D gel polishes and pigments are available and how to work with them
How to do an ombre manicure: step-by-step instructions
To make a luxurious gradient on your nails at home, prepare the following tools:
- basic white varnish;
- colored varnish in 2 or 4 shades (blue, purple or any other);
- porous sponge (sponge);
- water;
- scotch.
Step #1
Apply tape to the area around the nail for a neat manicure. The protective tape will help not to stain the skin when applying varnish using the ombre manicure technique. Instead of tape, you can use a special protective composition that forms a film that can be easily removed after completing the ombre manicure.
Step #2
Apply a base color to the nail in two or more layers - it can be either white, beige or clear varnish. Wait until the product is completely dry.
Step #3
Dip the sponge into the water and squeeze thoroughly. Cover the surface of the sponge with shades of colored varnish, ranging from light to dark.
Step #4
Using light touches, transfer the gradient from the sponge to the nail plate. Place the light shade next to the cuticle, the dark one at the tip of the nail. Repeat these steps on all nails. After you have coated the last nail with polish, start doing the ombre nail manicure with a second layer, starting with the first nail, which by this time is already dry. The more layered the application, the brighter and deeper the gradient will be.
Step #5
Remove the tape from the skin around the nail or, if you used a special protective compound, remove the film from your fingers.
Step #6
Secure the result with a finishing varnish. It can be a regular colorless shade, matte or glossy finish, or varnish with glitter.
Helpful tip: When creating an ombre manicure, instead of tape and a product to protect the skin around the nail from staining, you can use regular PVA glue or a face mask film. Such options are also quite effective, although unusual.
Rules and secrets of color combinations
- If you want your ombre manicure to last as long as possible on your nails, choose combinations with beige color – apply it at the base of the nail and stretch it closer to the tip into a different color. Thanks to this, your overgrown nail will remain unnoticed for a long time. When creating an ombre manicure, a harmonious combination of beige can be achieved with purple, burgundy, pink and black colors.
- If your nails widen from the base or you have imperfectly shaped nails, then dark shades on the tips of the nails will distract attention from such shortcomings.

- Another way to extend the life of a manicure is to ombre white varnish on camouflage.
Gradient on nails with gel polish with a brush: step by step
Shellac provides a long-lasting coating that, if applied correctly, will last on your nails for more than two weeks. The technique of ombre manicure with gel polish is no different from the classic creation of a gradient with ordinary varnishes. The differences lie only in the features of coating the nail plate with shellac. If you have the necessary tools to create a long-lasting manicure, you can create a beautiful ombre nail design at home.
What you need to create a gradient manicure at home:
- tool for grinding and polishing the nail plate;
- degreasing liquid;
- primer;
- base coat product;
- finishing coating;
- two shades of ombre gel polish;
- liquid that removes the sticky layer;
- lamp for drying gel polish;
- gradient correction brush.
Step-by-step instructions for creating a gradient with gel polishes
Step #1
Prepare the nail: shape it, remove the cuticle, sand it, apply a degreaser, then primer and base, dry the coating in a lamp.
Step #2
Apply base tone and dry under lamp.
Step #3
Apply gel polish with a brush like a rainbow, that is, from light to dark shade. Stretch the boundaries with the brush, trying to make the transition as smooth as possible. Do not forget to remove any remaining gel polish from the brush each time. Dry the nail in a lamp.
Step #4
Apply the shades in a second layer, again creating a neat gradient with the brush. Polarize the gel polish in a lamp.
Step #5
Gradient ombre manicure is ready! At the end, you need to cover your nails with a finishing compound, dry and remove the sticky layer. Enjoy beautiful ombre nails!
Tips: how to do ombre manicure on nails
To create a neat design on your nails, you need to know about some subtleties and secrets:
- Many people experience the appearance of bubbles when applying ombre nail polish with a sponge. To solve the problem, use a fine-grained sponge.
- You can reduce the number of bubbles if you first print a sponge with applied varnish on paper, and only then start working on your nails.
- The more layers of nail polish there are, the less noticeable the bubbles are.
- The transition of shades will be beautiful if you choose the right colors. Strongly bright shades are difficult to shade.
- To make the gradient more expressive, apply a base coat of white or the lightest pink color to your nails.
Mastering the technique of creating a gradient on your nails is not difficult. Try doing an ombre manicure on your nails - you will definitely succeed! Good luck!
Materials needed to make the gradient
Depending on the chosen method of applying the gradient, you may need different materials and tools. We will provide a list of everything you need, and all you have to do is choose what you need for each specific design from the methods listed below.
- Gel polish in 2, 3 shades or shellac
- Acrylic paint when working with an airbrush or sponge (optional)
- Gel paint
- White gel polish or shellac for base/base
- Base, top for gel polish
- Degreaser, dehydrator
- Brush: flat, comb, fan
- Acrylic powder of different shades (for design with gradient powder)
- Pigments (for ombre manicure with pigments)
- Cuticle protector: cream, tape, liquid cuticle tape, cuticle stickers
- Final cuticle oil
On the Internet you can find many instructions and life hacks on how to make a comb brush yourself. You can take any flat brush for watercolor or acrylic paints and trim it with scissors.
Comb brush for ombre manicure
In order not to wash off the paint or varnish from the cuticle with all available means, it is better to protect it before starting work. You can carefully apply the nourishing cream, but if it gets into the gel polish when working with a sponge, the polish will swell with bubbles.
Manicure brushes - types, purpose, how to choose and care
At home, regular tape or PVA glue for cuticles is often used. In salons, professionals use Skin Defender - this is a liquid product that resembles the action of PVA glue. We apply it to the cuticle, it hardens, forming a thin elastic film. After applying the gradient, simply remove the film and the skin remains clean.