What you will need
The exact list of materials depends on the type of application. It could be:
- Dyes.
- Mehendi mixture.
- Mehendi application package.
- Stencils.
- Henna.
- Airbrush.
- Airbrush paint.
- Cotton pads.
- Cotton buds.
- Alcohol.
- Glitter.
- Transfer drawings.
Adviсe
- Determine the location of the design on the body in advance.
- If you do it manually, you need to practice on a piece of paper so that you can do everything later without errors.
- When applying henna, try to avoid direct sunlight on this area of the skin for at least a day.
- Remove hair from the selected area.
- Be sure to treat the desired area of skin with alcohol.
- Wear gloves when working with henna and other dyeing materials.
- Wear a mask when using an airbrush.
Let's look at ways to apply temporary tattoos at home
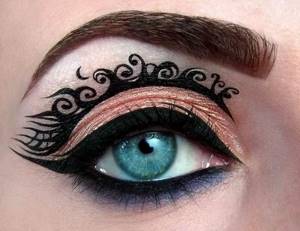
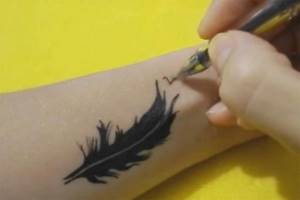
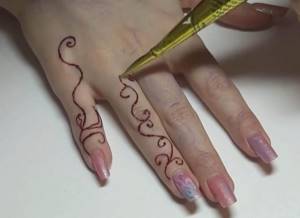
Using eyeliner
Essentially, this is just a neat drawing on the face or body using a sharpened pencil, which is secured with varnish.
The advantages of this method are that the drawing can always be corrected if something doesn’t work out or if the lines come out crooked.
For a good result, you should follow just a few rules:
- First, you need to practice on a piece of paper by drawing the desired design.
- You need to take an eyeliner with a sharpener, you can take a black one, but it’s not necessary. When using colored pencils, you can create an unforgettable drawing.
- You need to make a couple of test strokes on your wrist to understand how hard to press the pencil.
- You need to prepare the leather, wipe it with alcohol and let it dry.
- Draw a pre-prepared sketch with an eye pencil.
- If something doesn’t work out, you can wash it off with water and try to draw again.
- The finished drawing should be sprinkled with a small amount of hairspray. It will last longer and not smudge upon first contact with something.
This type is suitable for a themed party; the sketch can be selected to match the theme of the event and the desired image.
A tattoo with a pencil is more suitable for people who know how to draw beautifully and accurately.
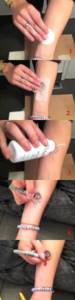
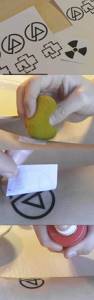
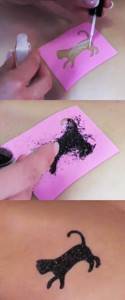
Using a stencil
This method of application is suitable for those who are not confident in their artistic skills. But I want to show off my tattoo in front of my friends.
- You need to choose your favorite drawing on the Internet.
- Print it out.
- Use scissors to cut out the design.
- For best results, shave the selected area of skin.
- Treat the skin with alcohol and let dry.
- Apply the stencil to the skin, you can hold it with your hand, or you can glue it with tape, but initially remove the sticky layer of tape. This is necessary so that it does not hurt to remove the tape from the skin.
- Use paints, pencils, henna or a permanent marker to fill in the stencil on the skin.
- Next you need to remove the stencil from the skin.

Ready. Using a stencil, you can experiment with different shapes and patterns.
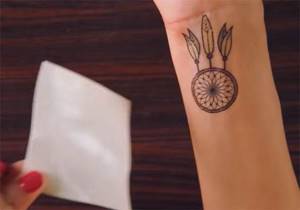
Transfer tattoo
There is a special transfer paper, which is what temporary tattoos are made on, which are sold in stores. This paper consists of a thin transparent self-adhesive film on which a design is applied, and a thin paper backing.
- It is necessary to purchase special paper in specialized stores.
- Choose the drawing you like, here you can no longer limit yourself in choice. It all depends on what printer the tattoo will be printed on – color or black and white.
- Print. You need to remember: when the drawing is transferred to the body, it will be a mirror image of its original image on paper.
- Cut with scissors.
- Treat the skin with alcohol.
- Place the side with paint on the skin, and apply a wet towel or cotton pad on top. Hold the towel for 30-60 seconds. Remove any remaining paper from the skin.
- This tattoo lasts about a week. You can wash it off with soap and a rough brush.
Tip: It happens that after application some parts of the design are too shiny. For greater realism, you can sprinkle it with talcum powder.
Using a Sharpie permanent marker
Another simple and practical way. You will need a Sharpie marker. You can buy it at any office supply store. And also children's talc without fragrances. Sharpie markers allow you to draw fine lines, are very resistant to abrasion, and have rich colors.
- Be sure to treat the skin with alcohol.
- Initially, draw the desired design on paper, and then transfer it to the skin.
- Sprinkle with baby talcum powder.
- Carefully trace the lines with a Sharpie marker.
- Spray with a small amount of hairspray.
This pattern will last for about a month. But you need to keep in mind that the marker is harmful to human skin.
Using a pen
This method is suitable if you urgently need to diversify your image, but there are no other means at hand. A simple gel pen will come to the rescue. With proper experience, you can make very beautiful drawings on the body with a pen.
- You need to treat the skin with alcohol.
- Apply the design with a pen to the skin.
- Fix with a small amount of varnish.
Unfortunately, such a tattoo will only last until you take a shower.
Using a printer
You can make both color and black and white drawings.
- You need to choose the drawing you like.
- Reflect it in a photo editor if required.
- Print on a printer.
- Cut out.
- Treat the skin with alcohol.
- And immediately attach the cut out picture.
- For 3-5 minutes you need to wet the paper with a wet sponge or cotton pad.
- Carefully remove the paper without moving it.
- Secure with hairspray.
Airbrush
An airbrush tattoo is a simple aqua makeup. It is done with water-based paints and applied with an airbrush. You can apply a thin layer of paint and create shadows. You will get a beautiful drawing with a color transition. You can use multiple templates to create a more impressive design.
- You need to prepare a special paint that is used in an airbrush.
- Prepare your airbrush.
- Purchase the templates you want or make them yourself.
- Treat the skin with alcohol and let dry.
- Secure the template to the skin with tape. There are templates on sale with an adhesive layer already applied.
- Using an airbrush, spray paint.
- Change template and spray paint.
The result is a gorgeous picture. But unfortunately, it will last no more than a week.
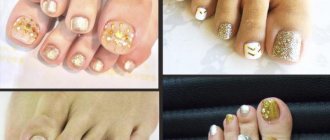
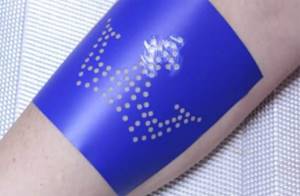
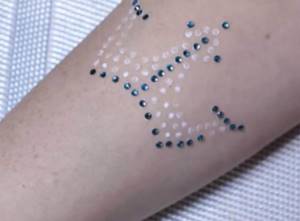
Glitter (tattoo glitter)
To create it you will need cosmetic glitter, hypoallergenic glue and a template.
- It is necessary to select a template and area for application.
- Treat the skin with alcohol and let dry.
- Attach and fix the stencil.
- Apply glue to the stencil. If the surface is large, it is recommended to apply the glue in parts.
- Use a brush to distribute the glitter, starting from the edges of the template.
- After covering the entire stencil with glue and glitter, brush off any remaining glitter with a brush.
On average, such a tattoo lasts 7-10 days. You can wash with it, but it is not recommended to rub with a washcloth.
The photo shows examples of what can happen:
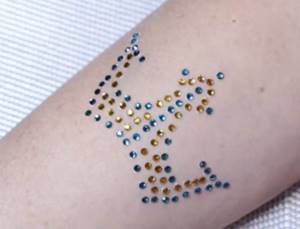
Rhinestones (Crystal)
Tattoo made using various stones and rhinestones. You can use stones and rhinestones of various shapes and colors. This look is suitable for brave and brilliant girls. Now you definitely won’t go unnoticed wherever you appear. You can also create an interesting image for a photo shoot.
This type of application is painless and safe. What will be required?
You can cheat and buy a ready-made crystal tattoo, but there will be no chance for flights of fancy and you won’t be able to play up your image the way you want.
Required:
- Glue for body art.
- Rhinestones and stones of various shapes and colors.
- Tweezers.
- Alcohol.
Creation stages:
- Treating leather with alcohol.
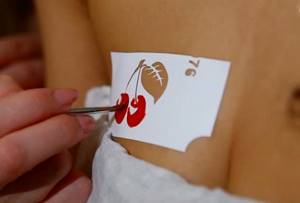
- Mark the desired pattern on the skin. Just put little dots. You can buy ready-made templates. They have perforations for applying glue.
- Using tweezers, carefully glue the rhinestones to the marked points. The glue can be applied either to the skin or directly to the rhinestone itself.
This is how glue is applied through a template
Rhinestones are glued to glue dots
This tattoo can be done together with other types. It will only last a couple of days.
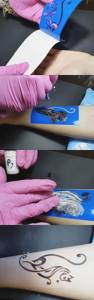
Biotattoo at home
The design is made with henna, but keep in mind that this is a special henna, and not the kind that is used to dye hair. You can buy it in specialized cosmetic stores.
To henna with a natural composition, you can add special dyes and make the design colored.
Stages of creating a biotattoo
- Degrease the skin.
- If you have confidence in your artistic abilities, you can immediately paint with henna. You can also draw a sketch on the skin with a felt-tip pen in advance and apply henna on top of it. If you have no artistic skills at all, it is better to use a stencil.
Video: how to apply henna using a stencil
- Ready-made henna is sold in special dispensing cones. With their help the drawing is applied. It can also be applied using a syringe without a needle .
Applying henna using a cone
If there is a mistake in the drawing or a little extra henna gets in, you can remove it with a cotton swab dipped in alcohol or soap solution.
- After drying, carefully remove excess with a dry cotton pad.
This pattern can last on the body for several months. The main thing is to avoid contact with copious amounts of water and alcohol-containing products.
How to make a temporary henna tattoo
The composition can dye the skin red-brown in color with different brightness.
This pattern looks best on the instep of the leg, palm or back of the hand. Filigree ethnic patterns are drawn in these areas. Such drawn mehendi patterns look stylish and original and perfectly complement a costume look or look for a photo shoot.
If you follow the instructions when mixing henna for mehendi and properly prepare the skin, this look can last from 5 days to 1 month.
Henna is a powerful coloring pigment, so you need to be careful with surfaces and clothing, and immediately remove any excess that gets on the skin with a cotton swab.
In order for the tattoo to last longer, you need to carefully prepare the skin. Treat the intended area of skin with alcohol. If the skin is peeling, it is better to treat it with a scrub or a hard washcloth, thereby removing dead skin cells. Also, if there is hair on the selected area of skin, it should be removed. This is necessary so that the pattern is erased simultaneously over the entire skin. It is also recommended to avoid direct sunlight and solarium a couple of days before you do the procedure and not repeat it 2 times in a row on the same area of skin.
How to make a solution
You will need:
- Henna powder.
- Lemon juice.
- Small glass cup.
- Sugar.
- Plastic bag.
- Medical syringe without a needle.
Method for preparing the solution:
- Mix 15-20 grams of henna powder with 1/4 cup of lemon juice.
- Stir until you get a homogeneous mass, without lumps.
- Place the resulting mass in a bag for 12 hours in a warm place.
- In order to achieve a darker shade, you need to add basma.
- After 12 hours, add 1 tsp sugar.
- If the henna is liquid, you need to add more powder and vice versa.
- Remove the henna bag for an additional 12 hours.
Application
- Clean and treat the skin with alcohol.
- For better penetration, it is recommended to lubricate the skin with eucalyptus oil.
- Due to the fact that the composition is quickly absorbed, it is better to initially draw a design with an eyebrow pencil and apply henna on top.
- You can draw either by hand or using a stencil.
- You can apply the paste with a special mehendi cone or use a syringe without a needle.
- After application, allow to dry for at least one hour. The more the skin dries, the richer and more durable the contours will be.
- After drying, carefully remove any remaining composition.
Do not contact with water for 3-4 hours.
Temptu
This is the most durable pattern. It is pricked manually under the skin at 3-4 millimeters. In fact, temptu is done like a permanent tattoo, the only difference is the type of dye. The disadvantages of this method are that there are limitations in the color palette and the small size of the pattern - approximately 4-5 centimeters.
For temptu, the same paint is used as for permanent makeup. Due to its characteristics, this paint disintegrates over time and the design disappears. But, as practice shows, the marks from the temptu may not completely disappear; ultimately, a stain similar to a bruise remains.
For temptu you need:
- Tool for pricking (machine or needle).
- Temptu paint (for permanent makeup)
- Thoroughly soak the skin area in alcohol.
It is better to entrust the drawing to a person who has the skill. Or at least practice applying it first. For training, you can use, for example, a piece of pig skin.
- After the temptu is applied to the skin, treat the area with a special ointment.
It is not recommended to do temptu yourself, but it is better to contact a professional master.
In the end, let's once again classify temporary tattoos according to their lifespan. Let’s also remember the pros and cons of different methods.
Temporary tattoo for 1 year
This is a permanent temptu design. It is made with less durable paints and is not deep, but is the usual introduction of pigment with a needle. As the masters promise, the marks should disappear in a year. But, as practice shows, the paint does not disappear without a trace and it leaves behind a fuzzy picture or even something like a bruise.
Temporary tattoo for 3 months
This is the same temptu, but the paint penetrates an even smaller distance under the skin. And because of this, it loses its brightness even faster. After it, a mark similar to dirty skin remains on the body.
Temporary tattoo for a month
Mehendi suits this look. If you rarely come into contact with water and handle it carefully, it will last up to 4 weeks. Over time, it will lose its brightness and eventually be completely erased. It should be noted that this method is one of the safest and can be done even by children.
Tattoo for a few days
This category fits:
- Glitter
- Crystal (rhinestones)
- Made with markers
- Transferable
- Airbrush
Other types, such as those made with a gel pen or using a printer, usually live for 1 day.
Precautionary measures
- You need to make sure that there is no allergy to the components included in the products.
- It is imperative to think about the consequences; marks and scars may remain.
- Use only high-quality products and preparations.
It is quite possible and not difficult to make a temporary tattoo at home, the main thing is desire and a responsible approach. If all the rules are followed and the skin is properly prepared, the design will decorate the body for several days. Such an experiment will give you the opportunity to add zest to the image and understand whether a real tattoo is needed.
Temporary tattoos: photos
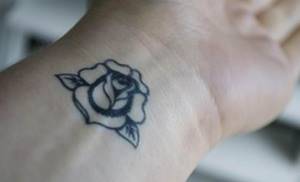
Making a temporary tattoo at home is both simple and difficult. A temporary tattoo is an excellent solution for those who decide to get a tattoo for the first time.
Tattoo with a stencil
Using a stencil it is easy to make a temporary tattoo with clear contours at home. You can use a ready-made stencil or create one yourself. The stencil greatly facilitates the distribution of paint over the skin, allowing you not to think too much about the accuracy of applying the composition.
Using stencils is one of the easiest ways to apply tattoos to skin at home
It is not necessary to create a drawing on paper by hand. All you need to do is print the image you like. After this, the contours of the design are cut out with scissors, a blade or a stationery knife. The resulting holes should be exactly the size corresponding to the contours of the future image.
Then the stencil is applied to the skin so that it is in close contact with it. Regular or double-sided tape, which should be used to glue the paper to the skin, will help prevent the stencil from moving.
Tattoos are even applied with nail polish using a stencil, using a new stencil for each color. The stencil you like can be reused.