Every woman wants to be special and beautiful, especially when it comes to some important event or holiday. That is why it is very important to be able to do beautiful evening makeup with your own hands - it is not always possible to invite a makeup artist. Today I will tell you how I do makeup for holidays and special events, and also give a couple of recommendations on how to properly apply makeup at home.
What tools and materials are needed
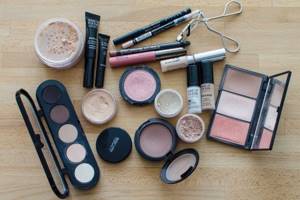
Professional makeup at home (step-by-step photo instructions are posted below) cannot be done without high-quality cosmetics and the necessary tools for applying it.
Skin is a canvas that should look perfect so that makeup turns out natural and beautiful.
To achieve this goal you will need:
- Primer (or makeup base). It is needed so that the foundation and all other cosmetics lie smoothly on the skin and last a long time. The primer has a slight coloring effect and protects from wind, sun and frost.
- Concealer. It comes matte and with a slight shimmer, allowing you to hide skin imperfections and even out your tone.
- Spot corrector. This product is available in the form of a compact liquid and pencil and has the same function as foundation, but in cases where you need to hide minor imperfections - pimples, redness, age spots or mosquito bites.
- Concealer. It is used mainly for the delicate skin of the eyelids and helps not only protect it, but also create more lasting eye makeup with shadows and pencil.
Professional stylists recommend focusing on either the eyes or the lips when making makeup. This approach will allow you to look stylish and natural, and not vulgar.
For eye makeup you will need:
- mascara, preferably brown or black (other shades are not excluded);
- liner or pencil to highlight or correct the line of the eyes and eyebrows;
- eye shadows of various colors suitable for the color type.
For stylish lip makeup you need:
- lip gloss and lipstick;
- nude liner to create a clear and even border between lips and skin;
- eyeliner to match the lipstick to adjust the shape and curve of the mouth.
Thanks to this set of cosmetics you can create excellent makeup.
But it wouldn't be complete without:
- blush;
- powders;
- eyebrow pencil.
To apply all these products you need tools specially designed for them. Some of the items can perform one or more functions and even replace each other.
But stylists recommend purchasing professional tools.
These include:
- applicators – used for applying cosmetics with a dry texture;
- sea sponges – used for applying creamy cosmetics;
- brushes of various shapes and types, at least 3 pieces per set;
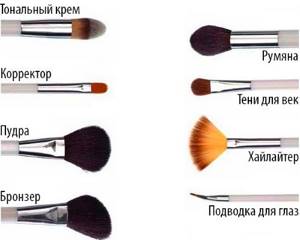
For professional makeup you will need a variety of brushes. - sharpener;
- sponges and puffs - used when applying tone or powder;
- an eyebrow brush with a comb and tweezers to give the perfect shape to your eyebrows;
- eyelash curler.
If something goes wrong while applying the product, instead of completely removing the composition and completely redoing the makeup, you can use additional products.
These include:
- cotton pads and sticks;
- a pack of dry and wet wipes.
Tools should be carefully cared for and washed with warm water and hypoallergenic soap at least once a week. This practice will extend the life of items and prevent skin diseases.
Don't miss the most popular article in the section: Face fitness for facelift, rejuvenation, muscle tone. Master class from Elena Karkukli
How to choose cosmetics for beautiful makeup?
There are universal tips that will help in choosing cosmetics:
- It is important to decide on the price. In most cases, cost is the key factor. To make the search circle smaller, it is better to initially decide in which class of cosmetics to look. There are 3 of them: Mass market. Here are the lowest prices.
- Intermediate. Cosmetics of this class are a transitional stage. Prices here are average.
- Luxury The most expensive and famous products.
Foundation
Each decorative cosmetics product has its own selection rules:
- Effect. First you need to decide what result is needed. Foundations are divided into: Mattifying.
- Moisturizing.
- Gives radiance.

If you have no idea what effect you need, you can go to the store and try everything.
- Degree of coverage. Foundations can hide absolutely all skin imperfections, but for every day it is better to choose the lightest options possible.
- Texture. Foundations can be: Fluid. Gives light, weightless coverage. Most often radiant.
- BB/CC cream. Light coverage and moisturizing.
- Mousse. The most airy texture.
- Cream. A classic and versatile option. A good example is L`oreal Allience Perfect Perfect Radiance.
- Cushion. Innovative product. The foundation is collected onto a sponge and applied like powder. A great example is Liquid BB Crème au Ginseng, Erborian.
- Color. A consultant can help with his choice. The shade should be tested on the neck or cheek.
Eyebrow products
Choosing an eyebrow product is much easier.
You need to complete 2 steps:
- Choice of funds by price. You need to decide on the highest possible price and try those products that cost less.
- Texture. Everything here is individual. The main thing is that the girl is comfortable using it.
Shadows
Good shadows must meet 3 points. If you can find such a product, you need to buy it.
These include:
- Persistence. The shadows should last until the evening.
- Pigmentation. Sometimes you come across a beautiful shade in the packaging, but when applied it is not visible. It is better to always try the color on your hand before purchasing.
- Texture. Shadows should not become dusty or crumble.
When choosing shadows, you can pay attention to the brands Colourpop, Huda Beauty, ProVG. They have the highest pigmentation and durability.
Eyeliner
The main thing in a pencil is the shade. In terms of durability and texture, most are about the same.
The pencil should:
- Have a rich color.
- It's good to stew.
- Do not wash after 2-4 hours.
- When drawing, the shade should be uniform.
Mascara
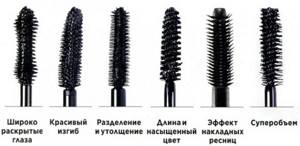
Mascara has 3 criteria when choosing:
- Effect. Short eyelashes need to choose products for lengthening, long ones - for curling and volume.
- Brush. Brushes are made of silicone with small bristles. They are best used by girls with sparse and short eyelashes. For those with long and thick eyelashes, fluffy brushes are more suitable.
- Price.
Blush
When choosing a blush, the most important thing is the shade. It is important to find the color that is ideal for a particular person.
2 more important characteristics:
- Price.
- Consistency. Blush can be creamy, like lipstick (Max Factor Miracle Touch Creamy Blush). The most common option is pressed like powder (Pupa Like A Doll Blush).
Pomade
Lipstick is selected in 3 steps:
- Price. In any category you can find the necessary product, so when choosing, you need to start from the maximum possible amount of money that a particular buyer can spend.
- Finish. There are 3 options: Matte finish.
- Glossy finish.
- Moisturizing coating.

- Color. The simplest and most difficult step at the same time. If you have questions, it is better to contact a consultant.
| Product | Mass market | Lux |
| Concealer | Catrice HD Liquid Coverage Foundation | Christian Dior Diorskin Forever Fluid |
| Gel for eyebrows | Art-Visage | Gimme Brow Benefit |
| Eyebrow pencil | Vivienne Sabo Brow Arcade | Dior Powder Eyebrow Pencil |
| Eyeshadow palette | Makeup Revolution Fortune Favors The Brave | Christian Dior 5 Couleurs |
| Mascara | Vivienne Sabo Cabaret | Clinique Lash Power Mascara |
| Blush | Vivienne Sabo Teinte Delicate Blush Duo | NoUBA Blush on Bubble |
| Matt lipstick | Golden Rose Velvet Matte | Clinique Long Last Soft Matte Lipstick |
Makeup application sequence
Professional makeup at home (step-by-step photos and videos below) is impossible without following the correct sequence of application of products.
Recommendations:
- Concealer. It can have a thick or light texture. The first type is intended for girls with problem skin, and the second is suitable for girls with normal skin. A foundation with a dense texture is applied with a brush, and a light one with a sponge.
- Corrector. Depending on the color, it can be used not only after applying foundation, but also before it.
- Emphasizing cheekbones. Bronzer will come in handy for this step. Liquid and cream bronzer are suitable for those who are learning the basics of professional makeup, while powder bronzer is recommended for experienced ones.
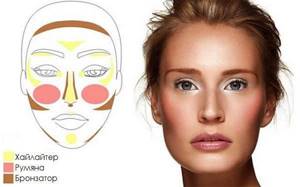
- Powder. Apply the product to the area below the eyebrows from top to bottom, and to the forehead - horizontally and downwards. Girls with oily skin should prefer mattifying compact products. Those with normal skin can use loose powder. And girls with dry skin can skip this stage in the makeup procedure.
- Makeup for eyes, eyebrows and lips. This type of makeup will be discussed below.
- Cheek makeup with blush. For the blush to apply beautifully, you need to smile broadly. This tricky step will smooth out cheek creases and create great makeup.
How to properly prepare your face
Makeup artists who work with Hollywood stars recommend preparing your skin for makeup in 3 important steps:
- Exfoliation of old cells using cleansing preparations with a gentle composition in the form of acids and enzymes. Such preparations are suitable for girls with oily skin. Those with normal or dry skin should use lotions and toners. Scrubs and peelings are not recommended in this case, as they dry out the skin.
- Moisturize with a moisturizing (never greasy) cream. The texture of the product should be light and pleasant when applied. You can apply it in a thick layer, and wipe off the excess with a napkin after absorption.
- Application of primer. It allows you to narrow pores, add radiance, and give the skin a matte color by evening out the texture and tone.
Cleansing
First of all, it is necessary to completely clean the remnants and traces of previous makeup on the face.
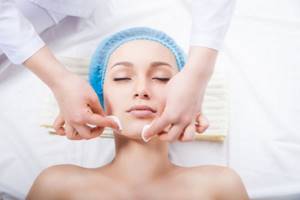
Tonics and cleansers will help with this, which will not only remove all the “dirt”, but will give the skin a healthy look, without an oily sheen.
Determining makeup shades
Professional makeup, despite the fact that it is done at home using step-by-step photos, must fully correspond to the original - even if the application technique is correct and the cosmetics are of high quality, but the color is chosen incorrectly, this makeup can hardly be called professional.
To avoid this gross mistake, makeup artists recommend learning the basics of color combinations, starting from your color type:
- For girls with an autumn color type, makeup artists recommend red, yellow, orange, gold and chocolate palettes;
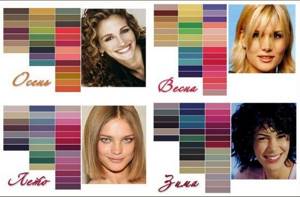
- owners of spring color type traits need a yellow, greenish, orange, yellow and pink color palette in their makeup;
- girls with a winter color type are better off giving preference to cool shades of blue, pink, emerald, light blue and charcoal gray;
- For those with a summer color type, violet-pink, gray-metallic, and blue-blue shades are suitable.
Tone equalization
Step-by-step photos will help you do professional makeup at home. And first of all, you need to create the right skin tone. For these purposes, you can use foundation, foundation or tinted moisturizer.
Makeup artists recommend purchasing two tones: one light for the cold season and dark for the warm season. In spring and autumn, the two colors can be mixed. When choosing a tone, you should focus not only on the complexion of the face, but also on the neck, so that when applying the product there are no obvious transitions or a mask effect.
First, apply makeup base. This can be done either with your fingertips or with a sponge. After application, blot off excess with a dry cloth. Then the foundation is distributed.

This can be done in two ways:
- Professionals use a special tone brush. This can be a tool with straight or rounded bristles and a kabuki brush. To do this, you need to squeeze a little product onto the back of your hand, take a little tone with a brush and apply it with patting movements until the entire face is covered with an even tone. At the end, you can walk the brush without product along the massage lines.
- The second method is with a damp sponge. To do this, you need to wet it and squeeze it well to remove excess moisture. Afterwards, you need to apply a little foundation on it and distribute the product over your face. Under no circumstances should you apply foundation with a dry sponge, as the cream will be absorbed into it due to the lack of moisture and you will need more product than necessary. The result will be a dense and uneven layer of foundation instead of a thin and perfect one.
Face shape correction
The main purpose of makeup is to hide skin imperfections, turning them into advantages unnoticed by others. One of the disadvantages may be the shape of the face. The ideal shape is oval. Therefore, girls with a different face shape try to get closer to the ideal.
For correction, you will need two foundations and two powders - both types of products should be a tone darker and lighter than the natural shade.
Adviсe:
- To visually make a square or round face oval, you need to apply light and dark foundation vertically from the side of the temple to the chin. You need to start from the hairline and light color. It is recommended to darken the selection. The product is shaded with a brush.
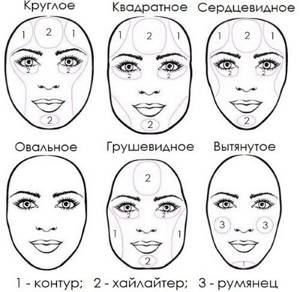
- To give an oval shape to an elongated face, you need to apply a dark and light tone horizontally. The light tone is applied to the top of the nose, cheekbones and chin. A dark tone is needed for the lateral surface of the cheekbones and temporal area.
- To give an oval shape to a triangular face, darken the temples and the sides of the cheekbones. Apply a light shade of foundation to your chin. Blush is applied to the upper part of the cheekbones.
Don't miss the most popular article in the section: Facial massage according to the system of the Japanese doctor Asahi Zogan.
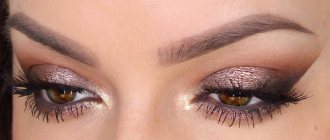
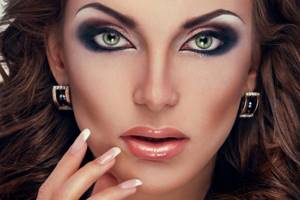
Features and rules of evening makeup
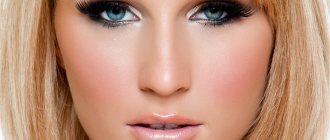
Every woman needs to look simply chic and irresistible from time to time: a date, a wedding, a prom, a corporate meeting, a birthday and a New Year's celebration - all these events are very significant and require a great appearance. To create a solemn, festive look, evening makeup is intended.
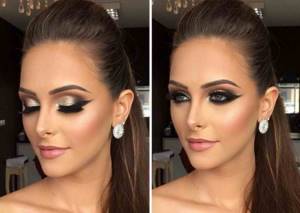
Nuances and priorities of evening make-up:
- In terms of brightness of colors, evening makeup is significantly superior to other styles, for example, nude or daytime;
- when creating an image, take lighting into account - for a room with dim light, take a tone a little lighter than usual, in bright lighting - a darker tone;
- use shimmering foundations with reflective particles, keep in mind that placing emphasis on the eyes allows this;
- emphasize either the eyes or the lips to avoid a touch of vulgarity.
Eyebrow development
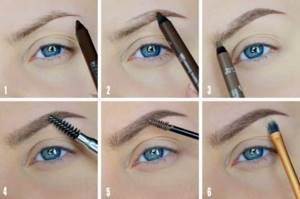
Professional makeup at home (step-by-step photos will help you do makeup according to the rules) includes the stage of eyebrow development:
- Correction of natural shape. At this stage you need to remove excess hair. If you have the skill, you can use thread or wax. But tweezers are best suited for these purposes. Shape correction should be carried out in daylight and the procedure should begin from the side of the temples. The trend is a natural eyebrow shape of medium thickness with a curve, rather than thin threads.
- Eyebrow makeup. It can be done using a pencil. if you have naturally sparse eyebrows, or leave the natural shape and color if your eyebrows are thick. First you need to determine three points: the bend, the beginning and the end of the eyebrow. It's very easy to do this yourself. For this you will need a pencil. You need to apply the pen at three points: at the wing of the nose and the beginning of the eyebrow, at the wing and end, and through the pupil. The first two points are the beginning and end of the eyebrow, and the third is the bend. If you have thick eyebrows, you need to get rid of excess hairs. Using an eyebrow brush, you need to comb the hairs up and trim the length with nail scissors. Then you should remove the excess from above with tweezers. If the eyebrows are sparse, then using a pencil that is as close as possible to the color of the eyebrows, using point movements, starting from the beginning, draw a line to the end from above and below. The space between the lines is painted over with dotted movements that imitate hair growth.
Drawing eyebrows with a pencil takes a long time. Therefore, this method cannot always be used. You can replace this step with eyebrow tinting. When choosing paints, you need to focus on their natural color.
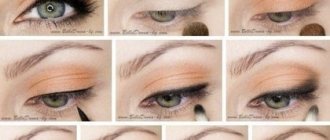
Eye makeup rules
Professional eye makeup at home (step-by-step photos will serve as a guide) can be made exciting or mysterious. The skin around the eyes is very delicate and makeup in this area requires a special approach.
It includes:
- Applying eye shadow base. This step will keep the eyeshadow bright throughout the day or evening and prevent it from creasing. The base can be cream or powder. The first type is driven in with your fingertips. The second is applied with a special brush in two layers. The step is completed by applying powder.
- Applying corrector or concealer. Their function is to remove dark circles under the eyes. If they are barely noticeable, then you can use a concealer a couple of shades lighter than your skin. If this method does not help and the bruises are still visible, then a concealer in a shade close to yellow for those with fair skin and shades of orange for girls with dark skin will come to the rescue. Only after applying corrector or concealer is the foundation applied.
- Applying shadows. The method of their application depends on the type. Dry shadows are applied using an applicator, which usually comes in a set. Liquid shadows are applied with a brush. The first type of shadow is suitable for beginners, the second - for girls who have the skills to use such a product.
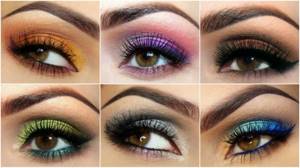
Makeup shades should be selected appropriately, depending on eye color:
- The ideal eyeshadow colors for brown eyes and light hair are rich, cool colors (bright blue, fuchsia, sea green). For girls with black hair and brown eyes, a dark blue eyeshadow palette will be the right choice. If the brown-eyed beauty has dark skin, then it is better for her to give preference to olive-brown tones. Stylists recommend oriental-style makeup for girls with brown eyes. It involves the presence of black eyeliner, which is drawn in a thin line along the upper and lower eyelids. The look will be completed with shadows of a suitable color and mascara.
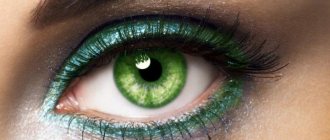
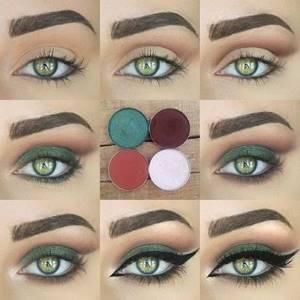
- Girls with green eyes You should opt for brown, copper, pink, green, purple and lilac shades. Stylists do not recommend using a blue eyeshadow palette, but advise giving preference to a deep blue contour, which should be used to highlight the inner eyelid. As for eyeliner, instead of black, you should choose gray, chocolate brown, white and golden pencil. The last two colors will help make your eyes appear larger.
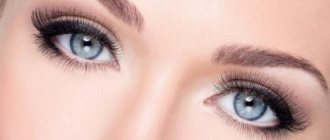
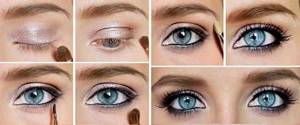
- Blue-eyed beauties Stylists recommend paying close attention to pink, silver-gray, gold, purple, and charcoal-gray shades. The latest range is ideal for evening makeup. If you want something unusual, then you can use the blue-blue palette. As for eyeliner, these are violet, emerald, cobalt, terracotta, bronze colors. You can choose not only black mascara, but also colored mascara - the main thing is that it matches the eyeliner and shadows.
- For those with gray eyes, stylists recommend paying attention to shadows that are a couple of shades darker than the iris. This advice is suitable for all gray-eyed girls, regardless of their color type. If a girl has gray-blue eyes, then it is better to choose gray-blue, steel, gray-beige and dark gray shades. The golden-brown and beige palette is suitable for girls with warm hair tones and orange splashes in the iris. For brunettes with gray eyes, it is better to avoid the orange and yellow palette, but you can choose any other colors. Depending on the color type, you can choose black, brown, blue or gray outline. The main thing is that the line is thin and clear. As for mascara, choose blue, gray, black, plum shades for daytime makeup and with shimmering pigments for evening makeup.
Additional Tips
Finally, we will give some more tips on products for evening makeup and the features of their use.
False eyelashes
Where else if not in evening makeup to use false eyelashes? You can choose one of two options - use individual bundles (sets of such bundles can be found, for example, in Inglot) or strip, “whole” eyelashes.
Before applying, apply the strip lash to the upper eyelid - if it is too large, carefully trim it with scissors from the inside (the part that ends up at the inner corner of the eye).
Both strip and bunch lashes are applied using tweezers. When working with a bundle, apply a drop of special eyelash glue to the base of the bundle, be sure to wait until it hardens halfway (about half a minute - a minute, read the instructions for your glue) and carefully place the bundle on your eyelashes, but butt up to the skin of the eyelid.
Inglot Bundle Eyelashes
In the case of strip eyelashes, apply a little glue to the base of the eyelash, spread it over the entire base (for example, with a cotton swab), wait until the glue is half dry and apply the eyelashes to the eyelid; The base of the false eyelashes should coincide with your own eyelash edge.
Inglot strip eyelashes
Always wait for the drying time specified in the instructions for the glue - if you apply the eyelashes to the eyelid immediately after applying the glue, it will not stick to the eyelid.
Makeup fixative
Previously, loose powder was used to set the tone and other makeup elements on the face, applying it with light movements with a large fluffy brush. However, special makeup fixatives in spray format are now available on the market. Perhaps the most popular of them, Fix Plus, is produced by MAC.
MAC Fix Plus
This spray should be applied to the entire face from a short distance; Thanks to a good dispenser, you find yourself “in a cloud” of spray. In addition to extending the wear time of makeup, this spray helps to “sit” products on the face and remove the “cakey face” effect - a large amount of tone and powder on the face (which is difficult to refuse when creating evening makeup), which is why the skin looks like as if she was sprinkled with flour.
HD products
With the advent of good photo and video cameras, high-definition television, traditional products for creating evening makeup in photos and videos began to look too noticeable on the face in the frame. Some cosmetic brands (mostly professional ones, for example, Make Up For Ever) began to produce HD products: powder, tone, which, thanks to their special texture and very fine grinding, can create the effect of ideal skin, but not overloaded with cosmetics, and achieve that same “Photoshop effect” " in frame. This same beautiful effect remains in life, but be careful: many of these HD powders greatly whiten the face in photos taken with a flash - and, since the powder is applied more densely to some areas of the face, a “whitewash” or “flour” effect occurs. Many celebrity makeup artists fell for this when such HD products first appeared on the market.
HD powder Make Up For Ever
Therefore, when going to an evening event where you are expected to be photographed or filmed with flash, try to test your HD powder in advance.
To create a spectacular evening look, you don’t have to seek the help of professionals - you can easily handle evening makeup on your own. It is enough to know the basic techniques and have a minimum set of cosmetics to create a bright image. If you encounter any difficulties, we recommend that you refer to the video tutorials:
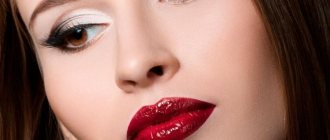
Lip makeup
When making up their lips, girls usually limit themselves to applying lipstick or gloss. This is not enough for professional make-up.
Celebrity makeup artists advise doing it in the following order:
- Peeling. This step will allow you to get rid of dead skin, disperse the blood and thereby enlarge your lips and give them a natural bright color. A mixture of honey and sugar or a toothbrush is suitable for this purpose.
- Applying balm. It will help moisturize your lips. This step must be followed not only in winter, but always. After 5 minutes you can apply lipstick or gloss.
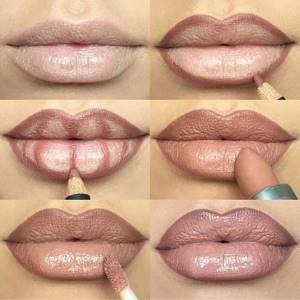
- Drawing the outline. This step is usually skipped, but it is necessary if you are wearing bright lipstick or need to adjust the shape of your lips. It will also make your lip makeup last longer, since the lipstick will not spread beyond the created boundaries. The shades of pencil and lipstick should be the same.
- Applying lipstick. Makeup artists note that lipstick should be applied from the center to the edges.
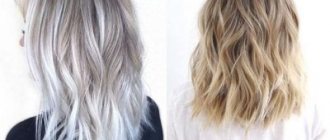
Evening make-up to match your hair color
Eye makeup
Bronze shades suit brunettes very well, so it is advisable to purchase eyeshadow palettes with a predominance of brownish colors. A pencil or eyeliner can be the same shade.
For blondes, the choice of makeup color will depend not only on eye color, but also on skin tone. Terracotta and gold are suitable for dark-skinned girls, gray, pink, violet are suitable for white-skinned girls.
Owners of red hair should not use too bright colors. A spectacular hair color in itself attracts attention.
Makeup with glitter for the evening
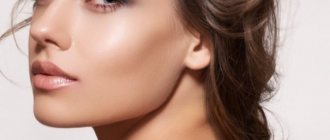
Blush and highlighter
Blush and highlighter complete the makeup. The functions of both tools are to highlight certain facial features. Blush is applied to the apples of the cheeks or cheekbones. To do this, smile broadly and apply the product with a wide brush to the protruding parts of the face.
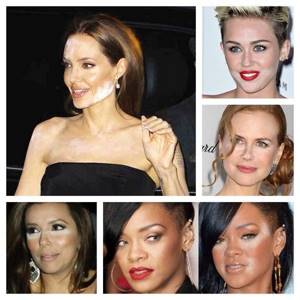
Highlighter is used to brighten the face and give it a slight glow. The product can be liquid, cream, in the form of shimmering powder, multi-colored balls, pencil or stick with a brush. You can apply highlighter to the nose, upper cheekbones, lips, eyes and under the eyebrows.
Under no circumstances should you apply it to all of the indicated points at the same time, only to one. For example, on the wings of the nose, if you want to lengthen it, or on the area from the bridge of the nose to the tip, if you want to reduce it. As you can see from the above photographs, you don’t have to be a celebrity makeup artist to do high-quality and successful professional makeup.
Even at home this is quite doable. To do this, you need a set of high-quality cosmetics that suit the color type of appearance and correctly performed step-by-step actions described in our article.
Article design: Oksana Grivina