Takes for a child and for an adult woman - just choose your favorite style and pattern. Video information is offered to help you: you will see with your own eyes on the screen how to crochet a beret, for a child or an adult, warm, for the off-season, or very light, for the summer.
Don’t be surprised by the variety of patterns: you will quickly learn how to create the most intricate knitting options with your crochet.
ps In the last article we looked at how to knit a beret with knitting needles, now with crochet.
Once you learn how, you will be able to crochet a beret without any tips, even more attractive than you saw in the video tutorials. This is not nearly as difficult as you might think at first: you will develop work skills quickly, all you have to do is add a little of your own imagination.
We offer video lessons for beginners with which you can quickly learn how to crochet:
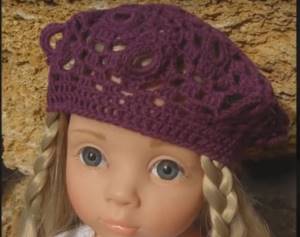
Takes with a head circumference of 31 cm, if your doll has a larger head circumference, you can take thicker yarn and a thicker hook. You can knit a sample with double crochets and calculate the density in such a way that with the same number of stitches as on the model, you get the number of centimeters you need.
After this you can start knitting. First of all, the bottom of the beret is knitted in the shape of a flower. You will get 32 columns, arranged in two tiers, one above the other. The next tier consists of elongated columns forming arches, 8 large and 8 short.
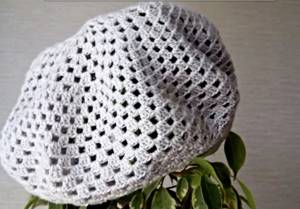
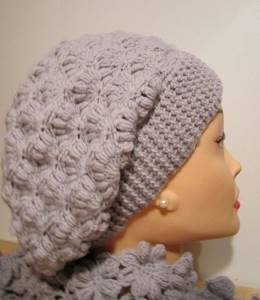
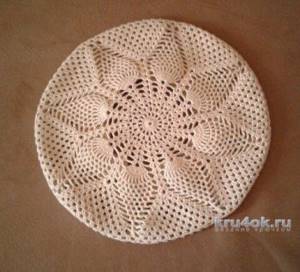
Super simple openwork beret
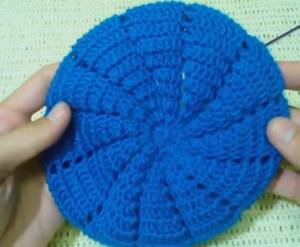
The yarn used is “Pekhorka Zhemchuzhnaya”; one hundred grams contains 425 meters. The yarn composition is half cotton and half viscose. Work begins by knitting six chain stitches and closing the resulting stitch into a ring. Rising columns are knitted on this ring, thus gradually forming an airy pattern in which the columns alternate in a checkerboard pattern until a disk with a diameter of 28 cm is obtained.
This size corresponds to head size 56; if you need a larger size, you can knit another row.
Video lesson:
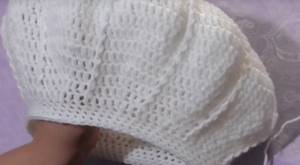
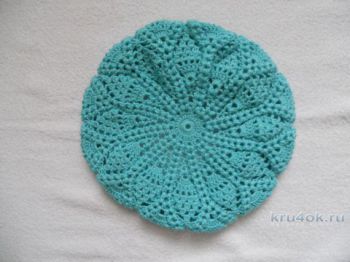
Beret with stripes of embossed columns
NAKO Bambino yarn was used for this work, which contains 130 meters in a 5-gram skein. Yarn composition: 25% wool and 75% acrylic. You will need 75 grams of it, that's one and a half skeins. The fourth hook number was used. First of all, you need to measure the volume of your head, in our case it is 58 cm.
First of all, the bottom of the beret is knitted until a circle with a diameter of half the size of the head is obtained. In the first row, 12 stitches are knitted and in subsequent rows add another 12 stitches. When the bottom is ready, the depth of the beret is knitted, from one to three rows without increments.
Let's look at a crochet winter beret pattern and a description of the knitting process
For work you will need the following tools and materials:
- Yarn;
- Hook No. 2.
In order to create an elegant beret, it is better to choose natural shades of yarn in a restrained color scheme.
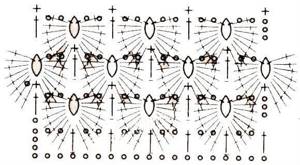
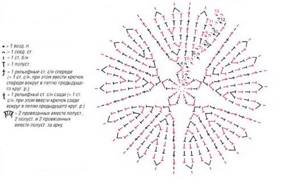
The crochet beret pattern is presented below.
The process of knitting a beret is carried out according to the following principle: we collect a chain of 6 air loops, which we close into a ring. In the center of the ring you need to knit 15 double crochets. Then you need to knit a circle with a diameter of 40 cm, while in each row you need to add 15 double crochets. After this, we knit 4 rows without additions. Again we knit 3 rows with single crochets, while decreasing every fifth loop. Now you need to knit 6-7 rows with an elastic band, as indicated in diagram No. 1.
To knit a flower to decorate a beret, you need to cast a chain of air loops 25 cm long. You need to knit 8-9 rows according to pattern No. 2. For the core of the flower, we collect a chain of 6 air loops, which we close into a ring. In the center of the ring you need to knit 15 double crochets. We assemble the ribbon, sew the core into the center and sew the resulting flower to the beret.
Another interesting idea for crocheting a beret with embossed posts.
For work you will need the following tools and materials:
- Yarn;
- Hook No. 3.
This knitting example is designed for a head circumference of 48 cm.
The pattern for knitting embossed columns is shown in the figure below.
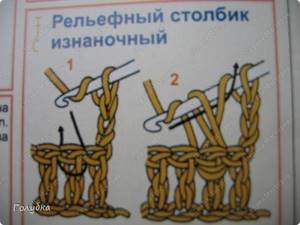
Such columns are also called concave or convex.
Let's start knitting. We collect 6 air loops and close them into a ring with a connecting post. The first row consists of 12 double crochets, the second row consists of 24 double crochets. In the third row, in every second loop we make increases with a relief column. It should be remembered that in our beret model, a raised column is always an increase. We should have 12 wedges. After this we knit according to the pattern to the desired diameter.
In our case, the last column is always embossed, so it is better to hide the seam.
We knit a pancake with a diameter of about 24 cm, in our case it is 13 rows. Then you need to make decreases on both sides of the relief column. We do this by knitting two double crochets together. This manipulation must be carried out so as not to mow the wedges. We knit the embossed columns as in increases.
Next, you need to knit a band in the form of an elastic band. We knit three rows, alternating the embossed purl and front stitches. The main thing is to ensure that the columns coincide with the boundaries of the wedges.
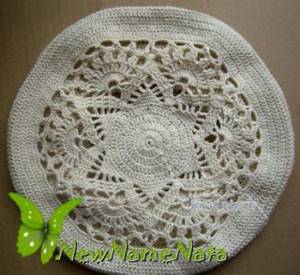
We bring to your attention another interesting idea for knitting a beret.
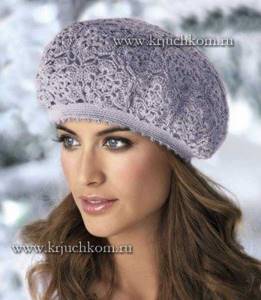
This beret model can be knitted from wool, alpaca or cotton. Accordingly, we get winter, demi-season and summer versions of the beret. The beret, as seen in the picture above, consists of floral motifs that are connected during the knitting process of the last row.
For work you will need the following tools and materials:
- Wool yarn-80g;
- Hook No. 2.5 and 2.25.
This example is designed to fit a head circumference of 48 cm and a height of 21 cm.
The figure shows a layout plan for the beret motifs.
Crochet patterns for a beret are shown in the figure.
In the diagram you can see in what sequence and how many motifs A and B need to be knitted. After all the motifs are knitted and connected to each other in the process of knitting the last row, it is necessary to make a beret rim using single crochets using a thin crochet hook.
For beginning needlewomen, it will be useful to watch a few more video lessons in order to study the knitting process in more detail, pay attention to certain areas of the work, or simply get inspired by ideas for crocheting berets. We hope that with the description, photo accompaniment and video lessons you will be able to knit a beautiful beret that you will be happy to wear or give as a gift to your mother, grandmother or friend.
Video lesson:
Set of beret and snood for women
The red yarn used is “Children's New” from Pekhorka, knitting is done in two threads, so a thick hook No. 6 is used. The beret is held loosely on the head, without fitting the head, which is why it is called a beret-hat. Work begins with forming an elastic band 4 loops high and length to the required head size.
The ends of the elastic band are connected to each other. Subsequent stitches are made with decreases, knitting is repeated in the round. At a height of 15 cm the decrease begins. The circle is divided into eight sections; if there are any extra loops left, they are evenly distributed among the sectors.
Universal option
This beret is called universal because it is perfect for women of any age. In this style, two types of knitting are used: RLS and SSN, which converge with each other thanks to the cart. loops.
Crochet beret pattern:
The knitting algorithm goes like this. The fillet mesh, which is ten centimeters larger than the circumference of the head, is knitted on a chain from a cart. loop. Now we knit a pattern using a straight fabric pattern. As soon as the pattern reaches a height of twenty-five centimeters, we begin to hide the loops: when knitting a “semi-circular pattern”, every sixth “semi-circular pattern” is hidden, while pulling up the tops of the pillars of the previous row using RLS. We knit until there are only a few “semi-circular patterns” left. We reach the top of the beret and tighten it, then sew it together. Making neat assemblies, we knit the lower edge of the beret using a sc. And to top it off, we knit the frontal part of the product in a spiral pattern. Our work is finished, see the photo for an example of how the product should turn out.
Related article: Do-it-yourself stained glass painting: master class with video
Video lesson:
Beret "Spring-Autumn"
Knitted from GAZZAL yarn, consisting of 40% wool, 20% cashmere and 40% polyacrylic. A 50-gram skein of yarn contains 200 meters of thread. When working, a hook No. 2.5 was used. First, a free ring of thread is made, and there are 10 stitches on it. Then the ring is tightened, and these columns become the future center of the beret.
Next, the pattern gradually increases, alternating two air loops and two double crochets. In the next row, knit two chain stitches, one double crochet and two double crochets. The next row is knitted in the same order.
Descriptions and patterns of knitted berets from our website
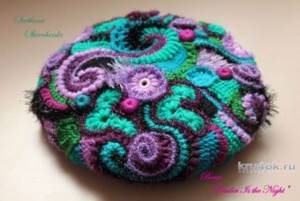
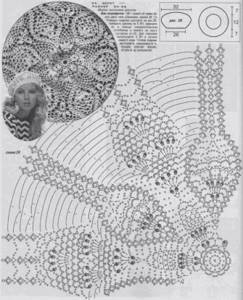
Beret Blackberry Glade, diagram and description of how to knit

The author of the work is Svetlana Shevchenko Sova Fotina. The “Blackberry Glade” beret is made using the freeform technique from several types of yarn - wool, wool blend, shaped, boucle and grass. Hooks No. 3, No. 2.5, No. 2, carpet hook. Various patterns - postal column, popcorn,
Read more…
Beret Tender is the night, diagram of work and description of how to knit
The “Tender is the Night” beret is made using the freeform technique from several types of yarn, classic and fancy. The work uses diagrams of various freeform elements (postal column, popcorn, voluminous roses, caterpillar cord, lush column, berry, etc.) and Tunisian knitting. Headband
Read more…
Crochet summer beret, knitting pattern and description
Summer beret "African flower". Made from white mercerized cotton and orange cotton yarn. Size 54-55 cm. Hook No. 2. It took about 80 g. The work uses a 6-corner motif "African flower" -
Read more…
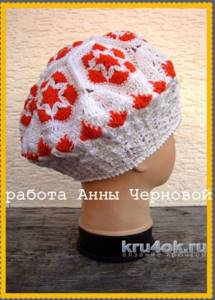
Crocheted beret, diagram and description of how to knit
Hi all! I’m imagining the beret again, only this time it’s grown up. He has already gone to his owner Marina in St. Petersburg. Knitted from cotton thread about 200m/50g thick. It took almost 100g. Hook 1.5. All diagrams are from the Internet. Description: Let's start with
Read more…
Turquoise beret for girls, knitting pattern
A turquoise beret with a bow is knitted from Alize Forever yarn. Yarn composition: 100% microfiber acrylic, 50 gr., 300 m. Head circumference 48 cm. The beret is knitted from top to bottom according to pattern 1. When the “pineapples” are already knitted, we knit 3
Read more…
Beretik for a girl, diagram and description from Natalia Zhdanova

Beretik for a girl on a cool summer day. Hello needlewomen! I knitted a beret for my daughter, head circumference 46 cm, made from Vita thread, ROSE series, 100% double mercerized cotton. I knitted according to the pattern up to row 19,
Read more…
Beret knitting pattern for girls
Beretik for a girl. I took the pattern from a special issue of the newspaper “Knitting is fashionable and simple. We knit for children" No. 5 2014 Threads - 100% cotton, hook number 2. I really like the color - ecru. Head circumference - 50 cm. Knitted like this:
Read more…
Children's beret with a pattern from Valentina Litvinova
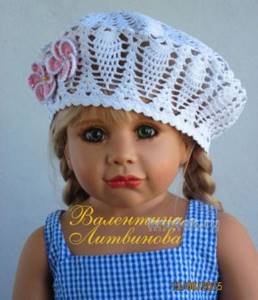
Summer beret is crocheted. Hook No. 1,1. Yarn 100% cotton. A fashionable headdress at all times. Reliable and practical sun protection. Knitting pattern
Read more…
Video lesson:
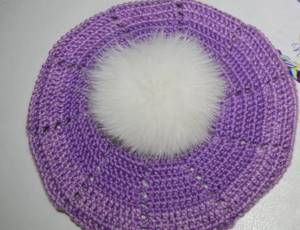
Beret for 9 year old girl with pompom
Designed for head circumference 50-52. A fur pompom can be purchased at the same store as the yarn, or you can make it yourself from white yarn. Beret for girls crocheted beret No. 3.5. For a child's beret you will need 100 grams of yarn. For these 100 grams there are 200 meters of thread. Knitted in two skeins, that is, eight threads.
Since the beret is associated with a gradient, a transition of color, the remnants of white, light lilac and dark lilac threads were used. The elastic band is knitted in single crochet stitches, while the elastic band itself is knitted in single crochet stitches.
How to crochet an openwork beret for the winter?
For more experienced knitters, we can recommend an openwork beret model.
There is a large selection of different options here. Openwork patterns can be knitted in circular openwork rows. But there are also beret models that are knitted from separate openwork fragments and then assembled together into one whole product, but, as a rule, such models are knitted from thinner threads.
The beret knitted with the Solomon's Knots pattern looks very impressive. This openwork does not require much experience and looks very attractive. Moreover, for such a model we can recommend both plain smooth threads and a version of boucle or melange yarn.
Video lesson:
Beret "Classic"
Knitted from Sapphire threads, the material is wool blend with 45% wool content and 55 percent acrylic. A 100-gram skein contains 250 meters of thread. The hook used was thick, No. 4, significantly different from the thickness of the thread. First, a circle with a diameter of 15 cm is knitted in single crochets in six directions.
Therefore, there are exactly six first stitches to be knitted. Then the number of columns is doubled, two for each column of the first row. Then two stitches are knitted into the first loop, and one into the next, so in the end you will get 18 stitches.
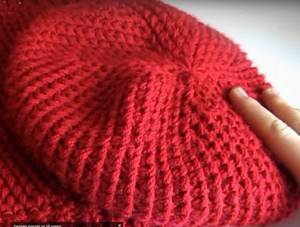
Crochet a simple winter beret
For those who are just beginning their acquaintance with crochet, we can recommend a model of a beret, knitted from thick threads with simple single crochets . In addition to the fact that such a headdress will be warm, it can be completed in just one evening.
Scheme and step-by-step description of work
So, for knitting you will need yarn of any color made from 100% wool, preferably sheep. You will need 3 skeins with a total weight of 150 grams. In 50 gr. the skein should have about 40 m of thread. For this thickness of yarn, hook No. 12 is suitable. In addition, it is worth buying hooks No. 11 and 13.
Sequence of work:
Before you start knitting the product, you should knit a 10 by 10 cm sample with simple single crochets. In this case, you should end up with a rectangle of 8 columns and 5 rows. If the knitting density corresponds to the presented sample, then you can knit the beret according to the pattern without deviations and additional calculations. The beret pattern fits a head with a girth of 50 to 54 cm.
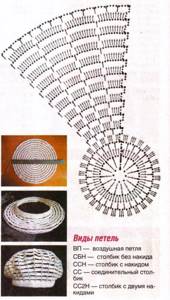
Next, we begin knitting the product, which starts from the central part. To do this, you need to crochet a chain of 6 air loops and start knitting in a circle in accordance with the presented pattern. The diagram shows 12 rows - this should be enough to complete the beret from the central part to the circumference around the rim of the head. The symbol in the diagram is single crochets, half-columns and connecting columns.
After all 12 rows of the beret are knitted, you need to close the edge of the product . To do this, a “crawly step” is performed. It’s easy to do - these are the same single crochets, but only knitted in the direction not from right to left, but from left to right.
If you wish, you can sew a pompom separately to the hat and decorate the central part of the beret with it. For the pompom, 6 chain stitches are knitted and closed into a ring. Next, it is knitted in circular rows in accordance with the presented pattern. But only from the first to the third row. After the third row the pompom is finished. To do this, you need to stuff the inside with the remnants of yarn and carefully pull it with threads to one point. Next, the tampon is sewn to the beret.
Video lesson:
Striped mohair beret
It is especially good for spring. You can use other threads, the knitting principle does not change. A thin elastic band is inserted into the collar so that the beret fits well on the head. The beret has only 31 rows of double crochets and single crochets. Hook No. 4.5 was used. The yarn used is Mondial, an Italian mohair yarn consisting of 80% baby mohair and 20% polyamide.
For 25 grams of yarn there are 245 meters of thread, knitting is done in two threads, so you will need 2.5 skeins. To get the striped beret, three skeins of different colors were required. Dark gray, light gray and turquoise, such rows are knitted in turns.

Video lesson:
Children's summer beret
Knitted to cover a head of 48-50 cm. Yarn used with a density of 350 meters per 100 grams, a total of 50 grams used. Hook used No. 2.5. First, a chain of 9 air loops is typed. Next, single crochets are knitted above them. The next row is also knitted with single crochets, but they are formed not on a loop of two threads, but in one half-loop, the back one.
The subsequent rows are knitted in exactly the same way, forming an elastic band. Its length corresponds to the circumference of the head. Next, a strip of elastic is tied together, after which the knitting of the surface of the beret begins.
Video lesson:
Simple classic beret
This beautiful headdress is knitted from the crown and can be made to any size. I used a hook number 2.5, Alize Lanagold Fine Mississippi yarn, it took half a ball. Any yarn can be used - mohair, wool. We form 12 loops on the ring of thread, since the beret is designed to be six-wedge.
The ring is tightened, and in the next row one and two stitches are knitted alternately. In the third row, an increase is made in every third column. This is how the bottom is knitted to the required diameter with gradual increases, after which nine circular rows are knitted without increases.

Step-by-step knitting algorithm for beginners
Crocheting a summer beret is not difficult for a woman. Before starting work, you need to carefully study the diagrams and descriptions of the master classes. You should also prepare the necessary materials and tools. There are many simple crochet patterns for summer berets that can be used to create original and beautiful products.
Elegant feminine for adult ladies
Before knitting an elegant summer beret, you should prepare 100% cotton yarn (240 m per 50 g), 1.5 mm hook. Abbreviations: VP - air loop, CH - double crochet, SBN - single crochet, C2H - double crochet, SS - connecting stitch.
Knitting pattern for a summer beret:
- Score 12 VP. To move to the next row, knit 4 more VPs.
- Until the end of the row, alternate: 1 VP, 1 C2H.
- Work a dc into each stitch.
- One sc in each loop.
- 3 VP lifting, then alternate until the end of the row: 4 VP and 1 CH.
- Under each arch from the VP of the previous row, knit RLS, 6 VP.
- 3 VP lifting, 4 dc in VP of the previous row, 1 sc under the arch. So until the end of the row.
- 3 VP rise, 3 VP, DC to the end of the row.
- Repeat steps 7 and 8 until the diameter of the circle reaches the desired size.
- Next, the straight part is knitted (about 6 cm). Two repetitions of steps 7 and 8 are enough. Tie the band with an elastic band: 1 dc, 1 convex dc.
- Tie the edge using the crawfish pattern. Take the thread and pull it into the outermost loop of the product, make a VP of lifting. Insert the hook into the next loop on the product and grab the working thread and thread it through. You will get two crossed loops. Next, re-grab the thread and make a VP. In this way, tie the entire edge of the product.
Thin openwork for young fashionistas
An openwork women's beret suits many young ladies. You can knit it in one evening and wear it throughout the summer season. Materials: “Iris” yarn (4 skeins), hook No. 2.
Step-by-step crocheting of an openwork beret:
- Cast on 5 VPs, close them into a SS ring (each next row should end with it).
- 3 VP lift, 13 CH.
- 3 VP lifting, in the first dc of the previous row 1 dc, v, 1 dc, in the second dc of the previous row - 1 dc.
- 3 VP rise, 2 DC in the VP of the previous row, 1 VP, 2 DC, then 1 DC in the DC of the previous row.
- 3 VP rise, knit the same as in step 4, only knit 2 dc in each 1 dc of the previous row.
- Knit in increments until the bottom circumference reaches the desired size.
- Gradually decrease the loops, removing the VP between the fans.
- The elastic band is knitted in any convenient way.
Stylish children's for babies
A beret for little fashionistas, even the simplest one, always looks very cute. To create a headdress you will need cotton (500 m per 100 g), a hook 1.8-2 mm.
Knitting a summer beret for a girl is done as follows:
- Connect 8 VPs into a SS ring.
- 3 ch rise, 15 dc in ring, finish with sl st.
- 4 VP lifting, 2 VP of the current row, tie 2 C2H into each CH of the bottom row, 2 VP between them.
- SS under the arch of the bottom row, 3 VP rise, under each arch from 2 VP of the previous row, knit 4 SN, finish with SS.
- 3 VP rise, 2 VP, knit a dc through one dc of the bottom row, 2 VP between them, finish with a sl st.
- SS under the arch of the previous row, 3 VP rise, under each arch from 2 VP of the previous row, knit 5 SN, finish with SS.
- Knit the seventh and remaining rows as in points 5-6, adding 1 sc under each arch in each next row (up to the desired size of the bottom).
- Knit 2 rows according to the pattern without additions.
- The decrease occurs by reducing the dc in each arch and reducing the VP between dc in each row without a pattern.
- Finish with an elastic band.