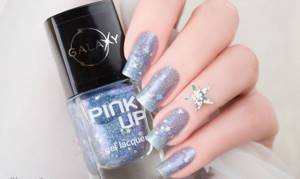
Fairytale magic dust for nails - glitter - is now at the forefront of fashion. To get a shining manicure, you don’t have to spend a lot of money at a beauty salon. It is enough to figure out on your own what it is, what types it is and consider the application features of each, and then simply study the proposed design ideas from the masters and choose the appropriate one.
What is glitter
Glitter is the name for decorative sparkles that are widely used in cosmetics. Outwardly, it is a finely chopped crumbly metallized substance. The particles can be of different sizes, shapes and colors.
The widest range of materials is used for manufacturing: from plastic to foil.
Sometimes it is called shimmer. But this is not entirely true, since shimmer is very small luminous particles that are indistinguishable on the surface with the naked eye.
Where to buy glitter
The answer to this question is quite predictable and obvious - in specialized stores with tools and materials for manicurists. The second option is cosmetic stores that provide a large assortment of glitter for decorating the body and eyes. The third “secret place” is stores with hairdressing paraphernalia and stationery stores. In the first case, such sparkles are bought to decorate curls, in the second - to transform applications.
Don't be afraid to shine and attract attention, collect compliments and use glitter not only for an evening out. And, of course, shine brighter, illuminating the dullness of everyday life!
Types of glitter
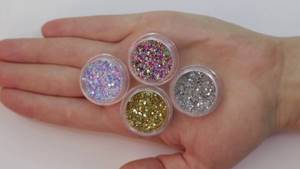
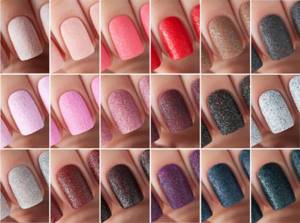
For manicures with glitter, specialized outlets offer a wide range of glitter. Manufacturers even manage to produce particles of a certain shape and combined colors. Conventionally, glitter is divided into two types - liquid and dry.
Dry
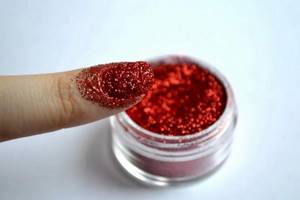
Dry or crumbly glitter looks like a light powder made up of particles of different sizes and fractions. Having several jars in different colors and shapes allows you to easily arrange them to create a new design. With the help of fine powder, trendy “metallic” and “rubbing” are created. It is also added to an existing gel, creating new and unusual combinations.
However, dry glitter also has disadvantages:
- they spray easily, staining everything around;
- during application there is an increased consumption of material;
- To work with them, you need to purchase a whole set of tweezers, applicators and sponges.
But all the problems are more than offset by the opportunities that these materials provide.
Liquid
The liquid version is a transparent or pigmented varnish mixed with glitter. It needs to be applied to the base.
The number of particles can be any, as well as the shape. To get a beautiful effect, you will have to apply several layers. But it will not be possible to create a thick metallized coating here due to the low density of the arrangement.
Types of glitter
There are countless varieties of glitter that transform a manicure, but globally it can be divided into two large categories - liquid and crumbly glitter. We will talk about each of them in more detail below, but you can compare the pros and cons of this or that element without putting things in a deep drawer.
| Advantages | Flaws |
| Dry glitter can be combined with the same particles, but in a different shade, size or color, while creating intricate patterns. By the way, it was thanks to this technique that mirror and metal nails, as well as ombre manicure, became possible | Nail glitter often cannot be applied without the use of special auxiliary accessories: applicators, sponges and even tweezers |
| Nail glitter, like any other glitter, has good adhesive ability, regardless of its texture or consistency. It fits tightly to the nail or base, adhering securely and not chipping over a long period of wear. | Before applying white glitter or glitter of any other shade, prepare the nail plates by first sanding down any uneven areas and removing any rough edges using a buff. Only in this case will the coating look impressive |
| The opinion that glitter on a woman’s hands is appropriate only in exceptional cases has long since become obsolete. Now glitter nails can be seen not only on stage or at high society receptions, but also in the office or at the university | There are certain types of glitter that require the use of additional materials for attachment. The most common option is a glitter base, which can be purchased at wholesale and retail manicure stores. |
| There is no difficulty in combining glitter and colored varnish. It is not necessary to use black glitter under black shellac; experiment and add a drop of rose gold, etc. to it. | If there are no problems with applying glitter, then many people notice difficulties with removal. The fact is that medical-dispersed glitter often literally “eats” into the base, which makes removing them very, very difficult |
| Feel free to combine glitter with different designs and don't be afraid to go overboard. Or add shimmering particles to the classic smile line of a French man, to curls on monograms or minimalist geometric patterns | Always monitor the process and adjust the amount of flickering pollen. Otherwise, you risk overdoing it and getting a too voluminous manicure that clings to clothes and hair, which is very uncomfortable. |
| Having even one type of glitter in the collection, a practicing master can satisfy the most daring ideas of his clients. It’s not at all necessary to buy a million treasured miniature jars in stores before starting work. | Follow the correct application technique exactly without skipping steps. Otherwise, even a long-lasting glitter manicure will chip or peel off in a couple of days. |
Liquid glitter or nail polish with glitter
To begin with, let’s dot the i’s and explain in detail that glitter and shimmer are not identical concepts. Shimmer is those small particles that obscure the light and are practically invisible to the eye. And glitter is large pieces of foil-coated plastic that can be noticeable individually. Gel polish glitter is the same notorious liquid glitter for nails. A simplified version is regular varnish that does not require drying under an LED or UF lamp. There are usually two types of liquid glitter:
- pigmented varnish. Pink glitter, blue or light blue - choose any one from the extensive collection of glass jars and bottles presented on store shelves. This option is practical and convenient, but you can hardly experiment with a colored coating;
- transparent varnish without pigment. A more functional purchase, since by covering any other color with it, you end up with completely different results, always striking in their impeccability.
Dry glitter
This type of glitter is more like powder, which in the hands of a real professional turns into magic dust, changing any design before your eyes. You can cover the entire nail plate with it, literally “dipping” your finger into the jar, or you can highlight individual details of nail art. Glitter powder also looks great against a dark background, creating a chrome-plated surface or creating a cat-eye effect. And light, pastel varnish and crumbly glitter will make your nails look like precious pearls.
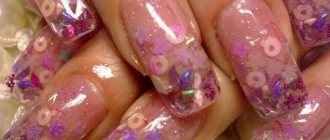
Glitter powder
Glitter powder is another popular type of women’s favorite glitter. To be fair, let’s say that this type of loose glitter is especially held in high esteem by nail technicians. Powder consists of many fine particles of foil, but classic nail glitter is larger and more noticeable. This type of decor is especially appropriate in combination with drawings; it elegantly complements a prom manicure or a wedding manicure, but looks no less impressive in everyday nail art.
How to use it correctly
The glitter is quite easy to apply. The glitter is very easy to use. To create a simple manicure with a shining effect, all you need to do is purchase a fixer and a clear varnish. For interesting tints, a few colors will be enough, which can be mixed with each other.
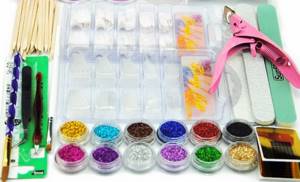
For more complex work you will need to buy:
- brushes of different thicknesses;
- sponges;
- lamp for drying nails;
- a set of gels and varnishes;
- tweezers;
- wooden stick;
- foil;
- stamps.
Additionally, you will have to learn some tricks for creating patterns on your nails.
We must remember that dry glitter is a very light substance and do not allow sudden air movements in the room when the jars are open.
How to make glitter with your own hands
If you do not have the opportunity to visit a specialized manicure store in order to acquire the coveted jar of glitter, then do not rush to despair. It can be replaced by ordinary stationery glitter, which is often bought for schoolchildren to design appliqués and crafts. Don’t forget about cosmetic glitter used in eye makeup or body decoration. It is also suitable for decorating your fresh manicure. If you are a big fan of evening styling, then you can probably get a bottle of hair glitter from your bins, which looks just as appropriate on your nails. In other cases, you need to use patience, ingenuity and manual dexterity in combination with the maneuverability of scissors. The coveted large sparkles can be easily obtained by cutting a sheet of culinary foil or metallized strips for nail art. Is this option not suitable for you? Then it’s time to resort to extreme measures and get a box with Christmas tree tinsel and toys from the mezzanine. Have you guessed what needs to be done with them?
How to do a glitter manicure
To create a manicure, the design should be thought out in advance. The most basic technique for beginners is to apply a continuous glitter coating to the nail.
Step-by-step description of the work:
- Applying base coat and varnish. In this case, the color of the latter does not matter, since it will not be visible due to the covering particles.
- The nail is carefully lowered into the container with glitter in a smooth movement. To ensure that the glitter is evenly distributed over the surface, you need to lightly wiggle it with your finger.
- Using a dry brush, shake off excess coating from the cuticle.
- Applying a fixative.
Each layer of decorative coating must be dried in a lamp. Drying time is indicated in the instructions.
A little trick: if patterns are created, then after the base coat has dried, the varnish is applied with a brush only in the places necessary for this. And then they are covered with glitter using a dampened brush.
After mastering the initial technique, you can begin more complex work.
Large glitter
Creating a manicure with large particles is most popular at home. You can even use a gel with a large filler, removing glitter from the jar one at a time with a special wooden stick.
The beginning is standard: base, varnish and each layer is dried. Then a pattern is laid out on the surface, which is covered with a fixative.
We must remember that large sparkles look very bold and defiant, so you should not overdo it with them.
You can make an interesting composition with one or two rhinestones, sprinkling small shimmering substances around. They can be in tone or contrast, emphasizing the shape of the main part.
“Aquariums” and “waterfalls” are very interesting, but the technology of execution will be difficult for a beginner. You need experience working with certain materials - gel and acrylic.
Glitter sand
A few years ago this type of coating was a hit. But it is still used today because this liquid composition is easy to work with and does not require additional equipment. A glitter varnish called “sand” is available for sale. All you need to do is purchase a bottle of the desired shade. The main advantage is that the coating is very thick and can be applied in one layer.
Salons have gone further and offer nail designs with velvet sand. But if you look at it, the technology is quite simple. Instead of “sand”, you can take small rhinestones, acrylic powder or even scrapbooking.
Step-by-step instructions for decorating:
- Preparing the nail and applying the initial layer. It is best if it is colorless. Drying.
- Cover with a second layer and thickly sprinkle with sand. It needs to be pressed down slightly. For the coating to dry completely, you need to wait 15 minutes.
- The remains of the decorative coating are swept away, and the nails are covered with shellac and a fixative.
These are the basic actions that are necessary when working.
It is not necessary to make a thick coating; you can simply draw interesting patterns on the glossy surface and scatter sand over them. But after pressing, they will not have a clear shape.
Bright “suede” or “shaggy” nails are very fashionable. The technique for applying the topcoat is the same.
Glitter powder
Using glitter powder, they create a full coverage with a very bright mirror shine. There are translucent options that shimmer with mother-of-pearl; they are also called “rubbing.”
Dust particles are thickly applied to the prepared base coat and polished with a sponge. Then it is dried and coated with a hardener.
Design ideas
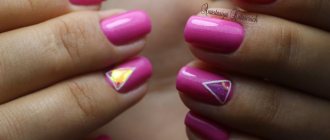
Even just nails sprinkled with glitter will no longer be called ordinary nail art. However, glitter sparkles provide the greatest opportunities for creativity. We present to your attention some examples of stylish design, following which you can easily create a real masterpiece. The main thing is to be patient and in a good mood.
Festive French
This example of perfection will appeal to fashionistas who are a little tired of the classic solutions of French design. Instead of the traditional white stripe, draw a smile line with iridescent varnish, and the strict design will sparkle with new colors.
This example of perfection will appeal to fashionistas who are a little tired of the classic solutions of French design.
Instead of the traditional white stripe, draw a smile line with iridescent varnish, and the strict design will sparkle with new colors
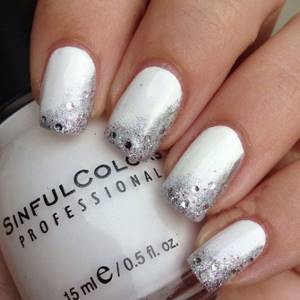
Gradient stretch or ombre effect
Several years ago, the gradient won the respect of fashionistas and since then its demand has not decreased.
Advice! To do this with shimmering particles you will need a soft bristle brush. Artificial bristles can be too rough with glitter, while natural bristles will allow you to achieve smooth transitions.
Gradual graduation is performed by gradually reducing the density of the sparkles from the free edge to the root or in the opposite direction. A short step-by-step guide consisting of only 4 steps:
- first remove the cuticle, process the plate and give it the desired shape;
- apply the base and the selected background shade of varnish;
- Cover the tip of the nail thickly with glitter. Using a brush, smoothly stretch them upward;
- seal the created creation with topcoat.
Several years ago, the gradient won the respect of fashionistas and since then its demand has not decreased. Gradual gradation is performed by gradually reducing the density of the sparkles from the free edge to the root or in the opposite direction
. That's it, the exquisite design is ready. By drawing monograms or flowers on top of a couple of plates, your nail art will become even more solemn.
Stamping design with a shimmering accent
Images printed using stamping are always clear and noticeable. It is possible to enrich the plot elements with shimmering strokes, highlight individual details, or even decorate the pattern. This will beneficially transform the composition and give it a new sound.
Images printed using stamping are always clear and visible
To create a design of wondrous beauty, choose an iridescent gel polish of your favorite color as a base. Rub in glitter pollen, it will turn out no less impressive.
Advice! To rub in the particles, use a makeup sponge. It will efficiently distribute and polish the pigment, hide all unevenness, increase the adhesion rate and remove all excess.
Next, using a stamp, transfer floral arrangements or any other design you like onto the plates. Add shining accents in some places.

Stamping and glitter of the same color

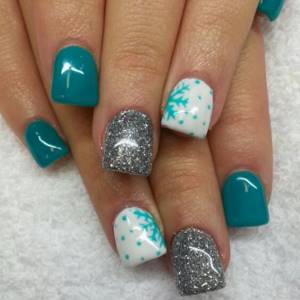
Winter theme
Such a masterpiece looks elegant and voluminous. With each movement of the handles, the glitter design shimmers and changes shade from light to darker.
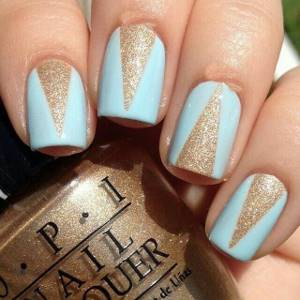
We lay out a drawing from large elements
Indeed, if it is more convenient to work with a small decor with a brush, then it is quite possible to arrange enlarged sparkles in a certain pattern using tweezers, a toothpick or an orange stick. A chaotic layout, or a strict, pre-thought-out plot order - it all depends on the preferred nail design.
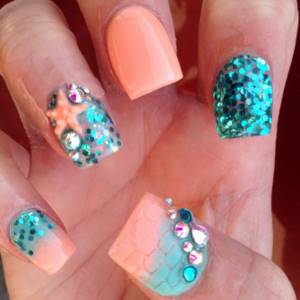
Marine design Stone decoration
Decorating the holes
Why not transform an ordinary moon manicure by adding catchy details? Large glitter in the shape of diamonds, squares or circles will help here. Simply place these miniature elements around the outline of the hole. This technique is quite easy to do yourself; you don't need stencils.
Why not transform an ordinary moon manicure by adding catchy details?
Lunula gets covered in glitter
Strict geometry
Geometric prints have been taking leading positions for several seasons in a row, but the nail industry is not lagging behind. Shining microparticles will make a strict design romantic and relaxed.
Manicure tape will help you achieve smooth lines - thin strips with a sticky base. Stick them according to a thoughtful design and cover the desired area with topcoat. Next, scoop up some glitter with a brush and sprinkle this area, lightly tapping the brush. Peel off the tape and place your hand under the lamp.
Manicure tape will help you achieve smooth lines - thin strips with a sticky base.
Shining microparticles will make a strict design romantic and relaxed
There is another approach: stick the strips on the plate and cover it completely with topcoat without drying it. Cover the entire nail with glitter and remove the tape. However, in this case a contrasting background will be required.
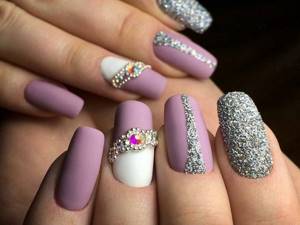
A combination of matte, gloss and star shine
Since matte manicure does not leave the first positions, we have no right to ignore it. The following recommendations will tell you how to create a chic evening option. For this you will need dark brown and white gel polish, golden glitters, rhinestones and stones, bouillons, matte and glossy topcoat.
Matte manicure does not leave the first positions An original combination of techniques
So let's get started:
- first, follow the standard preparatory steps: treat the handles, deal with the cuticle, apply the base;
- Next, cover all fingers with brown varnish, except for the accent ones (let it be the ring finger), apply a white tint to them;
- after distributing the colored enamels, seal all fingers except the middle and ring fingers with a glossy product;
- On a white base we make a gradient stretch with golden glitter. We told you how to do this above;
- We will first open the middle nail with a matte topcoat, after which we will create an inlay using pebbles. To do this, apply a little base at the base of the nail with a thin brush, place stones with rhinestones there in the desired order and dry in a lamp. Afterwards, go over the contour of the pebbles with the top coat one more time, but do not open the top, otherwise they will lose their shine. Place the pen under the UV lamp again.
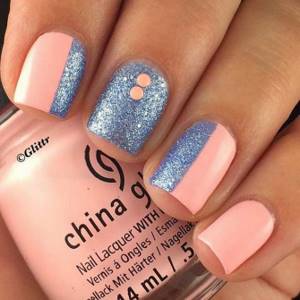
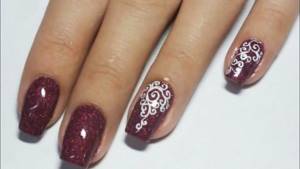
Volumetric monograms
When your nails are covered with colored varnish, top coat and the sticky layer is removed, you can begin to create the “highlight” of your look - wonderful curls that will shimmer with a rainbow variety.
When your nails are covered with colored varnish, top coat and the sticky layer is removed, you can begin to create the “highlight” of your look - wonderful curls
Remember that longitudinal monograms lengthen the nail plate and visually add grace to the hands
Draw a pattern with the top. Remember that longitudinal monograms lengthen the nail plate and visually add grace to the hands. Next, sprinkle the designs with glitter decor and dry. Blow off any remaining residue or use a soft brush.
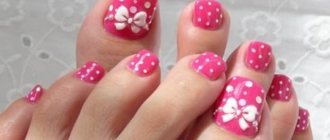
Pedicure with glitter
Before making a decorative coating on your toenails, you need to perform a hygienic pedicure with treatment of the skin of your feet.
It includes:
- removal of corns;
- prevention of cracked heels;
- softening and exfoliation of rough skin.
Only after this the nails are given length and shape. The nail plates on the toes need to be treated with soft and non-traumatic files. Then the irregularities are polished with a buff. This is done so that the shiny coating lays flat and does not emphasize the roughness of the nails.
Stages of applying decorative coating to toenails:
- Degreasing. This is done with an acidic or acid-free primer.
- Base. For such nails, it is better to take a compound with rubber that has a self-leveling effect. Polymerization under UF or LED lamp.
- Colored gel polish in one or two layers. Drying.
- Glitter.
- Top coating.
When making a simple glitter nail design yourself, you can first drop some glitter onto a foil palette and transfer it to the nail. Then take a thin brush and apply more glitter on top.
But with dry material you will have to tinker. First, all the points outlined above are completed, right down to the color coating. The varnish dries, but the stickiness is not removed.
Then you need to sit comfortably and place your feet on a sheet of paper. The brush or applicator is dipped into a jar of glitter, the pigment is transferred to the nail and gently rubbed in. When there is enough shine, polymerization is carried out.
If the color coating is done with a simple varnish, then you can resort to a little trick: the brush is dipped first into the varnish, and then into a jar of decor. The resulting mixture is applied to the nail.

How to use nail glitter
So, a miniature jar with promising contents has settled in your arsenal, but the question - how to use glitter - still remains relevant. ProstoNail exists to help its faithful readers in such difficult situations, and our step-by-step photos combined with detailed instructions will definitely dot the i’s. Arm yourself with patience and begin to take active action:
- perform the standard hygienic manicure procedure, adjusting the shape and length of the nail plates, cutting or pushing back the cuticles, but pay special attention to polishing the nails, since this determines how smoothly the glitter will lie;
- treat your nails with an antiseptic degreaser; it will not only remove moisture, but also improve the adhesive ability of the varnish. Apply an acid-free primer and let it soak in;
- cover your fingers with a moderately dense layer of self-leveling base, polymerizing it under an LED or UF lamp;
- Apply your favorite shade of shellac or gel polish in two layers to achieve optimal color intensity;
- in a separate container or on a piece of foil used as an improvised palette, mix dry silver glitter with transparent gel;
- take a small amount of the resulting mixture onto a flat brush and apply it to the nails, then dry it under the lamp;
- in the final, choosing a glossy or matte topcoat, secure the result of your efforts, not forgetting to remove the sticky layer.
Nail design with glitter
The popularity of glitter continues unabated. Every season, manufacturers produce new versions of varnishes with shining inclusions, and nail designers and nail service professionals offer new interesting ideas.
It is not necessary to go from one extreme to another. All you need to do is choose a few suggestions that suit your nail type and style. From time to time it is worth trying new things or slightly modernizing your favorite ones.
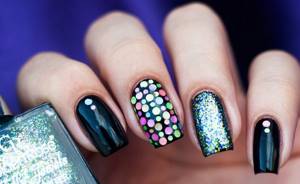
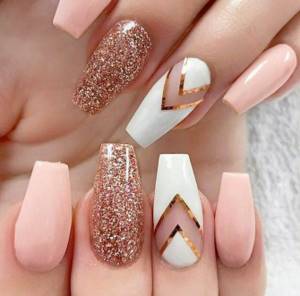
Patterns
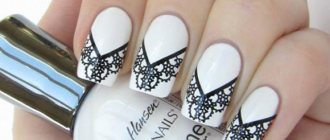
Beautiful and well-executed patterns on the nails give your hands a well-groomed look. And the small and large sparkles covering them make the manicure elegant and solemn. Almost everything is in fashion now: ethnic, graphics, lace, 3D. Miniatures and thematic original images are highly valued. For example, New Year's or summer. Simplicity and perfection are also in trend.
If you have certain skills, you can apply the pattern yourself. But the perfect image can also be created using stamps.
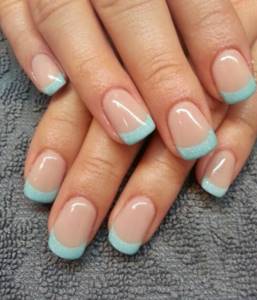
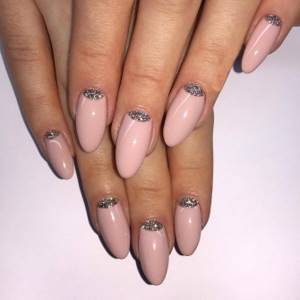
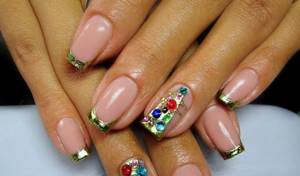
French manicure
Today, French has many varieties. Now it's not just a pink plate with a white rim. From a universal neutral “nothing”, it has turned into the most fashionable look with many options.
It happens:
- Colored, with a bright, eye-catching rim. The border can be emphasized with glitter or shimmer.
- In the “millennium” variety, foil, sparkles and rhinestones are actively used at the tip.
- Decorative allows you to cover part of the nail with crazy patterns.
- “Lunar” makes a rim on the opposite side; there may even be two of them, tending towards each other. The plate itself can be covered with unusual designs, while the background is made transparent or colored.
Incredible avant-garde models and “oblique French”, which combine matte, glossy finishes and shine.
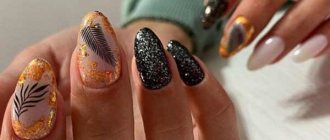
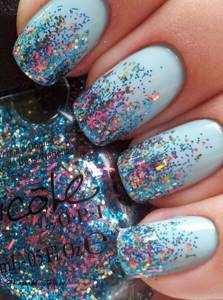
Ombre
Ombre or gradient is characterized by smooth transitions between colors. It can also be colored sparkles of different shapes. A combination of textures, colors and fine sparkling grains also look good. The color palette, direction of drawing and texture are not limited in any way.
With drawings
Drawing is the most common type of nail art. An illustration of any subject is applied to a prepared colored background using acrylic paints. Accents can be placed with sparkling details. There is also a special foil that can be used as a background or for individual details.
The image is made on one or more nails. Other nail plates are designed differently, but maintaining the general style. Then the work takes on a finished form.
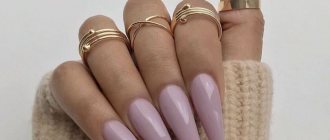
For short nails
For short nails, glitter designs are an ideal option. The uneven shiny coating perfectly masks imperfect nail shapes, uneven surfaces and even chips and scratches. There is no vulgarity.
With the help of sparkling details, specialists can even change the shape of the nail plate, placing accents in the right places.
With sparkling inserts, you can safely use matte and shiny varnishes, play with color, add rhinestones, patterns and modeling. French and ombre will look great. The latter has the ability to visually lengthen nails.
What is glitter for nails - or a short story about the Northern Lights
As it is not difficult to guess from the name, we will talk about glitter that transforms nail designs, even made in a single-color, pastel shade. At its core, glitter is a variety of shimmering metallic foil particles that differ in shape and size. Its unusual texture instantly “refreshes” even a classic French jacket, provoking a lot of compliments and admiring glances in the direction of your manicured fingers. At the dawn of civilization, reflective materials were used in exceptional cases, but now futuristic fashion trends dictate their own rules to us and women are absolutely unwilling to resist them.
They say that the ancestor of glitter, first mentioned in written sources and on frescoes, is hematite powder - a natural miracle that has the property of repelling and breaking the sun's rays. Already in Paleolithic times, sacred paintings in caves received such elegant decoration. During the prosperity of ancient Egyptian society, fashionistas went further and began to use shimmering powder extracted from crushed beetle wings as a highlighter. In India, fish scales, ground remains of precious stones, mica and even glass played a similar role. Well, beauty requires sacrifice.
During the dark period of the Middle Ages, the desire of lovely ladies to shower themselves with glitter diminished a little, but all this was in preparation for the big turning point in the history of glitter, which happened in 1934. It was then that an unknown farmer, Henry Rushman, noticed the amazing ability of plastic, which, when cut, turned into shining pollen, now called glitter. The enterprising cattle breeder did not yet know that this invention promised him huge profits, but just in case, he patented it, indicating his copyright, and then founded an entire production company, Meadowbrook Inventions. From this moment the popularization of glitter begins.
So, in 1960, several large world-famous cosmetic concerns (namely Revlon, Estée Lauder, Elizabeth Arden, and Helena Rubinstein) released products that contained small and large sparkles. Decorative glitter adorned powders and lipsticks, blushes and eye shadows. Particularly resonant was the event dating back to 1972, when rock singer David Bowie, the idol and idol of the youth of that time, appeared before the public with intricate makeup, which was the work of Hollywood makeup artist Pierre Sarosh. Needless to say, all products containing star powder were swept off store shelves.
It came as no surprise to anyone that in 1990, glitter was recognized as a megatrend. All the stars, celebrities and just girls who follow fashion tried to smear more glitter on their bodies, imitating Britney Spears. Around the same time, glitter began to be used in nail decoration. By the way, simple sparkles even played an important role in political and sociological revolutions. So, they were used by members of LGBT communities at parades, anointing their foreheads with particles. Chic and shine are what modern fashionistas strive for. Our photos are clear proof of this.
What is glitter used for?
Decorative glitter for nails is a universal thing. It is used in different fields and for different purposes. Which ones? Let's take a closer look:
- cosmetic glitter. Perhaps the most popular variety of glitter today. Moreover, it can be divided into two subcategories: glitter in skin care cosmetics and glitter in decorative products. There are no questions with the second type, because all girls, starting from a tender age, smear cream shadows, foundations, powders and highlighters, illuminators and bronzers, mascaras and tints on themselves. The first type is cosmetics aimed at care or styling. These include body oils and lotions, hairspray or facial serum with a glow effect;
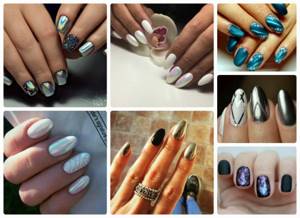
- designs with glitter powder are another form where “fairy dust” is actively used. The nail business is growing and developing every second, but the sparkles that are generously sprinkled on the nails of young ladies do not lose their leadership position. Most often, glitter is used for mirror rubbing, which creates the effect of a mirror or chrome manicure;
- fashion industry. Perhaps this is where most of the glitter produced by concerns is involved. Thus, silver glitter proudly flaunts on tops or even frills of jeans, while gold glitter exquisitely complements a pop combination for a pop diva like Beyoncé. Accessories are also not spared this fate, because rhinestones and sparkles are an integral part of evening clutches and even laconic pumps worn “on a special occasion”;
- interior decor. Yes, yes, even in decorating the premises of offices, hotels and ordinary apartments, glitter powder is used. It is added to wall paint, used to decorate picture frames, upholster sofas, and even “mixed” into ceramics, be it tiles or sanitary ware. In measured, small quantities, such things can dilute the dullness and monotony of minimalism, giving the room its own “zest.”
As you can see, glitter is something that is widely used in almost all areas of human life. And arguments about the fact that sparkles are appropriate only on representatives of the stage have long since sunk into oblivion.
How to remove glitter
Glitter coating is beautiful, spectacular and reliable. But it is very difficult to remove it.
There are three ways to remove glitter:
- Special nail polish remover for glitter. But here everything is not so simple. First, the composition will have to be applied to the cotton wool, then applied to the coating and held until it is saturated. The operation will have to be performed several times for each nail. To make things go faster, you need to wrap the nail with cotton wool in foil or purchase special caps.
- “Liquid Skin” or Peel Off. This is an innovation from manufacturers of manicure and pedicure products that makes it easier to remove particles from nails. Apply at the manicure stage as a base layer under glitter. Later it is removed together with the coating using a wooden spatula.
- PVA glue. They cover the nail plate before applying glitter and allow it to dry. Later, the decorative layer is removed with a wooden stick.
The last two methods turned out to be so convenient that they are now used as a base for any varnish. And glue is used to cover the skin before manicure to protect it from varnish and make the coating more accurate.

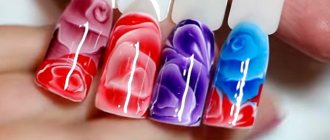
Glitter painting
Another very discreet, sophisticated and elegant manicure option is glitter painting.
In this case, you will definitely need liquid gel glitter of a fairly fine fraction, as well as a thin brush for drawings. What to draw? It doesn’t matter at all, the main thing is that it is done very subtly and carefully. Therefore, it is better to perform such a manicure by an experienced manicurist in a salon so that it does not look like it was done by a schoolgirl. A beautiful painting will suit business ladies if it is done on a nude or light base. The simplest option is geometry in the form of stripes and lines on the nails, parallel or intersecting in any direction. But geometry will also be the most trendy this season, so be sure to try this nail design. Floral motifs and floral designs require some drawing skills. Here you can paint not only with glitter, but also with some contrasting shade. Another option is to use glitter for the hole in the moon design. Very interesting and relevant, attracts attention, but at the same time not vulgar.
Recommendations
To ensure that working with glitter only brings pleasant sensations, and the design does not have to be constantly remade due to carelessness, you need to pay attention to the advice of manicurists.
They recommend:
- For large particles, use special tweezers.
- Apply clear varnish or a special fixative to the finished design. This way it will last longer.
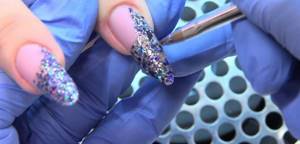
- Apply glitter powder with a special sponge onto the still wet varnish. This creates unparalleled mirror and holographic effects.
- Glitter sand should be worked with a special plastic spoon. The most interesting designs are obtained by combining sand and gel polish.
- Excess particles from the nail plate should be removed with a brush.
- It is better to draw patterns with a thin brush. There is a very simple technology: first, an ornament is applied, which is immediately sprinkled with glitter on top.
In order not to cover your interior with glamorous and expensive glitter of all colors and sizes, you need to get an A4 sheet of Whatman paper and perform all the procedures on it.
This method has one more important advantage: after work, you can collect all the crumbled “glitters” and carefully return them to the jar.
How to apply glitter to gel polish
The previous step-by-step instructions made it clear to us that even a beginner can apply glitter to gel polish and still get a very impressive result of his work. Large nail glitter is a little more problematic on ladies’ fingers, but this does not mean at all that you should deny yourself the pleasure of such decoration. ProstoNail has collected the most effective and proven life hacks from practicing professionals that are worth adopting:
- Many people have a question - what to glue the famous glitter on? The answer is quite simple - just a sticky base layer or colored gel coating is enough;
- If you plan to cover the entire surface of the nail with glitter, then pay special attention to evenly painting it with varnish. Otherwise, in places where the gel is bald, bald spots will form, but they will be shiny;
- carefully polish the nail plates with a buff, smoothing out all the irregularities. Only then can gold glitter or metallic glitter create a trendy chrome effect;
- To apply dry glitter, be sure to use a regular applicator, which you can remove from the eyeshadow palette. Using gentle circular movements, he will polish the glitter, remove excess and improve the adhesion rate;
- Only after waiting for the glitter to dry, brush off the excess from the side rollers and cuticles and only then fix the result with a top coat.
Liquid glitter
This type of glitter is a simple mixture of clear polish and dry glitter. Such varnishes are produced in ordinary, familiar bottles and are quite easy to use. Glitter nail polish is applied only after the plate is covered with the base. A fixing layer is applied on top of the shiny varnish so that small particles do not fall off. As for color, you can find liquid nail glitter in absolutely any color in stores, from classic to the brightest. However, gold, bronze and silver sparkles were and remain the most popular among girls. Now it remains to answer the question of how to apply glitter on nails.
Makeup with glitter - tips and application features
When using eyeshadow with glitter, some, especially inexperienced girls, may experience problems and difficulties. But a few simple tips from experts will help you cope with the task:
- Before applying dry and pressed glitters, prepare the surface of the eyelids using a base. The base is needed so that the shadows fit well on the eyelids, do not fall off and are applied without bald spots. It is best to use an eye shadow primer. But if you don’t have it on hand, preparations such as facial primer, concealer, duraline - any preparation with a creamy texture will do. If the glitter itself has a cream or gel texture, applying a base is not a necessary stage of makeup.
- Apply glitter makeup to your eyelids with a brush. If it has a dry or crumbly texture, you can use a wide flat brush made of natural material. If you are using glitter with a cream or gel texture, a brush made of synthetic material will be more suitable for you.
- When applying glitter, try not to shade it, but to “drive” it into the skin of the eyelids with patting movements.
- If you do eye makeup using shadows with shiny particles, then there is no need to focus on the rest of the face. It is acceptable to use lipstick and blush in soft, soft, pastel, nude colors. This approach is the guarantee that there will be no dissonance in the image, the whole “look” will look harmonious. It is also recommended to avoid the simultaneous use of glitter and iridescent outfits and accessories.
- To avoid glitter shedding, you can do makeup at the first stage, that is, before applying primer, foundation and powder, blush and lipstick. Apply glitter to your eyelids, remove any particles that end up on the skin under your eyes with makeup remover. After this, you can apply facial primer. Another little trick that will prevent glitter from randomly scattering across your face is to put paper napkins under your eyes or make a thick layer of powder and then apply glitter. If shiny particles of cosmetics still get on the skin of the face, it is not always necessary to completely wash off the tone. Try using gentle methods, removing individual glitter with a fan brush, a clean mascara brush, a small piece of tape, or a cotton swab.
And the last life hack from makeup artists - when you have finished making up your eyes with glitter, fix the result with a special makeup fixing spray. In this case, the shiny particles will definitely stay on your eyelids throughout the day and even evening.
Tips for applying glitter
Due to the fact that glitter can be applied to the nail plate either in an even layer or in any possible pattern, this type of manicure is very popular. However, when implementing such a design, you should adhere to the following rules:
- In order for nail glitter to lay down in an even layer, you should first cover it with a regular base and, without waiting for the polish to dry completely, sprinkle the nail with glitter of the desired shade.
- Don't forget to make sure that the base polish completely covers the nail, otherwise there will be empty spots without glitter and the manicure will look untidy.
- If the sparkles are small, simply dip your nail into a container of glitter. The results from this method of application are always excellent. However, you will have to press down any protruding glitter with your finger on top.
- When the varnish is dry, you can get rid of the remaining glitter with a brush or a regular brush.
- When the procedure is completed, coat your nails with a fixing varnish to ensure that the manicure lasts as long as possible.
- To create unusual patterns using glitter, simply paint the desired design with a base polish and, before the polish dries, dip your nail in the glitter. You should draw patterns with a thin brush, and after applying glitter, carefully sweep away the excess.
Today, if you go to a professional store, you can find glitter in a variety of colors and sizes. And the variety of decorative elements and tools for manicure makes your eyes wide open.
Glitter for nails: application features, photos - all the nuances of beauty on MedNews.info
Beauty and style are the main components of the success of every girl. Of course, it’s not bad at all if you also have a sparkling sense of humor and remarkable mental abilities. Anyone who mistakenly believes that to “open all doors” and find personal female happiness is enough to have a pretty face and an excellent figure, but style is not necessary, I hasten to disappoint, even as it is necessary. These are two halves of one whole. A stylish person a priori cannot but be beautiful. This is how our psyche works. We perceive everything unusual and original as beautiful. Beauty and style in the modern interpretation are practically synonymous.
Dry glitter
We have already figured out what glitter for nails is. Now let's look at the types in which it is available. The most popular, undoubtedly, is dry glitter, packaged in small jars. Such loose sparkles are convenient because they can be used for various purposes, not only for manicure.
Of course, in order for dry glitter to stick to your nails, it must be applied to a sticky base. That is, to decorate your nails with glitter, you will first have to paint them with a base, then dip your finger in the glitter, sweep away the excess and cover it with a fixer on top. But in this case, it is possible to mix colors and combine different types of glitter.
star dust
These are very finely ground glitter particles that can be selected to match the color of the coating. These glitters are applied before the second layer of varnish dries, generously sprinkling the grains onto the nail with a fan brush. Then, rubbing it into the plate, carefully remove the excess; this can be done using the same brush. You can repeat this procedure. The result will be a beautiful scattering of stars in autumn. Next, cover the design with a top coat. It happens that not all glitter sticks tightly, so it is recommended to prepare a napkin in advance on which you can wipe off the excess.
Editor's choice: Design of extended nails 2021, fresh ideas for manicure
Usually when you photograph sparkles, the nails show up in the photo, but not in this case. Stardust looks great even in photographs!
Multi-colored manicure
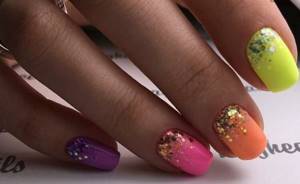
When you need to create a light mood, different shades of varnish on different nails will come to the rescue. Similar decor will help to combine them into one composition. In this case, medium-sized glitter is used. It emphasizes the richness of color through the play of highlights, and harmonizes the transition of shades thanks to a similar design.
Nail extension with glitter
This is a step-by-step process:
- Prepare your nails by removing all excess – cuticles and hangnails. To do this, you can use manicure tools or special products containing acids.
- Apply the base gel and wait for it to dry, which will be indicated by its matte appearance.
- Apply modeling gel to your nails, to which dry glitter has previously been added. Its amount depends on the expected effect, and to avoid the appearance of lumps, it is necessary to mix the components thoroughly. This is done on a plastic palette and the ideal mixture should be gel, glitter and shimmer.
- After drying in a UV lamp, it becomes necessary to create a glossy surface, for which a finishing coating is used.
- If you need to increase the concentration of glitter or create a certain pattern, this is done using an orange wood stick. Afterwards, you need to add another layer of modeling gel and gloss.
- The entire “structure” is fixed with a transparent gel.
Important! The design should be thought out in advance! The use of sequins, rhinestones, beads and other decorative elements is not prohibited.
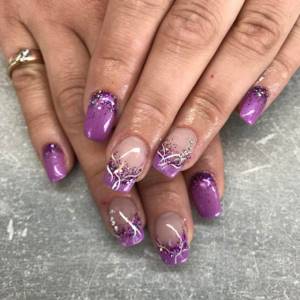
Spring manicure with a shiny base
Glitter can act not only as a key or additional accent, but also as a background for other designs, as in the photo. Spring-style painting gains depth thanks to the highlights reflected in the shimmering particles of texture. It is important to secure them with topcoat, and only then start drawing.