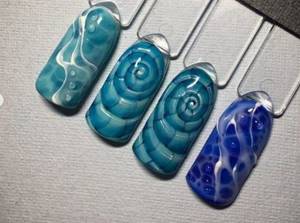
Design using wet gel polish is drawing on an undried coating, which allows you to make the image more natural due to the fuzziness and vagueness of the lines.
It requires flower beds of medium density, as well as a choice of thin, flat, beveled brushes, dots, toothpicks, and needles. There are also special products with a spreading effect from Nika Nagel, BlueSky, Gellaktic Mystic, MiiS. You can make beautiful patterns, abstract images, dots, cobwebs, twigs, shells, hearts. Drawing roses, butterflies, reptile skin, feathers, marble surfaces, and a bridal bouquet will require more skill.
Design features for wet gel polish
A wet gel polish design is an image, pattern or vague shapes that look as natural as possible. The technique itself gives them greater naturalness, because the wet coating makes all the lines a little fuzzy. To get the desired effect you need:
- choose a gel polish of medium consistency so that it does not spread instantly and at the same time easily mixes with other flower beds;
- use a suitable tool, because the details of the drawing can be larger or smaller.
Which varnish is best
For a vague design, it is important to choose the right gel polish:
- Well pigmented. If the flower garden leaves streaks, you will have to deal with them. Otherwise, the drawing will look sloppy.
- Correct consistency. A product that is too liquid will spread, may flow onto the cuticle or mix so that vague spots appear instead of a pattern. And thick textures do not mix well; soft transitions will not work.
If the gel polish is too viscous, it can be diluted with a liquid finishing agent.
How to apply drawings

Drawings are made:
- with a thin hair brush or liner,
- dotsami,
- a brush from a bottle of gel polish,
- orange stick,
- toothpick or needle,
- point brush, petal brush, beveled or flat.
The tool is chosen in accordance with the design and for reasons of convenience. Brushes are suitable with natural and synthetic bristles, even silicone ones. The main thing is that the gel polish does not slide off the instrument instantly.
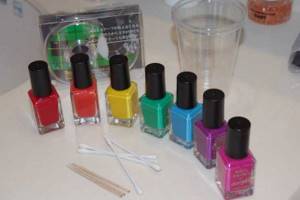
What tools and materials will you need for the job?
To get an excellent manicure, you need to prepare tools and supplies. For this you will need:
- Container with liquid. For your workflow, it is best to choose disposable cups or plastic plates;
- Liquid latex or tape. It is necessary to create a protective coating on the surface of the cuticle;
- Toothpick. It will be created by blurred boundaries and fancy designs on lacquer decor;
- Nail polish remover. This product will be needed to remove excess dye from the surface of the skin;
- Several cotton swabs;
- Base and top coat to prepare and consolidate the result;
- Set of colored gel polishes. For work you can use from 5 to 8 shades of different colors. However, when choosing, you need to take into account the overall color palette. For example, to create an evening look you will need bright and saturated colors, but for an everyday look, on the contrary, a pastel palette.
Possible mistakes when creating nail designs using wet gel polish
Nail design using wet gel polish is also accessible to beginners, but difficulties may arise when performing due to:
- Wrong choice of flower garden. Too liquid and dense are not suitable. And to avoid unpleasant surprises when mixing, it is better to take products from one company.
- Poor quality manicure, errors in applying the base and the first layer of the flower garden. All this can create unevenness on the nail plate, which will interfere with the distribution of gel polish over the general background.
- Uncertain, repetitive or too intense movements of the instrument. This causes bald spots to form on a wet surface, rather than clear lines that should blur slightly.
There are many other factors that prevent you from doing the job beautifully and quickly: incorrect position of the hands (upside down), excessive tension, poor lighting, etc.
Choosing a varnish
We offer some tips from professional masters on how to create a beautiful water manicure for beginners. These include:
- To work, you will need fresh gel polish compositions. They quickly spread on the surface of the water surface while creating beautiful circles;
- To create an exclusive design you will need high-quality brands of decorative coatings;
- Experts recommend choosing varnishes from one manufacturer. As a rule, they have a uniform texture and the same drying speed;
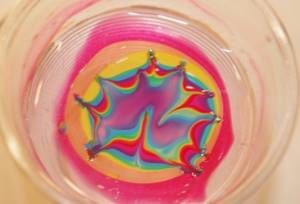
- To create a marble effect, it is not recommended to use shiny types of varnish. When immersed in water, the drop will sink to the bottom;
- To create an unusual design, you can use regular nail polishes.
Wet gel polish drawings that beginners can do
Drawings using wet gel polish for beginners should be simple:
- smooth divorces,
- different sizes of dots or circles,
- abstract images,
- cobweb,
- simple ornament,
- hearts, shells, and other easy-to-make figures.
And it’s better to sketch out in advance on a piece of paper what you would like to have on your nails. This makes it possible to think through the movements of the tool in advance and determine the location of the parts.
Step by step drawing on wet gel polish is done like this:
- The nails are filed, the cuticle is cut or pushed back, and the skin around the plates is polished.
- Surfaces are treated with a buff to remove gloss.
- Nails and skin are wiped with a degreaser.
- After it evaporates, a primer is applied to the surfaces of the plates and ends, and allowed to air dry.
- The next stage of the gel polish base is its polymerization.
- Nails are painted with the first layer of flower garden.
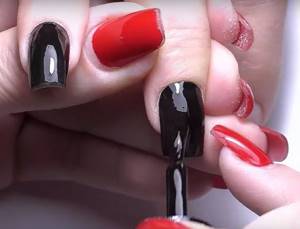
- This coating must be dried and residual stickiness, if any, must not be removed.
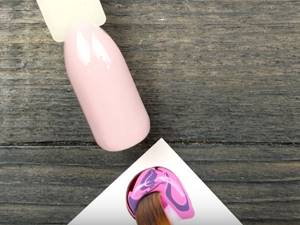
- Apply another layer of gel polish of the main shade, do not polymerize.
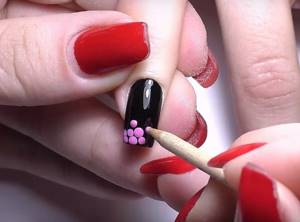
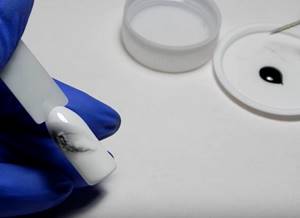
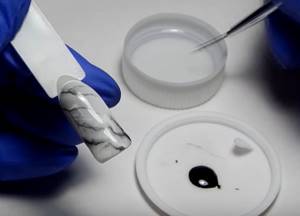
- The second flower bed is laid out as a drop on the palette.
- By dipping a dots or other tool into it, they apply patterns to the undried layer of gel polish on the nails.
- The hand is placed in the lamp.
- Cover the nails with a finishing agent and polymerize it.
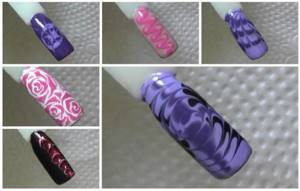
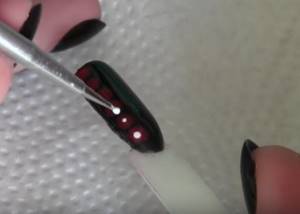
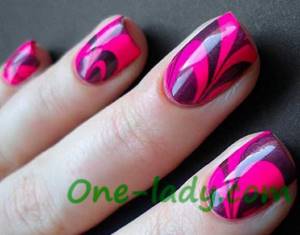
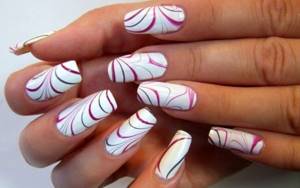
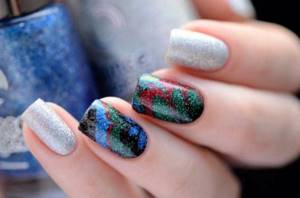
Divorces
Divorces can be done using 2 or 3-4 flower beds plus the main background, and there are 2 ways to do this. The first one is done like this:
- The prepared nails are covered with a base and dried.
- Apply 2 layers of the same color, leaving the second undried.
- Gel polishes of other shades are dripped onto the foil or palette separately from each other.
- Take each one in turn with thin brushes and use them to make lines on the nail along the undried base color.
- When the design takes on the desired appearance, the coating is polymerized.
- All that remains is to apply the top coat and dry it too.
Watch the video about design options for wet gel polish:
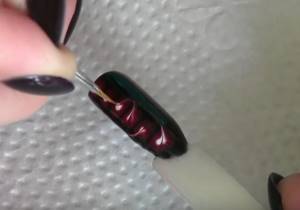
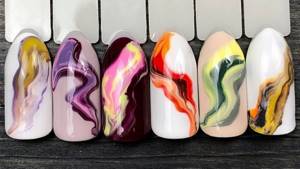
The second method is more difficult, but the divorces are more natural:
- The base is applied to prepared nails without leveling, so that in the end they do not look too thick.
- Cover them with the main color and dry.
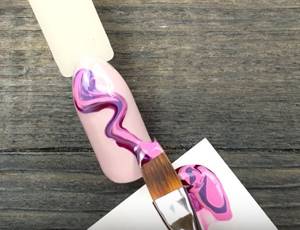
- Additional shades of gel polishes are dripped onto each other onto the palette and mixed with a thin brush or dot until streaks appear.
- Using a wide brush, pick up this mass and transfer it to the nail, stretch it from the base to the free edge, without disturbing the formed lines.
- The same is done on the side parts of the plate.
- Use a thin brush to paint the space around the cuticle.
- Dry the coating.
- Next you need to apply the top coat and place your finger in the lamp.
With this method, you don’t have to paint the nail with the main color, but apply stains directly onto the dried base, because they will cover the entire surface. If such a technique seems difficult, stage 2 is not skipped. But stains from the palette are applied to part of the nail. And then they level the gel polish with a thin brush so that it does not lie in a lump.
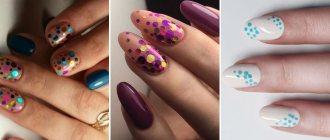
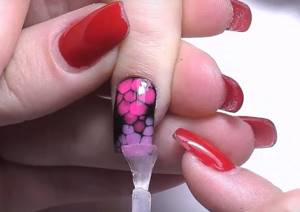
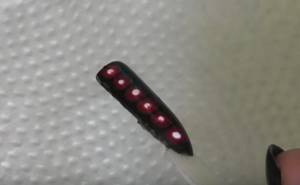
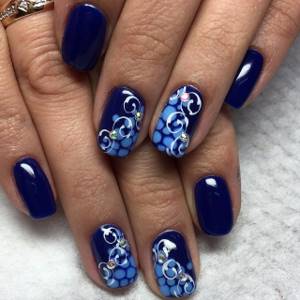
Dots, circles
The dot pattern is one of the simplest, you just need to follow a few rules:
- The second and subsequent shades of the flower garden are dripped onto the palette so that they do not mix.
- From there they are taken with dots; you can use different sizes of tools.
- If the first gel polish is not dried on the nail, they leave marks on the surface of the second and subsequent flower beds.
- Decorate the entire plate or part.
- To make the dots of different diameters, apply several pieces of gel polish with one portion until it runs out.
- Immediately after application, the circles blur, so there must be a certain distance between them, otherwise the entire decor will merge into spots.
When the pattern is completed, it is dried and covered with topcoat. The dots can be made of the same shade or different.
Abstraction
An abstract image is beautiful because of its uniqueness, because you won’t be able to make exactly the same thing again. This design is done as follows:
- Drops of gel polish of different colors are placed next to each other on the palette so that one flows into the other.
- After preparation, the nails are covered with the main background and dried.
- Paint them again with the same color.
- Using a comb brush or other flat brush, scoop gel polishes from the palette, like a spatula.
- Transfer them to the nail slowly, making a broken line in one movement.
- You can turn the brush over and walk it next to the already applied stripe.
- If bubbles have formed on the surface due to the large thickness of the gel polish layer, they are removed with a tool with clean bristles.
- The abstractions are allowed to spread a little more for a couple of seconds and the finger is sent into the lamp.
- The top of the nail is covered with topcoat and it is also polymerized.

For abstraction, you should use at least 3 shades - contrasting and intermediate.
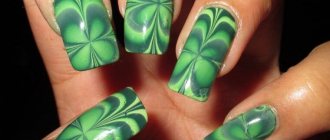
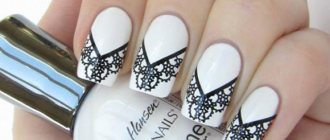
Patterns with cobwebs, twigs
Patterns in the form of a cobweb and a branchy ornament are very relevant this season and are easy to do:
- In the first case, 3 thin stripes are applied along the nail along the wet base gel polish. They should be parallel to each other, and their edges should be at a short distance from the end and cuticle. Using a toothpick or a needle, transverse lines are drawn from these strips at different levels in both directions so that they form a circle consisting of broken segments. This is how a web turns out.
- The branches begin to be drawn from points that are scattered quite far from each other. Using a needle or toothpick, they are pulled out to form leaves and connected to form stems. You can use different shades of gel polish.
Hearts, shells
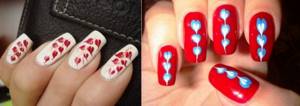
To draw a shell, dots are placed on the nail plate so that they form a circle. Inside it you need another circle - a small one. It is pulled out with a thin brush so that you get a blot with uneven edges. It is necessary to connect this element with a large circle with thin lines. And also draw segments between the points that make up the outer circle.
The heart is drawn based on several marks made with a dots or a thin brush:
- one in the middle of the plate,
- two on each side of her and above,
- another point located below the central one.
The first mark is connected to those above with smooth lines. Curved stripes are drawn from the paired lateral points to the lowest one.
The heart can be made from circles. Use 2-3 shades of gel polish, place large and small dots with them so that overall they form the intended figure.
Why doesn't something work out?
Have you followed all the instructions, but the water (marble) manicure didn’t work out, or are you not very happy with the result? Here are the main difficulties that arise during this procedure.
- Do the varnish droplets spread or curl up? Check the fluid temperature. If it is normal, the reason may be that the consistency of the varnish is too thick. To achieve a water-based manicure at home, replace it with a more liquid one.
- Are the patterns on each nail different from each other? Over time, you will learn to make almost identical drawings, the main thing is to maintain the style of stains on the water.
- A drop of varnish does not spread, but sinks? You may be holding the brush too high. Let us remind you that to do a manicure using water, the distance to it should be minimal, no more than 2 cm.
- Does your manicure end up smudged? Most likely, you take your finger out of the water too quickly or do not completely remove the remaining water rainbow with a toothpick.
Wet gel polish design: patterns for experienced craftsmen
Design schemes for wet gel polish can be more complicated, but they can only be completed with the ability to draw and sufficient practice in nail art:
- roses and other flowers,
- several small butterflies or 1 large one covering the entire plate,
- imitation reptile skin,
- feathers,
- marble texture,
- the bride's bouquet.
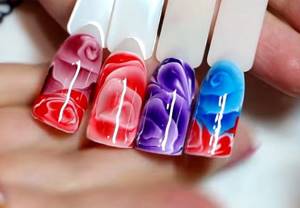
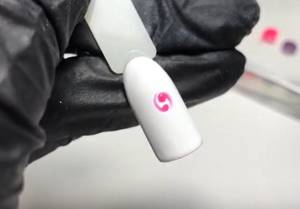
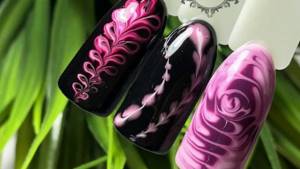
Roses
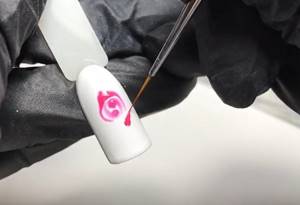
Roses are painted on a damp surface with a thin brush. First, a dot is placed in the center of the future flower.
Short, arched strokes are made around it, moving further and further from the middle. For greater naturalness, these lines should be of different thicknesses and lengths. They become thinner towards the ends.
For roses, choose a background that is lighter or darker than the flowers themselves. You can draw several small ones or 1 large one on the entire nail plate. Here, 2 gel polishes are enough - for the main background and the flower itself. But you can also use 3.
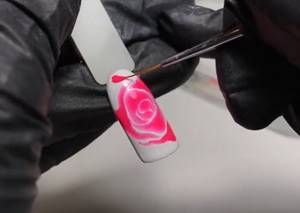
One covers the entire nail, the other is used as the main color of the rose, and the third draws the edges of its petals. That is, a stain is made on the dried base shade with another gel polish. And while it is wet, the third color is used to outline the petals. The last shade should be darker than the previous two.
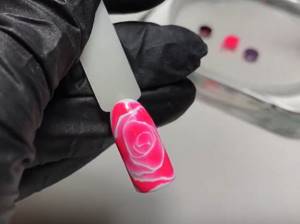
You can additionally decorate roses with rhinestones, sparkles or acrylic powder to get velvet flowers. In the latter case, the top is not applied to these areas.
Painting with butterflies
Painting with butterflies is performed in the following sequence:
- Draw 3 intersecting lines. The central (shorter) one will be the basis for the body of the insect. Through a point just below its middle, 2 other lines are drawn so that the entire structure resembles the letter Z.
- Using a thin brush, a stroke is made from the side strips to create the outlines of the wings. The top ones should be larger than the bottom ones.
- Inside the wings you can make another outline, but in a different color. The body, along with the tail and mustache, is drawn in black or dark gray.
- You can add dots and irregular multi-colored spots inside the wings. Or paint these parts with one color. And along it make thin black lines from the insect’s body to the edges of the wings.
You can draw several of these butterflies on 1 nail. To simplify the task, use a bright general background and only 1 gel polish to outline the image.
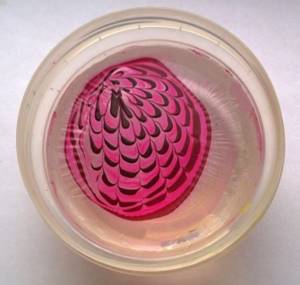
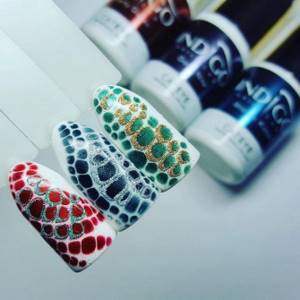
How to Draw Reptile Skin
Drawing snake or crocodile skin is quite simple, since the main thing here is maintaining the distance between the elements. Dots are placed on the nail so that when they spread, they do not merge. First, perform 1 vertical row in the middle of the nail. Then they make adjacent ones, but put points at the level of the spaces between the parts of the first line. Thin partitions should form between the spots.
Watch the video on how to paint reptile skin using wet gel polish:
To make “reptile skin” look as natural as possible and seem textured, choose similar colors of gel polish. For example, if the main shade is blue, the dots are made blue. You can also outline the lines separating the spots with gold or silver paint. But this is done after drying.
Technique for drawing a butterfly
To depict a large butterfly, a different technique than mentioned earlier can be used:
- Drawing a silhouette of an insect in profile, covering almost the entire nail. It looks like the number 9, but completely shaded. Use black gel polish over undried light gel polish. And on a dark background with a thin brush they draw colored narrow lines and spots.
- Drawing with five colors that smoothly flow into each other. The main shade depicts an insect with outstretched wings. It looks like the number 9 and its mirror image. The inside of the image is outlined with a different color, then with a third color. The remaining shades are used to draw small details - dots, spots, lines.
Feathers
There are two ways to depict a feather:
- Place dots at a certain distance from each other and circle each one with several colors of gel polish to create multicolor circles. They are connected to each other by making movements from one to another with a dry thin brush. It is also used to make short strokes from the edges of each circle. The result is a multi-colored peacock feather.
- Drops of gel polish are placed along the nail on a damp surface so that they form a curved line. The size of the spots spreading from them should gradually decrease. A thin dry brush is drawn along this row to depict the shaft of the feather. Use the same tool to stretch the edges of the spots. For this scheme, you can use several colors of gel polish or just one.
Marble
Marble coating is done as follows:
- Nails are painted with light gel polish in 2 layers and both are dried.

- Then a liquid finish is applied.
- Black gel polish and thick top coat are mixed on the palette.
- This product is applied to a thin brush and used to make uneven, winding lines along the wet finish on the nail.
- They are combined in some places, shaded in other areas.
- When the pattern looks like marble, it is dried, coated with topcoat and polymerized again.
For the desired effect, you always need a light main background and a darker color to draw the veins.
The bride's bouquet
The composition “bridal bouquet” is made in pastel colors:
- On a damp base coat (pink, beige or white) paint 3 abstract spots with outlines similar to flowers. They must lie on line 1.
- After polymerization, flower leaves are painted on with silver gel polish. You can also use light green.
- The coating is dried again. Then the edges of the petals are painted with white gel polish, as in the image of a rose, as well as the veins on the leaves.
- All that remains is to cover everything with topcoat and polymerize it. For flowers you can use a matte finish, for the rest of the surface of the nail - glossy.
Pros and cons of aqua manicure
The following criteria are considered to be the advantages of this decoration technique in the nail art industry. They include:
- Large color palette and the ability to independently combine shades. There are no special restrictions on the work. To create such decor, you can use absolutely any range;
- Water manicure is ideal for decorating short and long nails;
- The result can be supplemented with small sparkles and rhinestones;
- The technique is ideal for beginners and professional craftsmen;
In addition to the advantages, there are several disadvantages:
- To work, you will need additional protection for the skin around the nail. To make the decor as neat as possible, use liquid latex, tape and rich cream;
- This technique will require a large amount of decorative varnish. On average, to create an aqua pattern you will need 15-20 ml;
- It takes a lot of time to create a manicure using this technique.
What are the mistakes when painting on wet gel polish?
Painting on wet gel polish fails for several reasons:
- Incorrect base application. If it lies in lumps, a flower bed applied to a wet coating may flow in the wrong place.
- Air bubbles at the base of the nail. This happens when a manicure is of poor quality, when the cuticle is unevenly cut or not pushed back enough. The same problem as in the previous case is possible.
- Incompatibility of the means used. First of all, these are gel polishes, which are chosen for the general background and for painting on it. They may mix poorly, leak or shrink, and the design will not come out.
- Insufficient drying of the design. With some of them, there is a lot of material on the nail, and the standard 2 minutes in a UV lamp or 30 seconds in an LED lamp is not enough. The design lags behind the nails, despite the presence of a topcoat on top.
Tips for beginners
To get the design right the first time, you should use the secrets of experienced craftsmen:
- All movements and brush strokes must be clear. There is no need to carry the tool several times over the same place, this will lead to the appearance of bald spots.
- If the stains seem unsightly, they can be corrected. To do this, take a dry and clean brush, and wipe the bristles on a napkin from time to time.
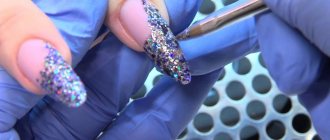
- To make the design more expressive, you can use glitter gel polish where appropriate. It is also used to paint the contours of individual parts.
- It is important that nail art is performed on well-prepared nails. No drawing will hide the “shaggy” cuticle and irregular shape, bumps and depressions on the surface.
What polish is perfect for a water manicure?
Varnishes that have become very thick are not suitable at all; they will not spread on water; it is better to give preference to liquid structures. If you urgently need a varnish with a certain tint, and it has thickened, there is an easy way to make it more liquid by adding a couple of drops of solvent to it and stirring well.
It is worth paying attention to which colors and combinations of varnishes are more harmonious for water design. If you need to create a brighter and more unique water pattern, you can use holographic varnishes. An interesting manicure can be created using varnishes with a thermal effect property; as a result, the shade will change under the influence of body heat. To create a unique design, you can use several shades. As a result, the design will turn out to be very extraordinary. If you don’t have the opportunity to make a beautiful design yourself, then you can visit a beauty salon and a master will create a unique pattern for you.
For more economical consumption, it is advisable to use narrow dishes. In addition, you need to use a container with sufficient depth, this will help to avoid your nails from touching the edges and bottom. Then your pattern will definitely not be smudged. The water prepared for water manicure should not be cold, otherwise the varnish will spread and harden.
How to create a wet nail effect with gel polish
The effect of wet nails in a gel polish manicure is done by rubbing. First you need to cover them with a flower bed or camouflage base. And after drying and removing the sticky layer, rub shiny powder into the surface. It should be finely ground, and the color should be chosen according to your taste, since the shade of the gel polish will be hidden under it. After using the rub, fan the nails with a fan brush and cover them with a glossy top coat. The final step is its polymerization.
There is a second coating option, but “wet” nails will look as if there is dew on them. Manicure is performed in the usual way. After applying the flower bed, you can use a matte top coat over the entire surface. But then they put droplets on it with a glossy finish. And they send their hand into the lamp again.
Simple drawings
It’s best to practice the technique on tips, and when you get the hang of it, start designing your nails. Drawing step by step includes the main stages of manicure - cuticle removal, degreasing and base layer. After this, apply a colored coating, but do not dry the last layer in a lamp. Drawings will be applied to it.
Simple pattern
Choose what's right for you:
- marble effect;
- imitation snake skin;
- circles, cobwebs or curls.
Important! To obtain an even color, apply and cure in a lamp 2 layers. Only coating 3 will work.
Is there a gel polish that spreads with a pattern?
Gel polish, which spreads in a pattern, is available from many manufacturers; the following products are known to provide the desired result:
- Nika Nagel gel polishes;
- MiiS base, which can be combined with flower beds from any company;
- flower beds and Rosalind solvent;
- BlueSky Flower Gel gel polishes;
- Gellaktic Mystic compositions.
These media may be called watercolors. Or there is no such definition on the bottle, but there is information about the spreading effect.
Drawing on a wet surface will make your nail design unique even with a simple image. This technique is accessible to beginners; it does not require additional funds or costs. And an unsuccessful picture can be corrected with a clean brush or erased with a napkin soaked in a degreaser.
What kind of design can you create?
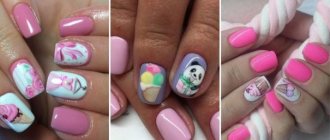
More recently, the most common designs for wet gel polish were floral designs . Today, trends have changed and the number of options has increased dramatically.
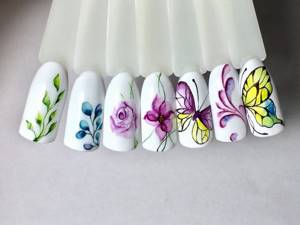
Flowers of various shapes, sizes and colors, as well as graphic patterns, abstractions, haze of various interpretations, butterflies and other patterns continue to be very popular .
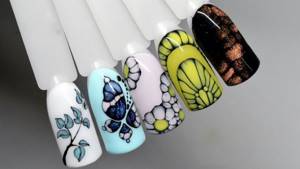
Marble manicure, which is very popular today, is also performed using this technique. You can design circles with penumbra, a cobweb entangling your nails, or create a shell effect, as well as use a marine theme . All this is available using this technology.
Other options for creating an original manicure
Fashionistas didn't stop at just one method, and figured out how to do a water manicure without even getting your fingers wet. To do this, you should wait until the varnish film has completely hardened, which takes about half an hour on average.
Then take the varnish circle out of the water and cut it into several pieces to fit the size of the nail plates. The film is fixed on the nail with a transparent varnish and covered with another layer of fixative on top. Thus, the skin of the fingers does not need to be protected from paint and remains clean.
Another way to create especially beautiful patterns is a technique that results in a pattern similar to the pattern of the famous marble nail art.

To do this, dissolve two or three drops of the same color in water, which are immediately sprayed with hairspray. This is how the characteristic marble look with many points and veins is achieved. This manicure will look luxurious.
Drawings for beginners, diagrams and implementation features
After numerous experiments, the experts of our magazine decided to share the simplest techniques. We will create nail art with varnish on a damp, undried layer of polymer material. With the help of simple diagrams, plant motifs and texture designs are created on the plate, reminiscent of the natural ornament of stone.
Dots, circles
Rounded elements will help give a textured look to the image. For the design you will need a hairbrush or dots. We use dots to transfer the paint. Choose the order of arrangement yourself, use a checkerboard row or a linear system.
For the first time, it is better to adhere to a certain sequence, creating a circle after another. Then, when spreading, the circle turns into a beautiful oval, changing the shape of a ball to an ellipse.
If one of the circles is not voluminous or even enough, correct the edges with a needle. To do this, you need to slightly redistribute the uneven edge to give the element the desired shape.
Web
To perform a manicure with a spider web, you will need three colors, a hair brush or a needle. Modeling of the web occurs in the root part. The wet layer is poured into the main coating, with the help of which the circle spreads.
To obtain a web, a point is placed one on top of the other, then with a needle we begin to stretch the blurred circle in different directions. When creating a web, it should look like you are drawing a sun with rays. After drying, the nails are covered with a finish.
Smears, spirals, curls
Elements in this category are the easiest to draw. Suffice it to recall the needle designs that used to decorate fingers.
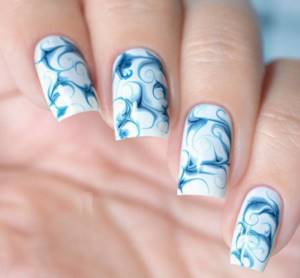
The curl pattern is useful for creating beautiful wet curls. To simulate a design with streaks, it is enough to stretch the edges of the applied circle in different directions with a needle. The action must be performed quickly, since the strokes instantly blur during the period of inactivity.
Hearts, shells
It’s not difficult to decorate your nails with hearts; we’ll draw with circles. Place the points in a semicircle, moving from the root to the end.
Using a needle or the thin side of a dot, draw a strip through the center of all the dots. As a result, we tighten the edges of the circles and form a heart pattern.
Tools
In order to perform the procedure, you need to use the usual set of tools and preparations:
- Various nail files;
- Scissors (can be replaced with tweezers);
- Orange wood stick
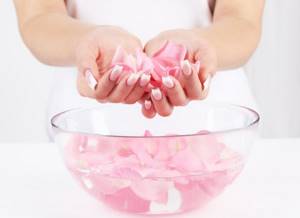
- Cosmetics that are used to add to the bath can be different. Today you can purchase a ready-made set for water manicure. The almond and citrus sets are especially popular. In addition, you can also purchase the bath itself, which is made of ceramics. You can add lotions and rose petals to the bath.
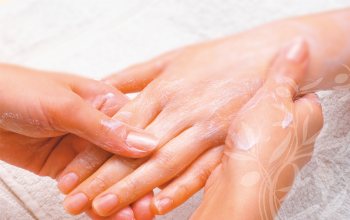
Disadvantages of the maceration procedure
Speaking about carrying out caring procedures for hands, it is difficult to name or identify any shortcomings or disadvantages. But, of course, they exist, like everywhere else. The only disadvantages of performing a wet manicure include the consequences of incorrectly performing the maceration technique, for example:
- the formation of burrs when using low-quality tools
- introduction of infections due to poor disinfection of instruments.
Also, the disadvantages of maceration include the rapid growth of skin and cuticle, which leads to the need to repeat the procedure. But whether this should be considered a disadvantage is a moot point, since the procedure itself is very pleasant and has excellent properties that have a beneficial effect on the condition of the skin of the hands.
Benefits of the maceration procedure
In addition to the positive cosmetic effect that is achieved after a wet manicure, maceration has other advantages. Among them
- low cost of the procedure, since the tools used are almost always in every woman’s cosmetic bag
- the procedure can be carried out under conditions of acute time shortage (maceration will take no more than half an hour, unlike other manicure techniques)
- wet manicure has no contraindications and is suitable for absolutely everyone
These are the most basic advantages of maceration. It’s better not to talk about them, but to experience them for yourself.
Maceration: Reviews from readers
Ratushnaya Elena, 34 years old (Samara). I was offered to perform this procedure as a gift in a new beauty salon. To say that I was pleasantly surprised is to say nothing. My skin instantly became soft and tender, like a baby's. I don’t know what exactly was added to the bath, but the effect is amazing. Belousova Irina 19 years old (Irkutsk) . I regularly do wet manicures on my own, without anyone’s help. In addition, I lubricate my hands with cream every day, maybe that’s why I didn’t notice any special effect. I like the fact that during the procedure you can relax and not think about anything.
Stepanchuk Elena 28 years old (Moscow). This beautiful word maceration hides the usual immersion of hands in a warm bath of water. The same effect can be achieved with regular care, which every self-respecting woman should provide to her hands. Moreover, applying a cream or mask will take much less time than maceration.
Svetlana Ivanova, 48 years old (Kuznetsovka village). Recently, I began to pay special attention to the skin of my hands, as I noticed that they are more susceptible to aging. My daughter advised me to make hand baths, adding a couple of drops of tea tree oil, and then apply moisturizer. To be honest, I didn’t see the result immediately, but after two or three regular baths. I was pleased with the effect, my skin regained its former softness and elasticity, and wrinkles disappeared. I like.
Igoshina Anna, 23 years old (Krasnoyarsk) . After the birth of a child, there is absolutely no time to visit salons and get a full manicure, but every girl wants to look beautiful. The Internet came to the rescue, where I found a technique for performing a wet manicure. I’m glad that everything you need is in your cosmetic bag, and it takes a minimum of time. A young mother can do this procedure during the baby's nap. Hands remain well-groomed, despite the constant washing of children's clothes.
Solovyova Victoria 35 years old (Komsomolsk-on-Amur). I always trust hand care only to specialists. I made a discovery in the form of a wet manicure a long time ago. The good news is that no suspicious means are used, but only natural products. I exfoliate with fine oatmeal and finish with olive oil. Add various herbs to the bath. The effect is magical. I carry out this procedure at least once a week
Positive as well as negative sides
This procedure has a whole range of advantages:
- This procedure can be performed both in the salon and at home;
- Low cost of tools, because to complete this we need to prepare an orange stick, a bath and scissors;
- The procedure does not take too much time, which is extremely important for a modern girl;
- If you haven’t had a manicure for a long time, then this procedure is the only way to get your hands in order;
- Maceration has virtually no restrictions, so it can be used by both men and women.
Like any procedure, maceration also has its negative sides:
- There is a risk of injury to the skin;
- There is a risk of infection. This occurs in cases where the instruments have not been properly disinfected;
- The rapid appearance of burrs is possible if the tools were poorly sharpened;
- The new skin layer grows quite quickly, so it must be removed quickly.