Design creation techniques
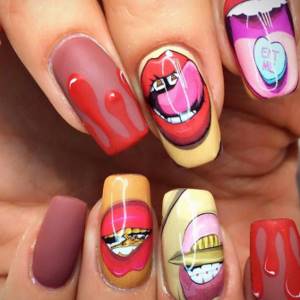
Considering the different decoration possibilities, you can decorate your nails with an unusual design in three ways. The first of them involves manual drawing of lips, and sometimes an entire composition. Lips can be simple, in the form of prints, with a tongue or lollipops. Some depict them together with part of the face, others complement them with streaks, giving the appearance of a watercolor technique of painting on a wet background. Manual creation of a drawing is convenient because it does not limit the master in selecting the best design. Drawings are created in different ways: one master uses a thin brush for this, another prefers to work with dots, the third even uses special pens with acrylic gel dyes. Sometimes a modeling gel is also used in the design, creating a voluminous print with it.
Everyone chooses their own technique, while it will be easier for a beginner to work with a brush or pen. Those who want to decorate an accent nail quickly and professionally can purchase ready-made plates or stamps with an engraved pattern for the design. This method of decorating a manicure will allow you to create a high-quality pattern of thin lines in a matter of seconds, and most of these patterns can be colored as you wish. If there are no stamps, and drawing seems like an overwhelming task, you can also buy ready-made stickers with lips. Gluing them onto prepared nails is easy. This will take no more than a minute along with straightening the nail. After the final sealing, the nail will look as if it was done by a professional nail salon.
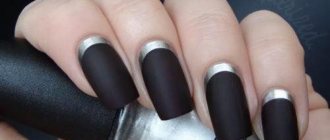
Red manicure is a bright classic
Passionate and confident ladies often choose red as the basis of an image or as an addition to it. A red manicure with lips will perfectly highlight a bright nature, unaccustomed to remaining on the sidelines. In such a manicure, both the lips themselves and the main tone can be red.
The photo shows a manicure with red lips, or rather, one of its variations. This is a very bright and festive option. It is perfect for a gala evening, a holiday with friends, New Year's Eve and many other events.
Make your manicure matte and it will look completely different. The matte red color is the epitome of style. Add a little sparkle and the look will be more fun and naive. But don’t be afraid of excessive brightness; you should choose light and delicate clothes, and your manicure will sparkle with completely different colors. Do not avoid brightness in details; it can always be “muted” with light and calm primary tones.
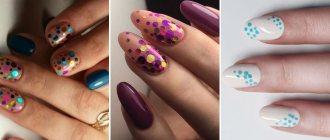
Types of sequins
Dragon scales on nails
Of course, we are talking about sequins for manicure. Elements of all sizes for nail decoration. There is a wide range of colors of sequins (confetti), including options with holographic shimmer or metallic glitter. The number of variations in shapes and sizes is impressive. Starting from small rounds, rhombuses, hexagons, to hearts and all kinds of drop-shaped shapes. There are also three-dimensional elements that create the effect of “dragon scales” on the nails.
Working with numerous types of sequins is very painstaking, especially for the smallest elements. Up to 180 scales can be laid out on one nail (refers to a full display). But more often, sequins are applied fragmentarily in geometric patterns. A spectacular shiny nail design is guaranteed in both cases!
What are they?
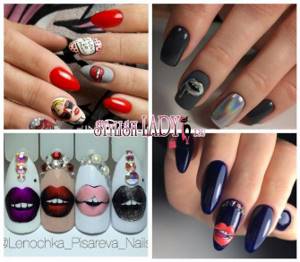
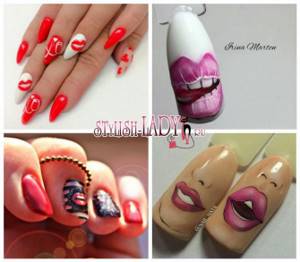
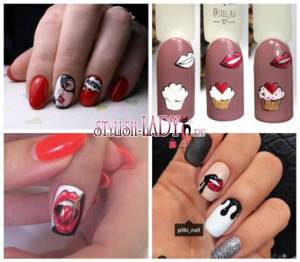
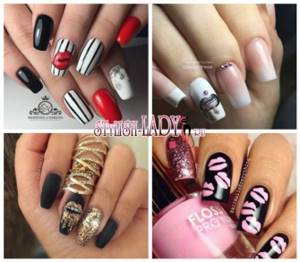
There can be a huge variety of lip manicure options.
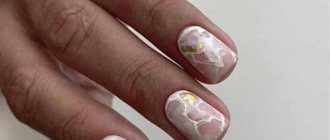
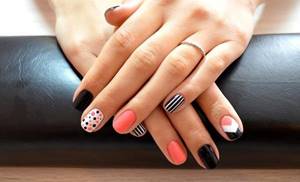
If your image suggests romance and lightness, then you should choose delicate pastel shades. For example, you can make pink lips depicting a kiss on a white or soft matte background. It all depends on the outfit. Nails must look harmonious with the image as a whole.
For bold and bright ones, you can choose the appropriate shades. The lips on the nails of such a girl may “scream” or the lower lip may be sensually bitten. Another original option could be lips painted in different shades simply on a white background. In this combination you can use stones and rhinestones.
There can be one lip on each finger, or several on one. Also, the image can be realistic or cartoonish, it can be glossy or matte, shiny and flashy, soft and laconic. It all depends on your imagination, mood and capabilities of the master.
The versatility of this design lies in the limitless number of variations and the ability to convey the inner state and character of any girl. The play of colors and shapes is all you need to tailor your manicure to suit you.
Drawings on nails with gel polish photo gallery
Bear on nails
Drawings can be done using the same colored gel polish using a thin manicure brush. By the way, you don’t have to buy expensive brushes designed specifically for nail design. All you need to do is pick up a thin brush at an art store and save a lot of money. We offer ideas for drawings that can be made on gel polish. We hope they will help you decide on your unique design.
For drawings you may need:
- Thin brushes;
- Dots, which is a rod with a ball at the end. With the help of dots you can make various designs in the form of polka dots, balls, flowers;
- Palette (piece of foil, plastic or thick cardboard, plate);
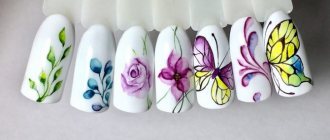
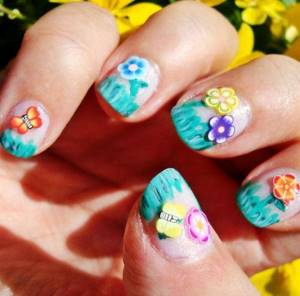
To draw flowers, you can use a dot or a brush. After applying the base and color coating, you need to remove the sticky layer using a degreaser. Then a drawing is made in the form of flowers on two or three fingers, then dots are placed in the middle of the flowers, and also as additional elements in the design. The drawing is dried in a UV lamp, then covered with a top coat. We choose dark tones of varnish as the main color (in this example it is dark blue, almost black). The flowers are made with a light varnish of the same palette - soft blue. The centers of the flowers are applied in the same color as the main color on the nails, and are also refreshed with white gel polish. You can choose a light gel polish color as a base, and choose a darker one for drawings.
Nowadays it is very fashionable to decorate each nail in its own style. The main thing is to combine colors correctly. Choose three harmonizing colors, highlight two or three fingers (ring and middle) with a special, interesting design. To make a drawing, as in the photo below, you need:
- Prepare your nails for gel polish (manicure, remove shine with a buffer for natural nails, degrease the nail plates, primer). Apply base coat and dry in a UV lamp;
- Cover the thumb, index finger, and little finger with black gel polish. Cover the middle finger with white varnish. Unnamed with delicate light coral gel polish. Dry in a UV lamp and apply colors in a second layer, dry again. Some colors may need a third coat. After drying, you need to remove the sticky layer;
- Using a dot, apply polka dots of different diameters to the middle finger with black and coral gel polish. Do not use too much gel polish so that the design does not spread. Each nail can be dried separately or together;
- We make stripes on the two little fingers, as well as on the index finger of one hand. This can be done carefully with a thin brush, or use suitable stencils. If you use a stencil, you should try not to get gel polish on the stencil itself; dry it in a lamp together with the stencils.
- At the end, we cover the nails with a top coat and dry them again in the lamp, remove the sticky layer, and apply oil to the cuticle.
Cute designs on gel polish can be made using stamping. This is a special print with discs that will allow you to easily transfer and print the design on your nail. Stamping should be done with regular varnish after applying the top coat and removing the sticky layer.
You can lay out a beautiful design or pattern with rhinestones of different sizes.
It is not necessary to paint with paint or gel polishes; the design can be easily obtained by gluing a suitable sticker with a design under the top coat. Neat, stylish and reliable!
Drawings can be made using velvet powder, which is glued (sprinkled on top) onto the applied design with glue or gel varnish. There is no need to cover the velvet pattern with top.
Nail designs can be made using the casting technique. The results are sparkling patterns that imitate gold or silver.
Manicure with color transition using baby boomer gel polish
A gel polish manicure with a color transition called “baby boomer” is done like this:
- After drying, a light beige flower garden is applied to oil-free nails coated with primer and base, covering each plate entirely. You will need 2 layers, both need to be dried.
- Apply white varnish to the tip of the foam sponge and blot this layer on the foil. You just need to touch the glossy surface with the product several times.
- Then tap the sponge along the free edges of the nails, almost to the center of the plates. The first layer must be dried and the second must be applied in the same way, and after the next drying, the third. The finger is again sent into the lamp, and the fourth layer is applied with a sponge. After drying, cover the nails with a non-sticky top, leveling them out. This is followed by final polymerization.
Selection of colors and decorations in a design with lips
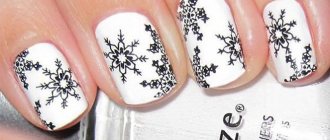
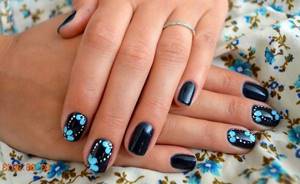
Cute snowflakes on nails in winter manicure 2019-2020 photo design ideas with snowflakes
This is an extraordinary choice of design for manicure, which is why it is used by brave, even daring girls and young women. They have a good sense of humor and good taste, because with such an unusual design you can very easily go too far and get a vulgar picture instead of a fashionable and stylish image.
Most popular colors:
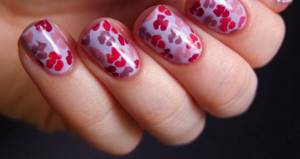
- All shades of red and wine. Traditional red lips in the form of a kiss imprint do not go out of fashion, but no one forbids using more complex shades, for example, coral, fuchsia, salmon, ruby, burgundy.
- Pink lips are a beautiful girly option. They can be light, barbie-colored, or closer to peach, flamingo.
- Light tones of varnish are excellent as a background for work - white, cream, flesh, pinkish, light yellow, pale gray and so on.
- A black or white background is practically a classic.
- Gold, silver, glitter or mother-of-pearl rubs will add a special festive touch to your design.
- Very bright “acid” paints. This choice is mainly made by creative and spontaneous youth. With the right combination of colors it turns out very impressive and elegant.
To make the drawing look even more interesting, the following types of decor are added to it:
- Rhinestones. A shiny pebble on the “lip” of a drawn mouth looks appropriate and even elegant. You can also decorate other nails with such rhinestones, it will turn out catchy and festive.
- Piercing. This interesting element is best used on extended nails, because your own may not withstand drilling and stress. Artificial nails will easily “survive” the procedure and will look stylish and fashionable next to the “kiss”.
- Multi-colored shimmer and glitter. Glitter will immediately make any manicure festive.
- Kamifubuki are multi-colored sequins that can be used to create almost any pattern.
- Lace. Their use will help make an already catchy design even more daring and extraordinary.
To complement the “kiss” you can use other images that are combined with this motif. It can be sweets, cherries, strawberries, various inscriptions. But the lips themselves are the focal element, so you should be careful with additional decor. Otherwise, a spectacular design will quickly turn into a motley disgrace.
There are several methods for creating such a design:
- Hand drawn. The manual technique is unique, but requires a lot of experience and a “steady hand.”
- Using sliders. This is the fastest and most accurate way to get a beautiful drawing. There are a lot of kissing options.
- Rhinestone inlay. You can post just the outline or the entire image of the lips.
- Stamping is a simple way to obtain a silhouette pattern. You can paint it or add catchy and bright elements.
- Deep design, in which the image appears in relief.
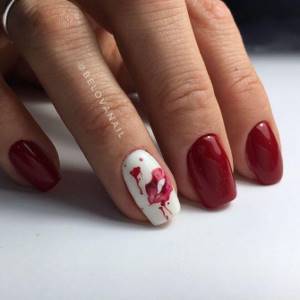
How to paint lips on nails
Even if you don't have any special artistic talent, it's not important for drawing a kiss.
It is important to have desire, perseverance and patience. Everything will work out great after a little practice
Any design on nails will be beautiful only if you have well-groomed and neat hands, so first of all you need to perform a hygienic manicure, correct the shape of your nails, and go over them with a buff to level the surface. These are important steps, because any design will look impressive only on even and smooth nail plates.
You can come up with your own version of the drawing or borrow it from experienced craftsmen. There are quite a lot of options, you can always find something to suit your taste.
In order for the drawing to be not only beautiful, but also durable, you need to do everything correctly:
- Cover your nails with base polish and dry the layer.
- Apply two layers of background varnish, also dry well.
- Place two small drops of scarlet varnish on the nail (the color depends on the author's idea).
- Quickly and carefully, use a toothpick to make a drawing, spreading the paint in the shape of lips.
- Dry the work.
- Cover with clear top varnish. It will protect the drawing and give it greater depth and accuracy.
If you have the opportunity and desire, it is better to draw lips using a very thin brush. This way you can get the most realistic three-dimensional image.
“Kiss” on nails is a stylish and fashionable decoration that requires very good taste from a woman so as not to become vulgar.
How to draw lips on nails: step-by-step master class
If you have no experience in drawing on nails, painting lips is a good basis for experimentation. This design does not require outstanding artistic abilities. All you need are materials, patience and a little time to practice.
Before you start painting, it is important to do a hygienic manicure: remove the cuticle, give the nail plates the desired shape, and sand the surface with a buff.
In order to choose the best design option, you first need to familiarize yourself with the works of nail art masters. For the query “pictures of nails and lips,” the search engine will return many options for the desired manicure.
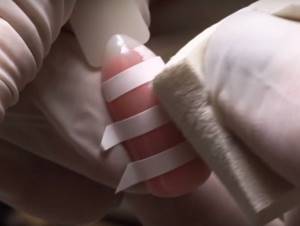
You can draw lips on your nails step by step as follows:
- Apply base coat and dry.
- Cover your nails with two layers of varnish, chosen as the background.
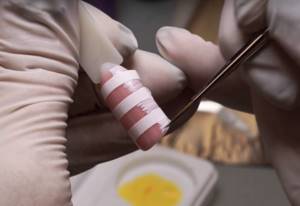
- Place 2 drops of red polish on the nail plate - they will subsequently turn into sponges. Using a wooden stick, stretch each of the drops, creating a silhouette of the lips.
- Apply a top coat to make your manicure last longer.
If you have experience in painting on nails, the image is made using a thin brush - this way it turns out more realistic, with drawn folds.
More complex versions of the nail art in question using the gel polish technique are presented in the video below.
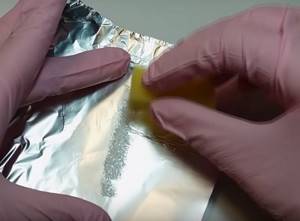
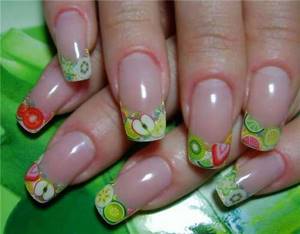
How to use fimo fruit sticks in nail design
Gel and acrylic
Acrylic nails with fimo
Fimo is in most cases used to create gel or acrylic manicure. The technique is as follows: a starting coating is applied, then fimo plates are applied. For better fixation, fimo is glued to the nail plate using glue for tips. After this, an additional design is applied: a pattern, sparkles or rhinestones. At the end, the nails are covered with a fixing layer of gel or acrylic. A detailed master class on creating a gel manicure with fimo can be viewed below.
Fimo nail design with regular polishes
Bright fruit sticks can even be used for home design, and with normal use you get a real 3D manicure. To create three-dimensional nude art you will need the following:
- - fimo (it’s better to buy already chopped),
- - base coat,
- - colored varnish for the background,
- - glue for false nails or household super glue,
- - fixative,
- - nail file,
- - rhinestones (optional).
If you purchased fimo in the form of a stick, then initially it should be cut into thin slices. The stick is quite elastic, so you need to cut it with a hard, sharp and thin blade. This procedure should be performed only on a flat and hard surface.
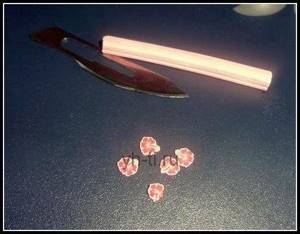
Cutting fimo
The technique of creating a manicure with fruit “cuts” is extremely simple. Initially, apply the base coat and background coat to your nails. (I also glued fimo onto the finished manicure using a sponge.) When the polish dries, glue fimo onto the nail. Try to glue the decorative element away from the cuticle. When the fimo sticks securely, you can sand it a little with a nail file, thereby reducing the thickness. After this, apply a topcoat.
Fimo for regular varnish
Manicure with fimo and rhinestones under clear varnish
Fimo for gel polish
Necessary materials:
- base coat,
- color gel polish,
- fixing coating,
- degreaser.
Gel polish is a stronger coating than simple varnish, and therefore any decor underneath will adhere better. In an article about how to use gel polish at home, I described in detail the technique of applying and removing such a coating along with the design. To describe it briefly, the base is first applied, then dried in a lamp, then the main color and fimo, dried again in a lamp, and finally the fixative (top) is applied, it is advisable to apply 2 - 3 layers, each dried in a UV lamp. The manicure will be very durable.
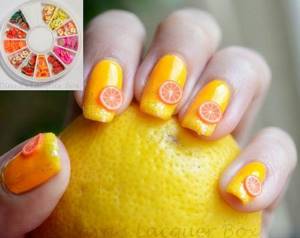
Fimo for gel polish
Well, and finally, a few more photos with manicure options with fruit sausage.
How to transition nails with airpuffing
The transition on nails with a gradient manicure using air puffing should be done as follows:
- A darker shade of varnish is applied to the prepared and base coated plate, covering it completely.
- This layer must be dried.
- Place a little dense gel polish or gel paint of a lighter tone on a clean palette.
- It must be collected by air puffing, tapping the product with the soft tip of the tool.
- Then the same is done at the base of the nail so that the border with the darker color is blurred.
- The finger should be placed in the lamp.
- Then a new, smaller portion of light gel polish is placed on the palette, collected by air puffing and applied with a tapping motion as a second layer to the same area of the plate.
- Border shading is done with the clean side of the device.
- The finished design is dried.
- All that remains is to coat the nail with topcoat and place it under the lamp again.
After use, wipe the instrument with a cloth moistened with a cleaner.
Where and what to rub
Finely ground glitters fit perfectly onto a sticky layer of gel polish, gel paint or acrylic. Sprinkle with pigment and carefully distribute over the entire plate. Afterwards, shake off the excess and cover with a top coat so that the beauty lasts as long as possible.
If desired, the rubbing can be done using regular varnish, but the work will be very painstaking. Good old varnish, as everyone knows, does not dry quickly. And you will have to guess the moment when it still retains stickiness before hardening, and rub in the pollen. Be sure to apply a topcoat, otherwise the luxurious effect will last only until the first hand wash.
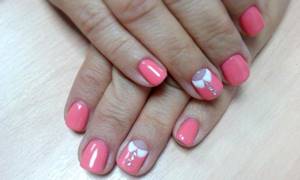
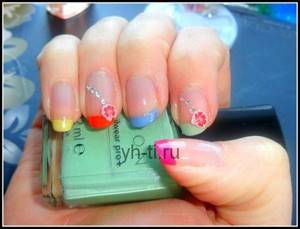
gentle manicure with hearts and lips photo new
- Manicure 2021 for Valentine's Day Instagram
- Manicure 2021 for Valentine's Day Instagram
- Manicure 2021 for Valentine's Day Instagram
- Manicure 2021 for Valentine's Day Instagram
- Manicure 2021 for Valentine's Day Instagram
- Manicure 2021 for Valentine's Day Instagram
- Manicure 2021 for Valentine's Day Instagram
- Manicure 2021 for Valentine's Day Instagram
- Manicure 2021 for Valentine's Day Instagram
- Manicure 2021 for Valentine's Day Instagram
- Manicure 2021 for Valentine's Day Instagram
- Manicure 2021 for Valentine's Day Instagram
- Manicure 2021 for Valentine's Day Instagram
- Manicure 2021 for Valentine's Day Instagram
- Manicure 2021 for Valentine's Day Instagram
- Manicure 2021 for Valentine's Day Instagram
Valentine's Day is approaching, and to make the holiday a success, choose a beautiful manicure 2021 in advance.
On Valentine's Day 2029, your nails should look flawless and you should shine and bloom like a bright flower in a winter garden.
Show a little imagination, add a drop of creativity, love of life, take a little time, and conjure up the design of your nails 2021 for Valentine's Day.
No matter what you prefer - stunning flashy designs, understated classics or just black and white - it's all there in the list of the trendiest nail designs for Valentine's Day 2021.
The editor in chief has compiled a photo gallery of fashionable manicure options 2021 for Valentine's Day.
Useful tips
- Apply a generous amount of glitter powder onto pearlescent nails. This is how they will look most impressive.
- Do not use the rub together with a matte top coat. The last remedy will remove shine and shine from the surface of the nail.
- If you apply shimmering pollen with your fingers rather than with a brush, it is better to degrease them first. In this case, the secreted sebum will prevent the coating from being damaged and will make the nail art more durable.
- Before starting the process, it is best to thoroughly polish the nail plate. The shimmering powder will fit perfectly onto the prepared surface.
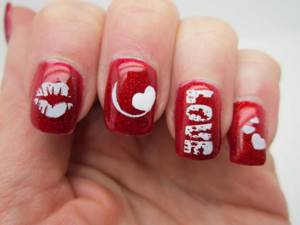
Lips on nails - cool design for Valentine's Day
If everyone does a hygienic manicure, then the coverage depends on the girl’s fashion and tastes. Young people most often opt for brighter and more creative methods of decoration, while older ladies more often use high-quality single-color coatings. Of the decoration methods that are fashionable this season, the most attractive and unusual is the image of lips on the nails. In addition, this manicure is ideal for celebrating Valentine's Day on February 14th.
Design ideas
- Rub-on or pearlescent varnishes are at the top of this list. They will be a great addition to any outfit and look.
- An excellent option would be a print in the form of lace or hand-painted with a pearl sheen. This nail art will look very feminine and romantic. Delicate mother-of-pearl patterns in the form of flowers or monograms on the nails look especially beautiful.
- You can achieve an interesting effect by decorating your ring finger or thumb with pearl powder. It is better to leave the rest of the nails matte and plain, applying white pearlescent shimmering nail polish to them.
- Nail plates decorated with a small amount of shiny beads will look no less beautiful. You can decorate several fingers with them.
- Lunar manicure or pearlescent jacket are some of the best options for decorating your nails. You can add variety to this nail design with the help of shining pebbles, ready-made stickers or hand-made artistic painting.
“Northern Lights” manicure design
- Remove the sticky layer from prepared nails. Apply primer and then base to them. Cure in a lamp.
- Paint your nail plates with dark gel polish in two layers. Repeat curing and then apply top coat. Dry under the rays of a lamp.
- Apply a white pigmenting agent to the top coat with a cotton swab, brush or sponge. Remove any remaining rub from the side rollers on your fingers.
Gradient gel polish using a sponge and stencil
A gradient of gel polish using a sponge and a stencil turns out to be very catchy, so you can design one or two nails on each hand like this:
- The plate is covered with base and dried. The surfaces of the nails on which the stencil needs to be glued are treated with a buff.
- Use a napkin to remove sawdust. The stencil is separated from the base with tweezers and attached to the nail. You need to smooth it out, fix it well and use scissors to cut off the parts that are outside the plate.
- Strips of gel polish are applied to the palette in the order in which they want to be seen on the nail, layering one color on top of another and blending the transitions. There can be 2-3 shades.
- A sponge is applied to this multi-colored print. And then it is leaned against the surface of the nail with a stencil so that the open areas are painted.
- Now you can peel off the protective film by carefully picking up the edges with tweezers and pulling in the direction of the design. The finger must be placed in the lamp.
- A top coat is applied over the dried gel polish. It is also polymerized.
A striped gradient is also made using stencils:
- The strips are glued onto a dried camouflage base across the plate.
- The remaining open space is painted with white gel paint on a third of the nail.
- Each mini-strip is shaded with a sponge closer to the middle of the plate.
- Dry and repeat steps 2 and 3 a couple more times.
- After the next polymerization, the strips are removed, the nail is covered with a top coat without a sticky layer, and dried.
- New stencil devices are glued again across the plate, but this time covering the gradient.
- Gel paint in 3 layers is applied to the open stripes, only on the other side of the nail and almost up to half of it.
- Each time it is shaded with a sponge and polymerized without removing the stencil.
- After drying the 3rd layer of white gel paint, the strips are peeled off.
- The last step is to apply topcoat and dry.
Watch the video on how to make a gradient with gel polish using a sponge and stencil:
How to do a manicure with lips
This design looks quite interesting and unusual, so it will definitely not go unnoticed. But still, a lot depends on the chosen method of application. The most popular is drawing. It presupposes certain artistic abilities. In addition, the process will require brushes and paints.
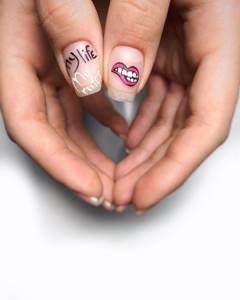
As for the complexity of applying the design, a lot depends on the chosen pattern. For example, even a beginner can apply a small image of lips. But still, more often they are drawn with a tongue or candy. Of course, implementing this option will be somewhat more difficult. At the same time, the advantage of the drawing is that you can add details yourself.
For newcomers to the world of nail art, we recommend choosing a different method of creating a design. We are talking about special stickers that can be purchased in almost every specialized store. There is a wide variety of designs to suit every taste. We also note that the stickers are quite bright, so they will look great on any basis.
There are two types of stickers, which differ in the method of gluing. The first one is as simple as possible. You need to cut out the fragment you like from the whole sheet. After which it is enough to separate the bottom layer and transfer it to the nail plate. For the second option, you need to collect warm water in a small container. After which the cut fragment is placed in it for literally a few seconds. When the bottom layer begins to peel off, you can safely transfer the drawing
It is very important at this stage to smooth it out well with an orange stick. For better fixation, apply a layer of clear varnish on top.
And, of course, there is another option for applying a pattern in the form of lips - stamping. It is used not only by professionals, but also by beginners. The main thing is to practice a little on paper before starting on your nails.
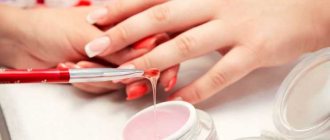
This method is not as budget-friendly as previous options. The fact is that in the process you will need the following: a plate with drawings, a scraper, a stamp and varnishes. After the nails are prepared, you need to apply the base color and wait until it dries completely. Only after this you need to apply a little varnish to the selected pattern and remove the excess with a scraper. Immediately, without wasting time, use a stamp to transfer the design to the nail plate. The result is a beautiful, clear design in just a few seconds.
By the way, you can remove polish that has imprinted on the skin around the nail using a cotton swab and nail polish remover. You can also apply a little good nourishing cream to your skin before working on your design. After this, all that remains is to remove the varnish with a simple cotton pad.
Manicure with lips is a beautiful, bold option not only for events, but also for everyday life. The main thing is to choose the most suitable shades and apply the design correctly. And small details in the form of sparkles and rhinestones will help to emphasize several nails.
Who is this manicure suitable for?
A manicure with lips can be chosen for absolutely any girl, because there are a great many options for combining colors, shapes and materials.
The mood of the manicure wearer will be conveyed by the shape of the lips on the nails. They can depict a tender or passionate kiss, screaming, boredom, irritation, laughter and many other emotions. You can be romantic, daring or shy, a lip manicure will say it all for you. Therefore, such a design would be appropriate on the hands of any representative of the fair sex.
You may be interested in: Nail design with red gel polish: ideas, fashion trends
A manicure with lips will look equally good on both short and long nails. The shape of the nail will also not matter, and the artist will be able to adapt the design to both oval and square shapes. The design can be applied using varnishes and gels, or you can use ready-made stickers.
How to draw certain pictures
Getting a manicure with a pattern is not always as difficult as it might seem at first glance. The simplest design option that can be done at home is a manicure with emoticons.
For example, it is better to make dark emoticons on a light background and vice versa. It is not necessary to draw circles, but faces in them; you can draw a smiley face on the entire plane of the plate. This manicure with a smiley pattern can be done with either regular polish or gel.
You can also draw other funny and amusing drawings at home. For example, a very simple option is “SpongeBob”.
SpongeBob will become a trendy nail design in the summer, because the plate will be painted yellow. So, to get a SpongeBob design, you should prepare all the necessary tools in advance: a fan brush, an oblong thin brush for drawing small details, acrylic paints.
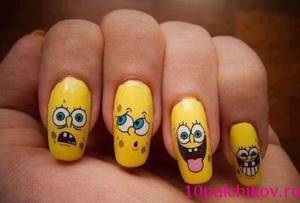
Initially, cover the plate with yellow using a fan brush. When the yellow layer dries, draw two circles in white, which will be the future eyes. In the white circles we draw the pupils in blue.
To make SpongeBob, be sure to add eyelashes to the eyes. Next, draw the mouth. There can be many options here; you can draw a face that smiles, grimaces, gets angry, etc. Next, draw the teeth in white. Draw small details, including the nose, with thin black lines. The SpongeBob design should be completed by covering it with a transparent finish.
You can also make other beautiful designs on your nails. Recently, youthful and at the same time funny designs on nails have become increasingly popular. For example, you can draw a panda.
To perform a simple and beautiful manicure on nails with a panda, you need to prepare white and black varnish or paint. Where to start drawing a picture at home? You need to start doing a panda-style manicure by drawing the face.
Using a brush, use white to create a rounded muzzle along the free edge towards the middle of the nail. When the varnish or paint has dried, you can start drawing small details, for which we will need a dot brush with a medium ball. At the top of the circle we put two large dots with black paint - these are the ears of the future panda. Next, in the center of the circle we place two smaller black dots - these will be the eyes.
Inside the black dots we place two more white dots. Just below we put one small black dot - this is the panda’s nose. After completing all these steps, you need to wait a few minutes for the paint or varnish to dry, after which we cover the manicure done at home with a panda with a transparent finish.
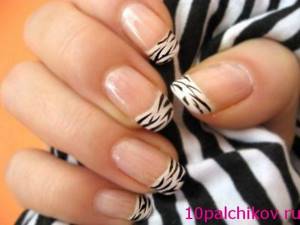
At home, you can apply not only animal faces to your nails, but also repeat their body color. So, you can get a beautiful and at the same time simple design on your nails in the zebra style. It is worth noting that a zebra manicure is quite easy to do and requires only black paint and white polish.
So, in order to get a beautiful zebra-style design on your nails, you must initially apply white varnish to your nails as the base for the future design. Next, when the base dries, we begin drawing the dark stripes. For this we need a thin, oblong brush. You can make black stripes either thick or quite thin, it all depends on the length of the plate.
To complete it we will need white varnish for the base, brown, white, black and red paint. We draw the muzzle of a deer with brown paint, its nose will be made with red paint, we outline small details with black color and draw the horns, and we draw the eyes of the animal with white color.
You can diversify the cool designs on your nails described above by drawing a peacock feather. What are the easiest ways to draw a peacock feather? A multi-colored peacock feather is a rather complex manicure option. If you want to decorate your nails, but have never painted a peacock feather before, then it is better to do it with a single-color paint, for example, black.
We begin to draw a peacock feather: in the corner of the plate with a thin brush we create a small ball, then from the ball we draw a fairly long “branch” - the basis of the future feather. From the base we draw horizontal “branches” in short, they should be as thin as possible. After completing this stage, you can color the design if you use colored foil, which we transfer onto the plate using varnish. The pen can be made on a pre-created color base.
French gradient gel polish
French gradient gel polish is done so that the tips of the nails are highlighted in a lighter or darker tone or several:
- The prepared plates are treated with a dehydrator.
- Then an acid-free primer and a thin layer of base are applied to the nail and dried.
- From the base to a third it is painted over with dark varnish.
- The remaining clean part up to the free edge is covered with a lighter tone.
- Using a comb brush, making small movements across the nail, pull the dark color towards the end, periodically wiping the pile on a napkin.
- This layer needs to be polymerized.
- Then steps 3-5 are repeated, only the border should be shaded more carefully, and the nail should be painted with a thin brush near the cuticle.
- After drying, a top coat is applied and polymerized again.
Watch the video on how to make a French gradient: