The laid-out French jacket is distinguished by the correctness of its lines and shapes. It is one of the most beloved and popular types of manicure among many women. Interest in it has not waned since its appearance. French design looks sophisticated and elegant. It is appropriate in any setting and will go with any costume. In recent years, many varieties of French have appeared. It can be done on short nails with regular polish in half an hour or you can spend more than 3 hours on competitive extensions.
The requirements for French manicure are very high. Its beauty lies in its ideal lines and shape. A real French jacket is made only by laying out. French gel nail extension is a complex and painstaking process that requires perseverance and concentration. But the result is worth it. It is recommended to do extensions on disposable paper forms. This method is simpler and more convenient.
Required tools and materials
You will need a manicure set, files of various abrasiveness, buffs, a product for removing skin near the cuticle, a base for gel and finishing gel, a tube for forming an arch and tweezers, as well as transparent, camouflage and white gels. Camouflage gel imitates the color of natural nails. Gels should be chosen not liquid, but not too thick. They should not spread when applied.
In addition, you will need an ultraviolet lamp and a sticky layer remover. You should also prepare lint-free wipes, cotton pads, a brush to remove dust and cuticle oil.
How to extend French nails: step-by-step instructions
Let's start creating your own French manicure. Prepare your work area and make sure it is well lit.
- we work through the cuticle properly , pushing it back without leaving any areas that have not been pushed back.
- a nail file to remove the shiny coating of the natural nail.
- We file down the side skin ridges , this also helps to create a beautiful nail shape.
- We coat the nail first with a dehydrator , then with a primer .
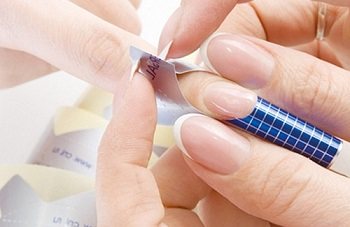
- We select the shape according to the size of the nail , place it under its free edge.
- If we are doing extensions on tips, then we glue the tips , and when the glue sets, we file off the shiny layer of the tips. If stained glass extensions are being done, then we choose only transparent tips.
- Using camouflage gel or transparent pink gel , if stained glass extension requires it, we lengthen the natural nail plate . If in-lay extensions are done, then the white smile will be applied adjacent to the beige or pink gel, and in other cases on top of it.
- Don't forget to thoroughly dry the layers in a lamp . We are waiting for high-quality polymerization of materials.
- Removing the sticky layer.
- We give the free tip the desired shape, and also check that the thickness of the nail plate is the same everywhere.
- We polish our nails with a buff.
- We cover it with a finishing coat , which we dry again in a lamp .
- Rub caring oil .
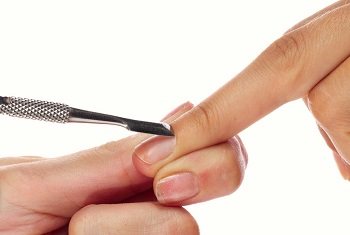
Before extensions it is necessary to treat the cuticle
Nail extension process
Manicure can be done both in a classic version and in an unusual design. Watch a master class on how to build a bright rainbow jacket:
Preparing for gel extensions
Before the procedure, hands must be disinfected. If microbes remain under the gel layer, they will have ideal conditions for reproduction. A clogged infection can give rise to the development of a serious disease of the nail plate or skin.
After applying the disinfectant, the skin near the cuticle is removed, and the cuticle itself is carefully pushed back with a spatula.
The nail plate is treated with a nail file and then polished with a buff. The treated nail is degreased and covered with a primer, which ensures a strong connection of the gel to the surface of the nail.
The next step is applying the base layer under the gel.
It needs to be made very thin. This layer is especially important for people with problem nails.
It smoothes the surface and improves the adhesion of coatings to the nail plate.
Setting up the form
The form is set. Ideal modeling is only possible with the correct setting of the template. The template plays the role of a pattern for a future manicure. Since everyone's nails have different shapes, the template needs to be adjusted to the specific type. From the application form, you need to cut out a template that best suits the shape of the nail type. It is inserted under the free edge of the plate, tightly adjacent to the skin. A correctly installed template resembles a tube sticking out slightly upward. This installation will allow you to simulate a thin but strong nail. The longer you plan to grow the nail, the smaller the angle of inclination of the form should be.
Modeling the arch and free edge of the nail plate
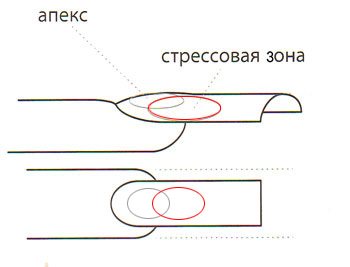
A special tube is installed on the free edge of the form to model the arch. The tube seems to be wrapped in a mold. If you look at the end of the nail plate, you will see that it is curved in the form of an arch. An arch with a 50% bend is a semicircle. This is the perfect shape. It visually lengthens the nail and makes even spade-shaped nail plates much more beautiful. Such nails are also called “pipes”. The correct bend makes gel nails more durable. The tube helps to form the free edge of the nail plate with the desired bend.
The bend can be formed in another way. Having modeled the nail with gel, the plate is immediately compressed from the sides with special clamps after a short drying. At home, such clamps can easily replace ordinary tweezers. You can use the tube and tweezers at the same time by pressing the additionally formed tip after polymerization.
After installing the mold, a layer of transparent gel is applied to it. Using the gel, the length of the free tip of the nail is modeled. The gel is applied with light rubbing movements both on the smile line and beyond. The dried layer is slightly compressed from the sides with tweezers. The plate must be compressed first on the stress zone, gradually moving towards the edge of the nail. The stress zone is the highest point on the surface of the natural nail plate. After compression, the coating is dried a little more and washed down. When filing down the free edge, you need to ensure that the side lines of the tip are strictly parallel to each other.
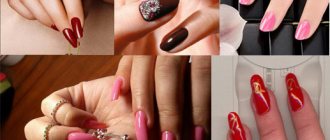
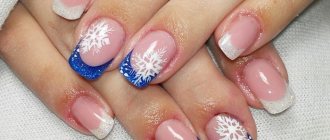
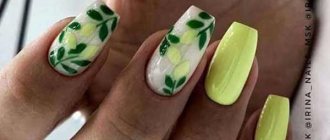
Colored French 2021 fashion trends photo
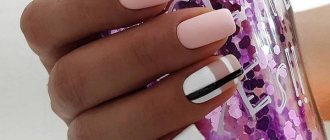
From year to year, manicurists try to surprise their clients with new trends and original ideas. They do it very well, because manicure these days not only attracts attention, but also makes you admire the work done. Stylists advise making it as natural as possible, which means that women’s nails should be short or medium length. This manicure is convenient and practical, it looks great on beautiful, well-groomed hands. As a separate type of colored French manicure, I would like to highlight a unique nail design, in which the strip is made in the form of a pattern or highlighted by any other elements. You can play with the shape of the tip of the nail. For example, make it beveled, shaded and even blurry. The main condition is to highlight the smile. Floral prints, ethnic patterns, hieroglyphs are excellent decorations for the tip of the nail. There are even special transfers. You can use rhinestones. However, so that the manicure does not look tacky, it makes sense to decorate one or two nails with such beauty, no more. Thus, modern fashion, although it offers a lot of decorations, still does not tolerate overload, which can be created by an excessive abundance of details.
Modeling on the natural nail area
Camouflage is applied to the natural nail area in two layers. The first layer models the smile line and the bevel to the base of the nail. It is polymerized for about 4 minutes. The second layer is applied after the first has polymerized over the entire area of the natural nail. When laying out the gel around the cuticle, you need to back off a little. There should be a small gap left. “Pushing” the material into the cuticle skin can injure it. In addition, if the coating is too close to the cuticle, it will not be possible to file it down thoroughly. If you do not remove the “step” of the gel, the material may peel off over time. The worse the condition of the cuticle, the greater the distance should be. If everything is carefully filed and polished, this distance will not be visible later.
The camouflage layer is covered with a transparent gel. After drying the transparent layer in a UV lamp for about 2 minutes, the mold is carefully removed. After removing the excess sticky layer with a napkin, you can begin to treat the smile line. The quality of the laid out jacket depends on the result of processing this line. It should be sawn perfectly evenly. Next, the surface of the gel coating is carefully filed and polished. Near the base of the nail plate, the coating should disappear. The free edge of the nail is modeled with a file.
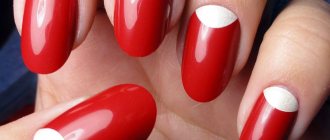
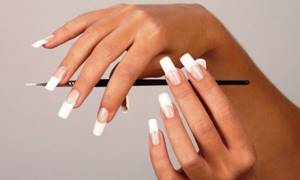
Classic French manicure
Many girls and women prefer the classic version of French manicure. It allows you to keep your nails looking great, regardless of the dress code at work or school. Minimal decorative elements are acceptable. See photos of new classic French nail designs in 2021.
Our editor's solo project

When did Kurt Russell's heroes stop being heroes? www.bunnycup.ru
Formation of the white tip of the jacket
When everything is ready, remove the gel powder with a brush. White gel is carefully applied to the tip of the nail in two layers. After polymerization of the bottom layer for about 15 seconds, you need to slightly compress the plate with tweezers so that the shape of the arch is maintained.
After this, continue polymerization for another 2 minutes. The second layer should be the same level as the smile. This layer is dried for 2 minutes, after which the sticky layer is removed. Nails modeled with gel are trimmed with a nail file. The entire surface of the coating is also filed and polished. Do not over-saw the stress area. The strength of the manicure depends on its thickness. You need to check that the tip of the nail is the same thickness along its entire length and not too thick. If everything is done correctly, the dust is removed with a brush.
The finishing coat is applied last. The shine of the French coat depends on the quality of the finishing material. There is no need to skimp on this product. A poor-quality finish will not give the desired shine, but a good gel finish will help avoid darkening or yellowing of the surface.
It should be noted that all layers of gel must be applied to the end of the nail. At the final stage of the French lay-out, it is recommended to apply cuticle oil.
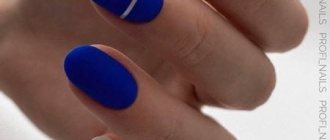
Matte French 2021 fashion trends photo
The use of a matte base is simplicity, which is associated with impeccable taste. This manicure is relevant both for every day and for holidays; you won’t be embarrassed to wear it in society or in the office.
Matte French manicure 2021 suggests that preference is given to pastel colors; dark gray or black also looks impressive. The edge, on which golden or silver varnish is applied, adds piquancy to the composition and acts as a highlight.
Source Share this article with your friends, don’t forget about them