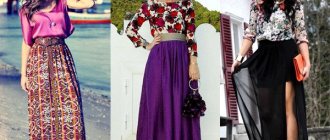
Advantages of the model
The attractiveness and demand of the model is based on the ability to emphasize the advantages of the female figure, regardless of the age, height and physique of the owner of the product.
Putting on a skirt that just needs to be wrapped around, refusing to use fasteners, the girl:
- draws attention to the waist;
- visually reduces hip circumference;
- increases the attractiveness of legs.
It's all about the design and shape of the smell itself or the cut created with its help. Most often it is a triangle, revealing to the eyes of those around part of the beauty’s leg above the knee, and sometimes even up to the middle of the thigh.
This skirt model can have any length. For example, mini and midi products are very popular among students, schoolgirls, and office workers. The scent on a long (floor-length) skirt makes summer holiday outfits and evening dresses unusual.
The advantage of a wrap skirt is that the products are made from light and dense fabrics, bringing to life unusual, comfortable styles and styles.
The overlay of one panel of the skirt on another becomes a decoration of the product in the style:
- pencil;
- tulip;
- bell;
- Tatyanka;
- half sun;
- trapezoid
An unexpected and interesting decision by the fashion designers was a skirt, the decoration of which is an imitation of the smell. Craftsmen refuse to use fasteners, making models without side seams, and buttons serve as a decorative element. The style chosen by the fashion designer should emphasize, first of all, the smooth lines and curves of the female figure.
Products whose length reaches the knee or covers it are in demand. Most often this is a tulip skirt (for those who want to visually enlarge their hips) or a pencil skirt (for those who are embarrassed by a significant volume of hips). The texture and color of the fabric chosen for sewing a wardrobe item are important.
Despite the positive qualities of the described model, a significant advantage is its ease of manufacture. A novice craftswoman will be able to sew a skirt, using the instructions and refusing to use complex patterns.
Which material is suitable?
At any time of the year you can meet a girl in a similar outfit. In the summer heat, many flaunt light, flowing skirts made of silk or chiffon, and protect themselves from the winter cold with leather or suede outfits. This is a comfortable, non-binding item, suitable for everyday wear and special evenings.
You can easily sew this product yourself. A long wrap skirt is easy to make, especially the tie model.
Today, many print publications, such as Burda magazine, offer step-by-step sewing instructions, patterns and useful tips.
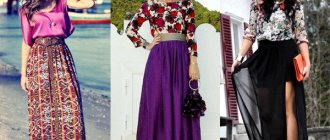
The long wrap skirt has many variations and colors. In addition to plain models, there are also outfits with various prints:
- animalistic;
- cell;
- geometry and ethnoprint;
- optical illusions and holography;
- floral.
In addition, such a skirt can be made of various materials:
- cotton;
- linen;
- silk;
- chiffon;
- viscose;
- velvet;
- atlas;
- leather;
- suede, etc.
You can find a skirt of almost any style from light fabrics, but from denser fabrics, such as leather, simple and laconic silhouettes are often sewn, since this material is difficult to drape.
How to choose the right skirt
To achieve the desired effect and make the figure more attractive, you need to choose a model that will visually increase the owner’s height, make the waist thinner, and the hips rounded, but not full. There are certain rules, according to which it is better for tall girls to choose short models, thin ones - tulip, loose ones (Tatyanka, half-sun), full ones - pencil or straight ones with an asymmetrical wrap.
When choosing a model, you should take into account the features of the girl’s figure:
- You can visually increase the volume of your hips with the help of a flounce decorating the edge of the wrap.
- A high belt and an oblique line that defines the border of one panel of the skirt overlaying another make the fashionista visually taller.
- A triangular cut is a way to draw attention to the legs while hiding the less attractive part of them.
- Trapezoid is a model for thin, short beauties.
Straight models look best on overweight women, especially in cases where the product is cut in such a way that the skirt is flared towards the bottom.
Thanks to modern designers, the wrap skirt has become the most fashionable trend and today is included in all the latest collections, regardless of the season. These models become the basis of popular costumes and interesting ensembles. Despite the fact that modern women prefer trousers and shorts, the wrap skirt still remains one of the most popular models due to its convenience and the ability to combine it with numerous elements of a women's suit.
What is
The wrap skirt has been a fashion standard for many years, because the unusual design hides flaws and unobtrusively emphasizes the advantages of a woman’s figure. The original cut distinguishes the product from all other analogues: one half of the fabric is superimposed on the other, resulting in the formation of an element that is called the smell. As a standard, it can be diagonal, vertical, partial, each option has individual advantages. Among the main features of wrap skirts:
- Maximum comfort to wear - the products do not restrict movement, while emphasizing the femininity of the figure.
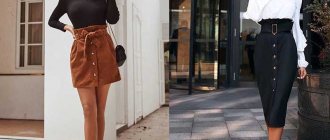
- Stylish appearance - the smell can be found on ties, buttons, zippers, with lacing, there are even interesting options with a hidden overlap. In addition, this element can be located in different ways: in the middle, on the left or right side.
- Masking figure flaws - long skirts with a wrap around the hips hide full calves, while making the image more mysterious, which is achieved by partially opening the legs while walking. High-waisted products hide a small tummy, while low-waisted ones emphasize the silhouette and visually reduce the size of the hips.
Many fashionistas are also attracted by the fact that wrap skirts are offered in a variety of lengths and designs - choosing a product for an evening walk, a business meeting or a holiday will not be difficult.
Maximum wearing comfort
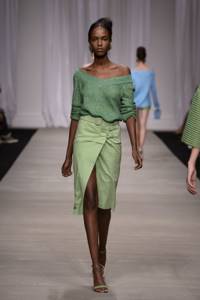
Stylish appearance
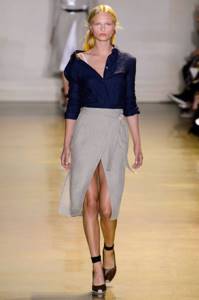
Concealing figure flaws
Length
The length of the original clothing depends on what event it is intended for.
Mini
The short version is ideal for a dance evening, beach disco, or friendly gatherings. The lady must have perfect, tanned legs and the right age.
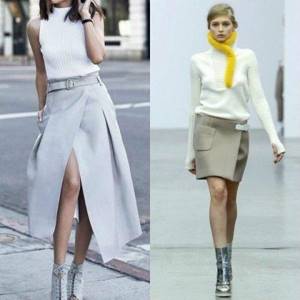
Midi
Summer wrap midi skirts are considered a classic option in the summer heat and are suitable for business meetings or going to work. Moreover, such a model will not spoil the female figure. It is worn by ladies of any age.
Maxi
Long products have not lost their relevance for many centuries. After all, such clothes disguise ugly legs.
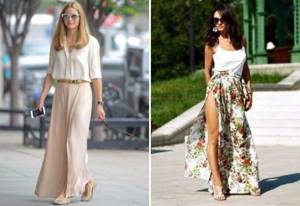
The subtleties of sewing without seams
The popularity of the described model is not becoming less because it is possible to sew such a skirt without having special skills or work experience. Even a novice seamstress can cope with the task, knowing the features of the cut and the nuances of creating products without seams. The easiest way is to make a Tatyanka skirt, since when creating this model there is no need to observe the dimensions and proportions that emphasize the roundness of the hips.
Enough:
- Select material.
- Measure your hip circumference.
- When measuring the required length of fabric, take 1.5 size OB.
- Leave one side edge of the canvas unchanged, and give the second the desired shape, making it semicircular or oblique.
- Determine the depth of the smell, fix one panel of the skirt on the other.
- Gather the top edge with an elastic band, and carefully hem the bottom in accordance with the selected length of the finished product.
We can say that the work on creating a summer version of the wrap skirt has been completed. If a thicker fabric such as gabardine is chosen, the product will become the basis for a business suit.
Other styles of wrap skirts are also made without side seams. It is important to determine the features of the chosen model and take into account the difference between the waist and hip circumference.
To avoid mistakes, it is better to use a drawing of the base pattern for a straight skirt made in advance. Both parts of it are laid out on the fabric, making allowances for processing the edges (cuts). In the places where the seams are supposed to be, the parts of the pattern are combined, having previously marked or hidden all the undercuts.
In this way, a seamless straight skirt, pencil or even tulip is created. It won’t be difficult to make a light summer model like the sun. Working on the pattern of the base for a straight skirt, sew on a narrow or wide belt, using buttons, hooks, and ties as fasteners. Having abandoned the pattern, it is easier to assemble the top of the product with an elastic band.
Tools and accessories
After choosing a style and suitable fabric, you should take care of preparing the devices necessary for the job. The following materials and consumables will be required:
- pattern;
- chalk or marker;
- tape measure;
- pins;
- a set of sewing needles;
- thimble;
- adhesive fabric (dublerin or non-woven fabric);
- threads of suitable colors;
- scissors;
- paper.
The seams are made on a sewing machine. An overlocker is useful for this work, but if you don’t have one, then the cuts are processed with a knitted stitch. Fabric consumption depends on the size and length of the product. Many master classes for beginners contain detailed information on calculating the amount of material, base and lining.
The choice of fittings also deserves attention. A zipper is not required for making wrap skirts, but braid or buttons that will act as a reliable fastener will not be superfluous. Models that are draped around the waist and secured with decorated brooches, ribbons, and ties look attractive.
Popular styles
Wrap skirts have several styles that are especially relevant at any time. The type of style is determined by the shape of the cut of the base itself. The most popular styles:
- The summer beach option is distinguished by long, light fabric and variegated colors.
- Tulip. A type of pattern that emphasizes the roundness of the hips and smoothes out imperfections in the figure.
- The straight cut type is relevant for office workers. At the same time, the image contains a softening detail - smell.
- The A-line skirt is considered a strict style - not suitable for overweight or short women.
- The circle skirt is another beachy, casual and romantic cut option that suits any look.
- The flared hem is a unique model that is striking in its cut shape. Suitable for creating any image.
- Half sun. The product must have a medium or mini length. A very fashionable motif for everyday use.
- A wrap-around shorts skirt is a visual illusion that attracts attention. In general, these are mini-length shorts, which are covered in front by a wrap-around skirt.
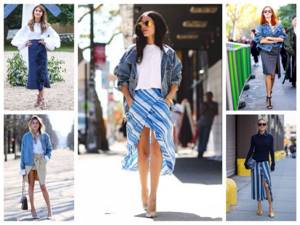
Each style has its own distinctive features and nuances.
Option for a wrap skirt, the bottom is decorated with an angle pattern
A straight, formal skirt is usually designed with a downward angle. Additionally, the hem in such models is usually asymmetrical. Such an element assumes that the top corner “falls out” of the composition. A minor compositional element of this type makes the product more interesting, attractive, and playful.
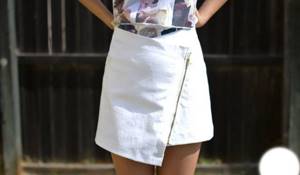
Asymmetrical hem with an angle
The length of an item can be completely different. For the office, you should choose a medium one, and for walking or going to the beach, a mini one is suitable.
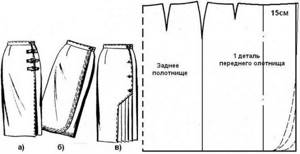
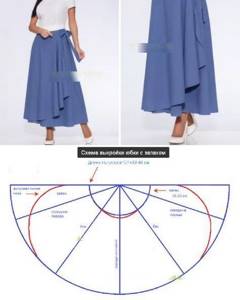
Pattern drawing for a skirt with side seams and a rounded wrap
To give the product elegance and further emphasize the hip and waistline, you should choose an option with side seams. Additionally, the model will be able to decorate the semicircular smell in front.
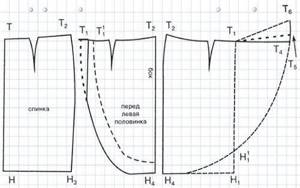
Pattern drawing with rounded hem
To sew a product where the base seams are located on the sides and the front of the joint is rounded, you need to use the following pattern drawing:
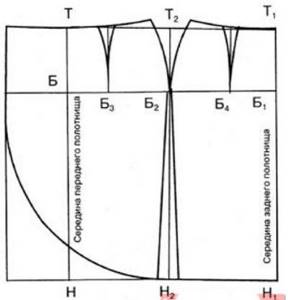
Another pattern option
Note! Each seam must be neat so that the item does not bulge.
A slight rounding makes the model more elegant and slightly opens the legs. Often designers drape the semi-rounded part.
A-line wrap skirt
A-line, among all the options for wrap skirts, is considered simple to sew, but very whimsical in terms of choosing a figure. This option is definitely not suitable for plump and petite girls. But this style looks very impressive.
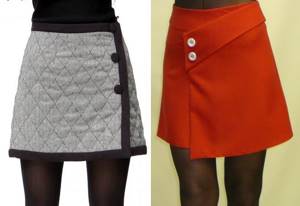
Product with a trapezoid shape
Additionally, the seam where the fabric overlaps is usually finished with bright fittings - large buttons in a contrasting color, metal rivets, a plastic zipper with huge teeth.
Building a base pattern and modeling
Pattern construction begins with the creation of the main drawing. The pattern is formed from a vertical strip, which is equal to the desired length of the product. The simplest project is a straight model that is sewn simply. To work you will need:
- measurements taken;
- whatman;
- marker;
- construction film or a piece of unnecessary wallpaper;
- measuring tape or ruler;
- scissors.
The process of modeling wrap skirts is based on a straight cut design. It is easy to find in the public domain and in cutting and sewing magazines. You can develop new options with various additions: wrap and flounce, cuts, folds. The following models are suitable for beginners:
- Products with asymmetrical hem. They have an uneven hem, the length of one half of which is several centimeters longer than the other.
- Half-sun skirt of different lengths. The shape of this feminine model resembles a truncated cone. The sides of the circles consist of arcs, the size of each is 1/4 of the circle. The distance between them is equal to the length of the thing.
- Models with side seams. They consist of two canvases that are connected to each other.
- Products with a wrap without side seams. Typically made from fabric decorated with a checkered or striped print. This option allows you to avoid complex pattern adjustments, which cause problems for beginning seamstresses. The model has a straight cut, six darts and one stitch at the back.
- Floor-length temple skirt. To create a pattern, you will need two measurements - waist circumference and length of the model. The smell is done from right to left. Products with elastic bands and ties are popular.
A suitable skirt pattern can be created independently or selected ready-made. In the latter case, the drawing will need to be adapted to individual parameters. To do this, the dimensions of the waist, hips, and the length of the product change up or down.
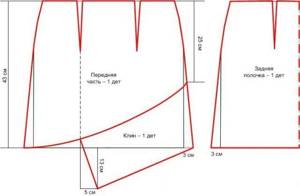
With asymmetrical hem
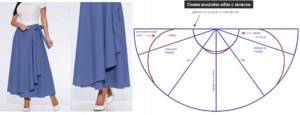
Half-sun skirt
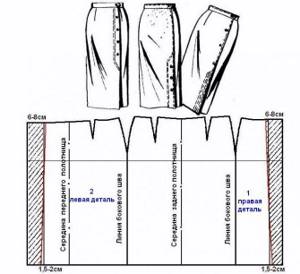
With side seams
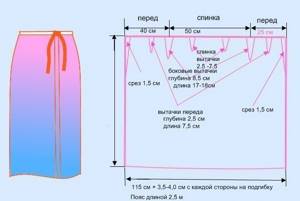
No side seams
To the floor
Constructing an A-line skirt pattern
The shape of such skirts in the classic version resembles a geometric figure - a trapezoid. Emphasizing the silhouette at the waist and widening towards the bottom guarantees the almost universal use of A-silhouette models. Creating a pattern for an a-line skirt is simple and accessible to beginning seamstresses.
A straight silhouette skirt pattern is used as a base one. You can build a pattern yourself or download it for free on the Internet. Step-by-step instructions for creating a basic pattern are on our website.
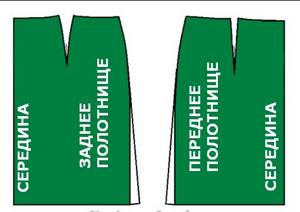
We transfer both panels of the skirt onto tracing paper.
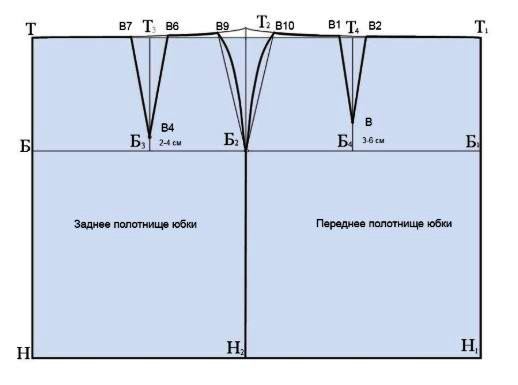
Modeling a simple A-line skirt consists of creating an extension at the bottom.
This can be done in two ways.
First way
We set aside from 3 to 7 cm along the bottom line (depending on the size of the required expansion) and build a new side line of parts. At the same time, do not forget to round off the bottom section of the skirt, lifting it along the side sections. This is done to even out the length of the skirt. We do not remove the darts at the waist during this modeling; they remain in their places.
Second way
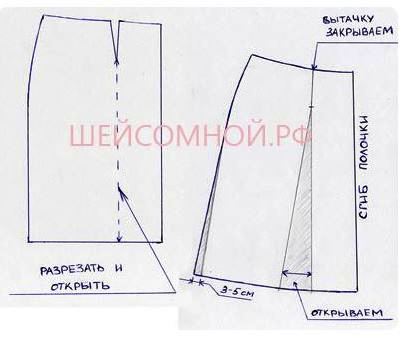
The second method allows you to get a more beautiful fit of the product. The trapezoidal shape is created by closing the darts at the waist and widening at the bottom. We extend the central lines of the darts to the entire length of the skirt.
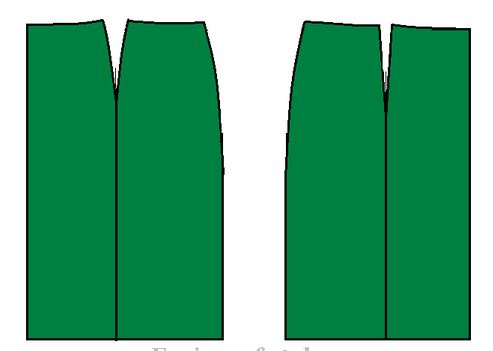
We make cuts along the marked lines. We close the dart at the waist, creating an expansion at the bottom. But since the width of the back and front darts is different, the lower extension will also be different. Since the back dart is wider, the back part will also be wider, which, with a standard figure, will cause the side seam to move forward.
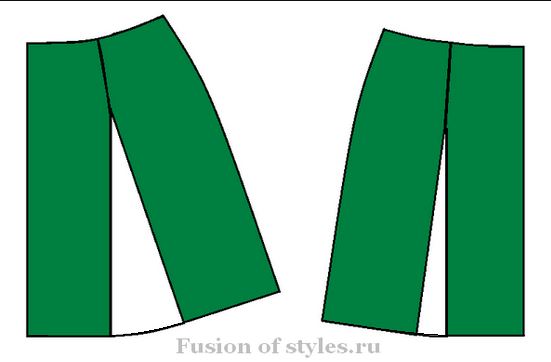
Whether to align the flare at the bottom depends on the characteristics of the figure.
For women with curvy buttocks, a wider back panel will be the best fit. For standard figures, the front dart is closed completely, and the back dart is closed by the same amount as the front one. Thus, the dart remains on the back panel, but is smaller in width. Additionally, we expand along the side seams - see photo.
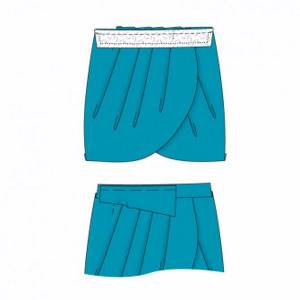
How to sew a skirt with pleats and a wrap effect
- Pattern of a skirt with a draping wrap
- Miniskirt patterns with draping wrap
A bold combination of an extravagant skirt with a chaste white blouse, which also has folds. Black ankle boots enhance the contrast and make the look trendy and sexy. Against the background of a luxurious oriental pattern, the scent effect looks especially good. This skirt is best combined with discreet things. A biker jacket, for example, will not lose anything from this proximity, but will bring boyish enthusiasm. The shoes will provide the necessary elegance, and a gray pullover will balance out the explosion of colors. Please note: in our catalog you will find all the pleated skirt patterns!
Recommended fabrics: Lightweight skirt fabrics.
Back length including waistband: 43 cm.
You will need:
- silk satin 135 cm wide: 1.30 m for all sizes
- non-woven fabric g 785 0.25 m wide 90 cm
- hidden zipper 22 cm long and a special sewing machine foot for attaching it
- elastic band 1.5 cm wide and length: size. 34, 36, - 0.45 m, size. 38, 40, 42 - 0.50 m, size. 44 - 0.55 m
- sewing threads.
Besides:
- silk paper for transferring patterns from a pattern sheet
- pencil
- paper scissors
- tape measure
- tailor's pins
- tailor's chalk
- cutting scissors and small craft scissors
- Burda carbon paper and a copy wheel for transferring the pattern
- sewing machine needle and hand sewing needle
- safety pin.
Skirt pattern
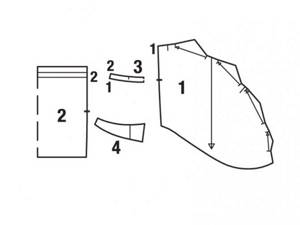
Place the silk paper on the pattern sheet and pin. Trace the pattern pieces in your size along the corresponding contour lines and don’t forget about the markings and inscriptions. To simplify cutting, take paper pattern piece 3 2 times. On part 1, the side fold arrow mark is drawn for size 34. For other sizes, draw the fold arrow mark according to the pattern lines.
Layout plan
The layout plan shows how to arrange the paper pattern pieces onto the fabric.
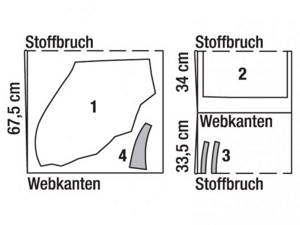
Pin the paper pattern pieces. 1 front panel 2x 2 back panel with fold 1x 3 front belt with fold 2x 4 front panel strip 2x

Step 1: cutting out parts 1 and 4
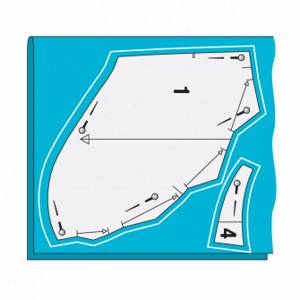
Fold the fabric in half with the right side facing inward. Place paper pattern pieces 1 and 4 onto the fabric and pin. The grain lines drawn on the parts are parallel to the edges. Around the details of the paper pattern, mark the allowances with tailor's chalk: along the front sections of the front panels and on the hem of the bottom - 2 cm, along all other cuts and on the seams - 1.5 cm. Cut out the details.
Step 2: cutting out parts 2 and 3
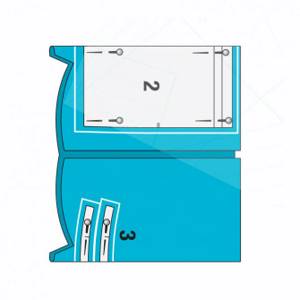
On the remaining part of the fabric, measure 68 cm from one edge and place a mark on the wrong side. Fold the fabric right side inward, aligning the edge of the fabric with the mark. Pin paper pattern pieces 2 and 3, aligning the middle of the pieces with the folds. Around the details of the paper pattern, mark allowances with tailor's chalk: for the hem of the bottom - 2 cm, for all other cuts and seams - 1.5 cm. Cut out the details.
Step 3: interlining g 785
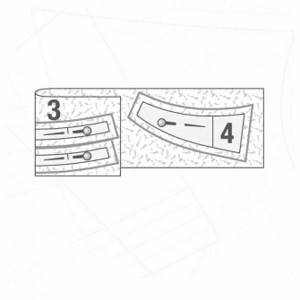
Fold the gasket as shown in the figure, with the adhesive side facing inward. Place paper pattern pieces 3 and 4 (piece 3 to the fold) and pin. Mark 1.5 cm wide allowances around the paper pattern pieces. Cut out the pieces. Iron the interlining from the wrong side of the belt and placket parts, setting the iron thermostat to the “silk” mode and holding it in one place for approx. 8 seconds.
Step 4: Seam lines and markings
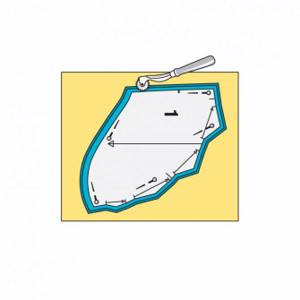
Fold the parts duplicated with the gasket right sides or in half. Transfer the contours of the pattern details (seam and bottom lines), as well as all markings, with the exception of the grain line, onto the fabric using a copy wheel and Burda copy paper (see detailed instructions on the paper packaging). Transfer the lines of folds and folds to the front side of the cut pieces using large running stitches.
Step 5: Front Panel Strip
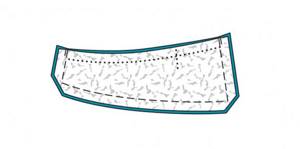
Fold the parts of the front panel strip right sides together and pin the side and bottom edges together. Stitch. Cut the seam allowances close to the stitching, at the corners - diagonally. Turn out the bar. Iron it. Sweep open cuts. Set the plank aside for now.
How to sew a pleated skirt
Step 6: Skirt Front Panels
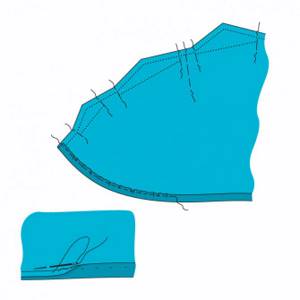
On the front panels, overcast the allowances along the front (rounded) edges. Adjust the allowances on the rounded cuts so that they lie flat in the rounded areas. To do this, machine stitch with a large stitch at a distance of 5 mm from the front edge of each panel. Bring seam allowances to the wrong side, pulling them together at the bottom threads. Distribute the gathers evenly, press the seam allowances. Sew the allowances by hand, starting from the top and not reaching approx. 10 cm to the side cuts.
Step 7: Fold the Front Panels
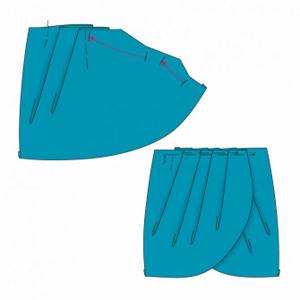
On the front panels on the front side, place and sweep the folds in the direction of the arrow marks. Do not iron folds. Place the right front panel on the left front panel, aligning the lines of the middle front, wrong side to the front side, baste the top sections of the panels.
Step 8: stitch the outer part of the waistband, baste the placket
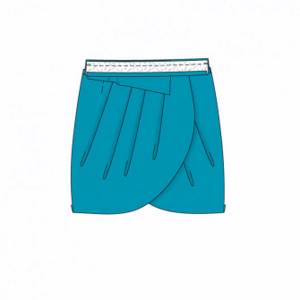
Pin one part of the waistband (= outer waistband) to the top edge of the front panel of the skirt, right side to right side. Sew it in. Press the seam allowances onto the outer waistband. Pin the strip of the front panel to the top cut of the outer belt; the seam allowances protrude from the right side cut of the belt. Baste the plank.
Step 9: Sew the inside of the waistband
On the other part of the waistband (= inner waistband), iron the bottom seam allowance to the wrong side. Fold the inner and outer belts right sides together, pin and stitch the top edges. Cut seam allowances close to the stitching and press.
Step 10: Back Panel
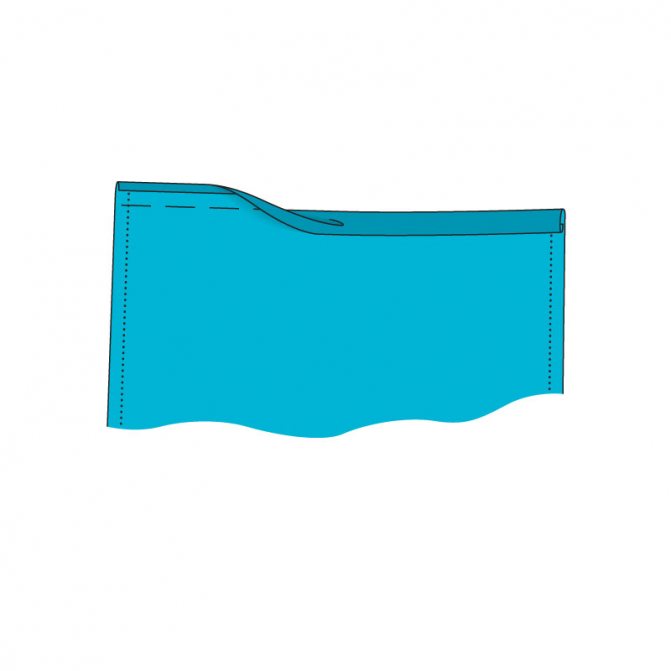
Iron the seam allowance along the top edge of the back panel to the wrong side. Turn the one-piece facing to the wrong side along the fold line and iron it. Lay the facing and seam allowance flat again. Overcast the hem allowance and press to the wrong side, but do not sew it on yet.
Step 11: Right Side Seam
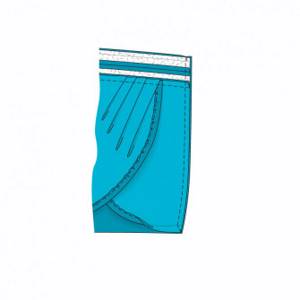
On the front panel of the skirt, turn the seam allowance along the bottom edge of the inner waistband up again. Fold the hem allowance for the bottom of the skirt down. Fold the panels right sides together, pin together the right side sections, aligning the stitching seam of the inner waistband with the fold of the one-piece facing. Sew the right side seam; at the marked bottom line, place a line diagonally to the seam allowances. Overcast and press the right side seam allowance.
Step 12: Hidden zipper, back panel
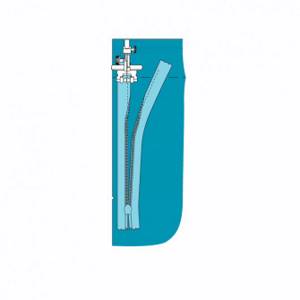
On the allowances of the left side cuts of the front and rear panels, make a notch (approx. 5 mm long). Place the open zipper with the outer side facing the right side along the edge of the cut of the back panel. Pin the top end of the zipper tape to the seam allowance, the teeth starting at the fold of the one-piece facing. Sew the zipper from the top end to the cut mark, using a special sewing machine foot for sewing zippers and edges, with the sewing machine needle positioned to the left of the teeth.
Step 13: Hidden zipper, front panel
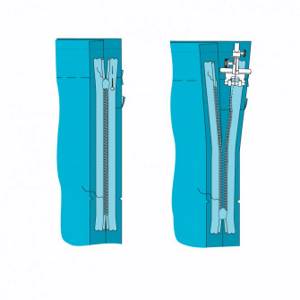
Close the zipper. Place the second zipper braid with the outer side on the front side along the edge of the cut of the front panel and pin the upper end of the braid with a pin, the teeth begin at the stitching seam of the inner waistband. Open the zipper again. Place the sewing machine foot over the zipper so that the spiral is located under the notch of the foot to the left of the needle. Stitch the zipper tape from the top end to the cut mark, with the sewing machine needle located to the right of the teeth.
Step 14: Left Side Seam
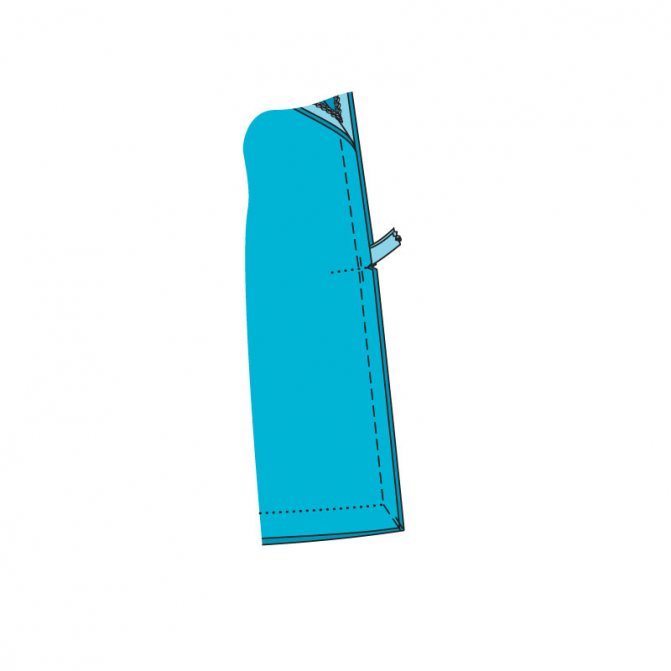
Fold the panels right sides together. Pin the left side edges to the cut mark, folding the hem allowance for the bottom of the front panel down and the loose bottom ends of the zipper tapes toward the seam allowances along the edges of the cut. Sew the left side seam, starting at the bottom at a distance of approx. 5 mm from the edge of the left side seam allowance, laying it up diagonally along the hem allowance for the bottom of the skirt to the side seam line, and then laying it along the side seam line close to the last stitches of the invisible zipper seams. Press seam allowances and overcast.
Step 15: Top Edge of the Skirt
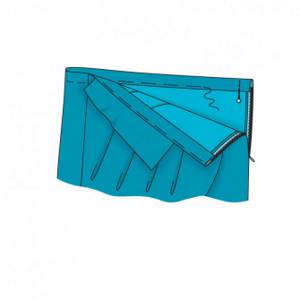
Turn the inner belt on the front panel of the skirt to the wrong side and baste it. Iron it. Turn the bar down. Iron it. On the back panel, turn the one-piece facing again to the wrong side along the fold line, tuck it, baste it and stitch it to the edge to form a drawstring. From the elastic band, cut a piece of length: size. 34 - 38 cm, size. 36 - 40 cm, size. 38 - 42 cm, size. 40 - 44 cm, size. 42 - 46 cm, size. 44 - 48 cm.
Step 16 elastic band and hem
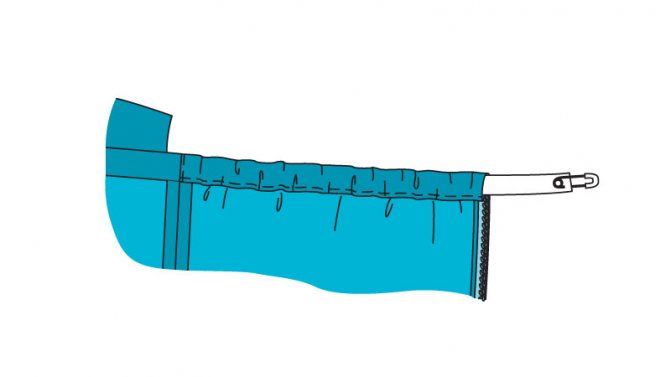
Using a safety pin, insert the elastic tape, pin the ends of the tape at the edge of the zipper slit and at the right side seam, stitch at a distance of 7 mm from the edge of the slit and at the side seam. At the edge of the opening for the hidden zipper, cut off the end of the elastic band a little. Fold the inner waistband under and pin it over the topstitch seam, and hand-sew at the zipper. On the right side of the skirt, stitch the waistband along the seam close to the seam. Turn the hem allowance over to the wrong side again and sew by hand. Photo: Jan Schmiedel (2), U2/Uli Glasemann. Illustrations: Elke Trayer-Schäfer. "Burda. Special issue “Sewing Academy” (2015) Material prepared by Anna Soboleva
A-line pleated skirt
A checkered skirt is sewn from rectangular pieces of fabric. Trapezoidal folds create a beautiful A-silhouette. At the same time, the model does not look bulky at the waist, and the folds do not puff up.
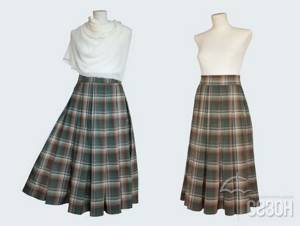
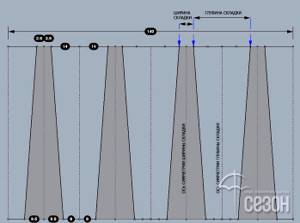
Let's consider constructing a pattern for such a model for OT = 84 cm. This parameter will be the main and only one determining the width and depth of each fold. Hip circumference is not taken into account in this calculation.
We take the depth of each fold to be 7 cm (along the waist line). Accordingly, the number of folds is 84:7 = 12.
To determine the depth of the fold, multiply its width by 4. We get 7x4 = 28 cm.
We put the dimensions on the pattern symmetrically in both directions, dividing the width and depth of the fold in half, i.e. 1⁄2 width (= 3.5 cm) and 1⁄2 depth (= 14 cm) in each direction.
Important Note
We place the pattern, taking into account the direction of the grain thread. The axis of symmetry of the folds should coincide with the warp thread. The flare at the bottom edge is determined depending on the length of the skirt. In our calculation, this is a midi length of 85 cm.
How folds are formed
In the next photo, the width of the fold is indicated in gray. For clarity, we will break the process into steps. In the first case, the fold is bent so that its edge coincides with the axis of symmetry. In the second step, the fold, mirroring the first, is bent so that its edge is adjacent to the edge of the first.
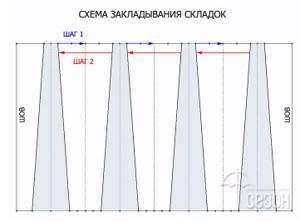
As a practice, it is recommended to try making such a bookmark on paper. The step by step process is shown below. It makes sense to trim the waist line after adding all the folds, and not each one separately. There is no need to trim the bottom of the skirt.
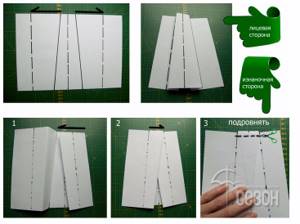
Depending on the material used, we decide on the advisability of ironing the folds. If the fabric holds its shape, then this is not necessary. We sew the skirt model in question from cambric with silk, so we iron the edges of the folds.
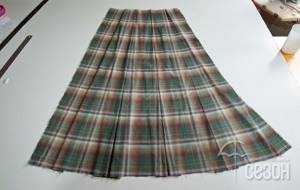
Since such a pleated skirt requires three panels of fabric and their total width will ultimately be 4.5 m, it is more convenient to lay the folds on each panel separately. Then we sew the fabrics together. We insert a hidden zipper into one of the seams. It is more convenient to do this by sewing the 1st and 2nd panels.
We combine the third panel with the 1st and 2nd.
We sew on the belt and process the bottom of the product. If desired, you can provide an additional fold, thus expanding the volume at the waist. In this case, we make the belt with a partial elastic band, which adds convenience to the product.
How to take measurements correctly
To quickly make a beautiful skirt with your own hands, you need to take the measurements correctly. To determine the waist circumference, the centimeter is placed horizontally at the narrowest point. The measuring tape should not be stretched as this may cause the finished product to end up being the wrong size.
You will also need to measure your hip circumference. The tape is positioned horizontally. Care must be taken to ensure that it passes over the most convex area of the buttocks. The centimeter is placed freely, without tension. The measurements are recorded as follows:
- From – waist circumference;
- About – hip circumference;
- V – product length;
- D – distance from waist to hips.
Hip height is the distance between the waist line and the most protruding points of the buttocks. Depending on the elasticity of the fabric and the desired width, increases are made on the skirt. This feature is always taken into account when creating a pattern. Up to 1 cm of material is additionally left at the waist, and up to 2 cm at the hips.

The best style for your figure. Photo
- Straight skirt – The typical severity inherent in the style is softened by the presence of a smell. The overlay element may differ from the base in the shade or texture of the fabric. The cut shape is usually chosen straight or rounded.
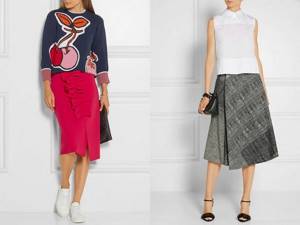
- Trapezoid - An excellent basis for building classic images. The silhouette is not suitable for full and short figures. It is recommended to make an a-line skirt from natural or artificial leather, which holds its shape perfectly.
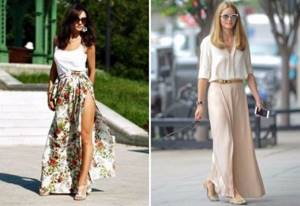
- Flare - A long skirt, widened at the bottom, is usually decorated along the edge of the wrap with ruffles or flounces. In this form, it is an ideal thing for a summer holiday, especially when it is made of thin, flowing fabrics in bright colors. If you additionally model a high slit, this will give the skirt more sexuality.
Long wrap skirt
A floor-length wrap skirt (a pattern for beginners is presented later in the article) looks very beautiful and feminine. At the same time, it is quite modest and at the same time mysterious. Despite the length, the skirt will still diverge, so more often a long skirt is sewn for going to the beach. Sewing such a skirt is no different from sewing a short skirt and does not require a special approach.
How to cut fabric for a long wrap skirt
A long wrap skirt is cut out as follows:
- Take measurements from the customer.
- Draw the model on paper, paying attention to details.
- Based on the measurement results, build a skirt on tracing paper or old wallpaper.
- Transfer the model to the fabric and cut it out, leaving allowances for seams and darts.
How to sew a long wrap skirt
A long wrap skirt is sewn as follows:
- First of all, mark the grooves and transfer them to the other halves of the parts.
- Baste darts.
- Fold the back half of the skirt over the front (the darts should coincide with each other when applied) and baste the side seams by 1-2 cm (depending on how many cm were left for allowance).
- Make a fitting and “fit” the skirt to your figure.
- Machine stitch along the darts and side seams.
- Turn over side seams and bottom. If the fabric is thin, then the side seams will be overlaid together, if it is dense, one at a time.
- Iron the skirt. Direct the grooves towards each other.
- Cut a belt with a width of 8 cm and a length of +2 cm. Glue the belt with adhesive fabric and iron it, folding it in half horizontally.
- Baste one side of the waistband to the skirt and machine stitch it.
- Machine stitch the sides of the waistband inside out.
- Turn the waistband inside out, iron it, and sew the other edge to the skirt with blind seams by hand.
- Fold the bottom of the skirt 4 cm and baste. Sew with hidden seams or glue with cobwebs.
When gluing the bottom with cobwebs, you need to be prepared for the fact that after the first wash it will come off. Therefore, it is recommended to hand-stitch the bottom with hidden seams - the highest quality option, although it is not suitable for all fabric styles. If the fabric is light, like chiffon, it can be machine stitched.
Ready-made skirt patterns with vertical pleats
Using ready-made patterns, you can quickly and easily sew such a skirt yourself.
Patterns are made in several sizes:
Popular brands
There are many brands of women's clothing. Particular attention is paid to the following manufacturers: Befree, AdL, Dasti, Vila, Tutto Bene, Tom Tailor, Sly.
Befree
This is a Russian company specializing in clothing and shoes for girls of different ages. Befree offers a wide range of products at low prices.
AdL
AdL is a Turkish manufacturer that produces stylish and high-quality clothing. The company offers beautiful and original items that highlight a girl's figure.
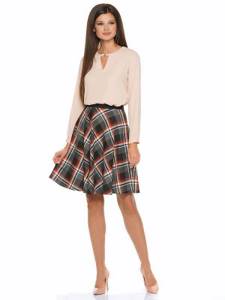
Dasti
Dasti is a Ukrainian fashion clothing brand. Makes comfortable and practical clothes for ladies of all ages.
Vila
Vila is a brand for spontaneous young women. The clothes of this company are suitable for girls who understand fashion trends, have their own style and are not afraid to experiment.
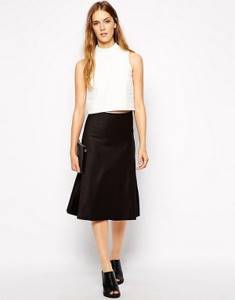
Tutto Bene
Russian, relatively young brand of women's clothing. Tutto Bene offers things at reasonable prices.
Tom Taylor
Tom Tailor is a German company that produces casual women's clothing. The brand produces items in the mid-price category.
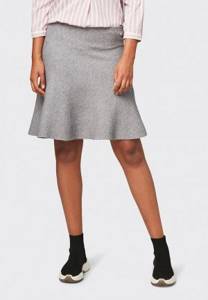
Sly
Sly is a Polish brand that makes school clothes. These are designer items with impeccable quality.
